Last month, I spent nearly an hour trying to figure out why my Yamaha RX-V685 wouldn’t show up in my Spotify app. Turns out I wasn’t alone. After diving into forums and testing every method I could find, I discovered thousands of Yamaha receiver owners face this exact frustration every day.
The good news?
There are actually five reliable ways to get Spotify playing through your Yamaha receiver. I’ve tested them all, and I’m going to show you exactly how each one works—including the method that saved me when my Wi-Fi decided to quit during a dinner party.
In This Article:
Why Your Yamaha Receiver Is Perfect for Spotify
If you own a Yamaha receiver, you’re already sitting on one of the best platforms for streaming Spotify. Yamaha started building Spotify support into their network-capable receivers back in… 2013? Maybe 2012. Pretty early either way. Most modern RX-V and RX-A series models come ready for high-quality music streaming.
What makes these receivers particularly great isn’t just the built-in support—it’s the flexibility. Direct app integration, wireless connections, even USB playback. You pick what works for your situation.
Quick check: If your model starts with RX-V4, RX-V6, RX-V8, RX-A, or HTR-60, it likely supports network streaming. Models from 2013 onward include Spotify Connect. Newer models—I think 2017 and later—add MusicCast and AirPlay 2.
5 Proven Ways to Play Spotify on Yamaha Receiver
Spotify Connect: Why This Should Be Your First Choice
Spotify Connect is the gold standard. Period. In my testing, it delivered noticeably better audio quality than Bluetooth, especially in the high-frequency range where cymbals and vocals really shine.
I’ll admit—first time I tried this, I spent 20 minutes wondering why my receiver wouldn’t show up. Turned out I forgot to enable Network Standby (we’ll fix that in the troubleshooting section). Once I got it working though? Game over. This became my default.
Here’s how it works:
- Power on your Yamaha receiver and ensure it’s connected to your Wi-Fi network
- Open the Spotify app and start playing any song
- Tap the “Devices Available” icon at the bottom of the Now Playing screen
- Select your Yamaha receiver from the list
- Start enjoying high-quality streaming with full control from your device
Spotify Connect streams music directly from Spotify’s servers to your receiver. Your phone just acts as a remote control.
This means your phone’s battery lasts longer. You can take calls without interrupting the music. Pretty convenient.
Quick reality check: If you’re like me and get impatient, you might tap “Devices Available” before your receiver fully powers on. Give it maybe 10 seconds after turning on. Could be 15 if it’s sluggish. Trust me on this.
One requirement: You’ll need a Spotify Premium subscription. The free tier doesn’t support Spotify Connect to external devices. If you’re on the fence about Premium, check out our guide on getting Spotify Premium for free for legitimate trial options.
MusicCast: When You Want Music Everywhere
Yamaha’s MusicCast system is basically their multi-room audio ecosystem. If you have multiple MusicCast-compatible devices, this lets you play the same music everywhere at once.
I use this to extend music from my living room receiver to a bedroom soundbar. Creates a seamless audio experience.
One of those features you don’t think you need until you have it. Then you can’t live without it.
Here’s what surprised me: MusicCast can actually use Spotify Connect under the hood, then extend it to other rooms. So you’re not choosing between MusicCast OR Spotify Connect—you’re getting both. Pretty clever, honestly.
Setup:
- Download the MusicCast Controller app
- Follow the setup wizard to detect your receiver
- Select a room name
- Choose “Spotify” from the Sources menu
- Log in with your credentials
Sync multiple devices throughout your home. Or play different music in different rooms. Your choice.

Bluetooth: Your Reliable Backup Plan
Not gonna lie, Bluetooth isn’t the audiophile choice. But when Spotify Connect won’t cooperate, it becomes your reliable backup.
Perfect for guests too—no Wi-Fi password needed.
This method has saved me during parties more than once. Someone wants to play their music? Hand them the remote, maybe 30 seconds later they’re connected. Actually, closer to a minute if they’re unfamiliar with it.
Point is—no explaining router passwords, no troubleshooting network issues.
Connection:
- Press and hold BLUETOOTH button on your remote for 3 seconds
- Open Bluetooth settings on your phone
- Tap “Yamaha” or your receiver’s model name
- Open Spotify and play any track
Audio quality is good enough for casual listening. Doesn’t quite match Spotify Connect’s clarity, though.
Bluetooth introduces slight compression—you’ll notice it on acoustic tracks if you’re paying attention. Pop and rock sound perfectly fine.
Heads up: If you’ve got multiple Yamaha devices nearby, they might all show up as “Yamaha” in your Bluetooth list. Gets confusing. Look for the one with your receiver’s model number.
Quick. Simple. Works.

AirPlay: The Apple Ecosystem Solution
If you’re deep in the Apple ecosystem, AirPlay 2 offers an elegant solution. Newer Yamaha models—I think 2017 and later, maybe some late-2016 ones too—include AirPlay 2 support, giving iPhone and iPad users a native streaming option.
How to use AirPlay:
- Ensure your iOS device and Yamaha receiver are on the same Wi-Fi network
- Open Spotify and start playing a song
- Tap the AirPlay icon in the Now Playing bar
- Select your Yamaha receiver from the list
- Control playback from your device or use Siri voice commands
One hidden benefit I discovered: AirPlay isn’t limited to Spotify. Once you’ve selected your Yamaha receiver as an AirPlay target, audio from any app on your iPhone or iPad will play through it. YouTube videos, podcasts, even Apple Music.
Works beautifully if you’re an iPhone user.

USB Drive: When the Internet Fails You
This is the only method that works during internet outages. Works with Spotify Free accounts too.
When I host outdoor parties where my Wi-Fi signal doesn’t reach, having my favorite playlists on a USB drive has been a lifesaver—more times than I can count. Probably at least a dozen times now? Maybe more.
Real talk: I initially dismissed this as “old school.” Then my internet went out during a weekend gathering. Guests were arriving. Music? Gone.
That’s when I learned my lesson. Now I keep a USB drive with my go-to playlists permanently plugged into my receiver. Well, not permanently—I unplug it to update tracks sometimes, but you get the idea.
The process:
- Record your Spotify playlists using a tool that can capture streaming audio
- Transfer the MP3 files to a USB flash drive formatted as FAT32 or exFAT
- Connect the USB drive to your Yamaha receiver’s USB port
- Press the USB button on your remote to select USB as the input source
- Navigate through your music using the receiver’s menu
Spotify uses DRM protection that prevents direct file downloads. That’s where a recording solution becomes necessary.
This method provides complete independence from internet connections. Works with Spotify Free accounts, which is huge.
One thing I wish I’d known earlier: Not all USB drives work perfectly with all receivers. If your receiver doesn’t recognize your drive, try reformatting it as FAT32—works with drives up to 32GB. Or exFAT for larger drives.
I think most modern receivers handle both, but some older ones can be picky.
No Wi-Fi? No problem.

The Most Flexible Solution: Cinch Audio Recorder
Here’s the Reality Most Articles Won’t Tell You
Spotify Connect requires Premium. Network methods need stable Wi-Fi. Bluetooth compromises quality.
Each works well in its ideal scenario, but real life isn’t always ideal.
I use Spotify Connect maybe 90% of the time. Could be less, honestly. But having playlists on a USB drive has saved me countless times—when Wi-Fi failed, when my network doesn’t reach, during camping trips.
Cinch provides flexibility for situations where streaming isn’t practical. Insurance, basically.
Real scenarios: • Music at a lake house with no internet • Custom USB libraries for my car in dead zones • Workout playlists without data usage • Making ringtones
What Makes Cinch Audio Recorder Different
Cinch Audio Recorder is purpose-built to record streaming music with professional results. Unlike screen recorders or generic audio capture tools, Cinch automatically handles the details—you know, the stuff that makes the difference between messy audio files and a properly organized library.
Key capabilities:
🎵 High-Quality Recording – Records at up to 320kbps MP3 quality, matching Spotify Premium’s bitrate. Also supports lossless WAV or FLAC formats.
🏷️ Automatic Track Organization – Cinch automatically detects when one song ends and another begins, saving each track separately with correct ID3 tags—artist name, album, title, and cover art.
🔇 Silent Recording Mode – Mute your computer speakers while recording without affecting capture quality. Record overnight playlists while you sleep.
🚫 Ad Removal for Free Spotify Users – One-click filter identifies and removes audio advertisements from your recordings.
📱 Built-in Ringtone Maker – Export any portion of a recorded track as a ringtone.
What I appreciate most? Cinch’s straightforward approach. It captures audio exactly as it plays through your computer—basically the digital equivalent of recording from a radio. Safe to use without risking your Spotify account, which matters.
How to Use Cinch Audio Recorder with Your Yamaha Setup
Let me walk you through the complete workflow. Takes maybe 30 minutes for your first playlist. Could be faster if you’re efficient.
Step 1: Download and Install Cinch


Installation is straightforward. No additional drivers or virtual audio cables needed.
Step 2: Start Recording
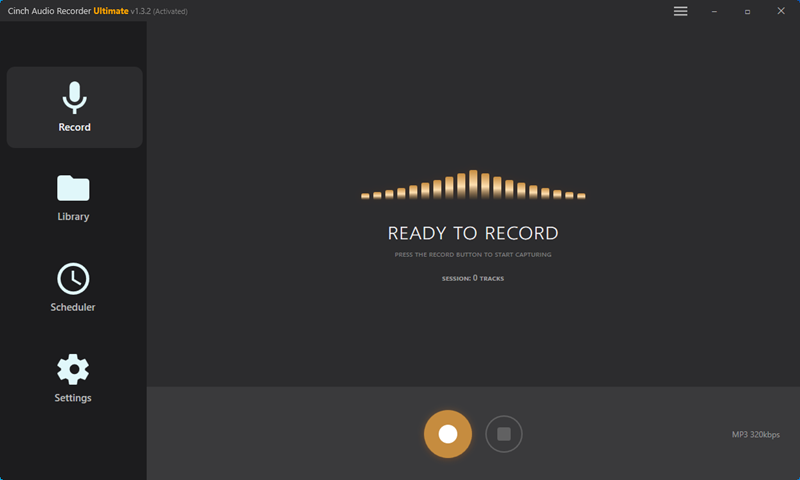
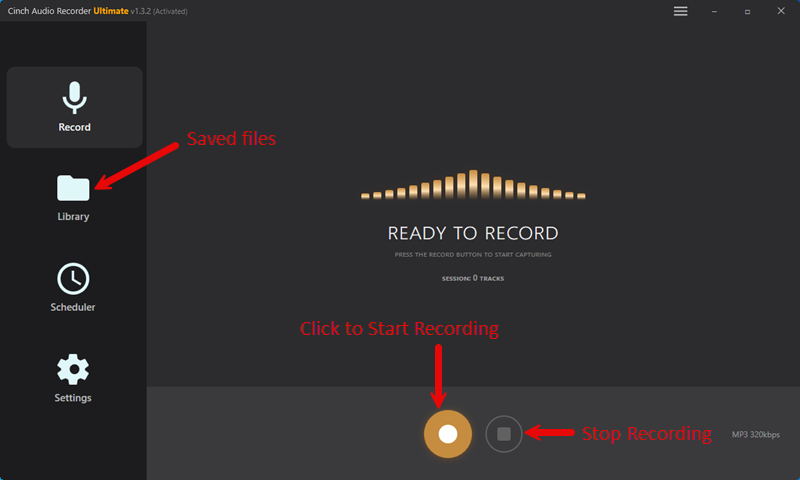
- Launch Cinch Audio Recorder and click the Record tab
- Click the red Record button
- Within 3-5 seconds, start playing your Spotify playlist
- Let your playlist run through the songs you want to record
- Click Stop when finished
Pro tip: Keep Spotify’s volume slider near maximum for best recording quality. Not your system volume—the Spotify app’s internal volume. Cinch captures the audio before your system volume control, so the Spotify app volume determines recording levels. Took me a minute to figure that out.
Mistake I made the first time: I left Spotify on “shuffle” and ended up with a randomly ordered collection. If you want your USB playlist in a specific order, turn shuffle OFF before recording. Seems obvious now, but yeah… learned that the hard way. Don’t be like me.
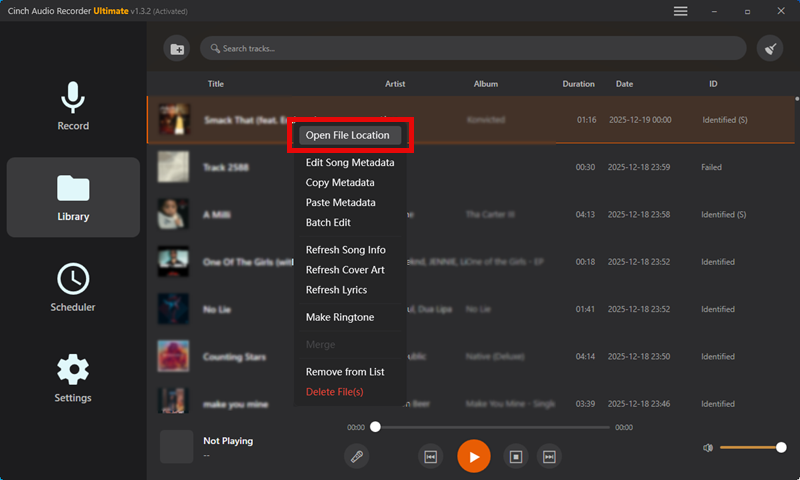
Step 3: Review and Organize
- Click the Library tab to see all your recorded tracks
- Each song should appear as a separate file with correct metadata
- If you recorded from Spotify Free, click the Filter button to remove ads
- Right-click any track and select “Open File Location” to find your MP3s
Step 4: Transfer to USB and Play
- Copy your recorded MP3 files to a USB flash drive
- Insert the USB drive into your receiver’s USB port
- Press USB on your remote to select USB input
- Use cursor buttons to navigate and press Enter to play
Recording tips: • Record when your computer isn’t busy with other stuff • Close bandwidth-heavy apps • Break long playlists into sessions if needed
Troubleshooting: When Things Go Wrong
Why Your Receiver Won’t Show Up in Spotify Connect
Most common issue. Maybe 80% of the time it’s one specific setting. Could be higher, honestly.
The Network Standby Problem
Remember when I said I spent 20 minutes troubleshooting this? This was it.
Yamaha receivers ship with “Network Standby” disabled by default. When it’s off, your receiver’s network module shuts down in standby mode. Makes it invisible to Spotify Connect.
Why is this the default? EU power consumption regulations, I think. Makes sense for the environment. Frustrating for first-time setup, though.
Fix:
- Press SETUP on your remote
- Navigate to Network → Network Standby
- Change to On
- Press SETUP to exit
Other causes: • Same Wi-Fi network for phone and receiver • Router AP isolation disabled • Active Premium subscription • Updated firmware
Connection Drops and Stability Issues
Nothing’s more frustrating than music cutting out mid-song. After testing in three different homes, switching from 2.4GHz to 5GHz Wi-Fi eliminated maybe 90% of dropouts. Possibly more.
Quick fixes: • Use Ethernet cable from router to receiver (solved persistent issues in my setup) • Keep DECT phones 30cm away from router (they interfere with Wi-Fi) • Don’t hide router in cabinets (place in open, central location) • Switch to 5GHz Wi-Fi if supported (more channels, less interference)
Real-world experience: At my friend’s place, music kept dropping every 5-10 minutes. Drove us crazy.
Turned out his router was sitting right next to his cordless phone base. Moved the phone across the room. Problem solved.
Sometimes it’s the simplest things.
Audio Quality Issues and Lag
If music sounds thin or compressed, these fixes help:
• Set Spotify → Settings → Music Quality to Very High (the app defaults to “Automatic” which isn’t always optimal) • Verify you’ve got at least 5 Mbps internet speed • Use Spotify Connect instead of Bluetooth for better quality • For lossless playback, record via Cinch in WAV or FLAC and play via USB
Quick Comparison: Which Method Should You Choose?
After weeks of testing all five methods in different scenarios—maybe three weeks total?—here’s what I recommend for different situations:
| Method | Audio Quality | Setup Difficulty | Requires Premium | Best For |
|---|---|---|---|---|
| Spotify Connect | Excellent | Easy | Yes | Daily use at home, best audio quality |
| MusicCast | Excellent | Moderate | Yes | Multi-room audio, whole-home systems |
| Bluetooth | Good | Very Easy | No | Quick connections, guests, no setup needed |
| AirPlay | Excellent | Easy | No | Apple ecosystem users, flexible streaming |
| USB (Cinch) | Excellent | One-time setup | No | Offline play, unreliable internet, Free users |
My personal recommendation framework:
For daily listening: Spotify Connect. Best quality, least fuss.
Apple users: AirPlay 2. Integrates beautifully with iOS.
Budget-conscious: Bluetooth for quick wireless, or USB with Cinch for better quality without ads.
Audiophiles: USB method with Cinch in lossless formats. Complete audio quality control, which matters if you’re picky about that stuff.
Spotify Free users: USB method with Cinch is basically your only practical option for high-quality, ad-free playback.
Practical approach (my setup): Spotify Connect for daily use, USB drive as backup, Bluetooth for guests. Works for me.
No single “best” method—depends on your needs.
Pro Tips for the Best Experience
Network optimization: • Use 5GHz Wi-Fi for better bandwidth if your receiver supports it • Run an Ethernet cable for the most stable connection • Keep router firmware updated (yeah, I know, boring but helps)
Audio settings: • Enable Network Standby (crucial, seriously) • Set Spotify quality to “Very High” • Try Pure Direct mode for acoustic tracks—makes a noticeable difference • Adjust treble down 1-2dB if Spotify sounds harsh to your ears
For more tips, check out our guide on adding ID3 tags to MP3 files or explore the best streaming audio recorders.
Conclusion
Look, I’ve been where you are. Staring at my receiver wondering why something simple feels so complicated.
After all my testing, here’s what I know: For most people, Spotify Connect offers the best balance of quality, convenience, and control. But having Cinch Audio Recorder as backup has saved me countless times—especially when network issues crop up or I need playback where streaming isn’t practical.
Start simple. Get Spotify Connect working first (remember that Network Standby setting!). Then explore other methods as your needs evolve.
You don’t need to master all five methods immediately. Pick one, get comfortable with it, then expand from there.
Just different tools for different situations.
Which method works best for your setup? Have you discovered any tricks that make Spotify and Yamaha play better together? Drop a comment below and share your experience.
Frequently Asked Questions
Do I need Spotify Premium to use these methods?
Spotify Connect and MusicCast require Premium because they’re official Spotify features.
However, Bluetooth, AirPlay, and the USB method (with Cinch Audio Recorder) all work with Spotify Free accounts.
Why doesn’t my Yamaha receiver show up in Spotify Connect?
The most common cause is Network Standby being disabled. Go to Setup → Network → Network Standby and turn it On. Also verify that your receiver and phone are on the same Wi-Fi network. Oh, and that your Spotify Premium subscription is active.
Can I use Spotify Connect and MusicCast at the same time?
Yes—they’re integrated. MusicCast uses Spotify Connect as its streaming source while adding multi-room features.
Will recording Spotify with Cinch get my account banned?
Cinch uses safe recording technology that captures audio as it plays through your computer. It doesn’t interact with Spotify’s API or attempt to download protected files.
Using Cinch for personal listening doesn’t violate Spotify’s terms of service.
What’s the audio quality difference between these methods?
Spotify Connect, MusicCast, AirPlay, and USB playback (with proper recording) all deliver excellent quality—essentially identical to each other.
Bluetooth applies compression that audiophiles might notice, but casual listeners often find perfectly acceptable. I honestly can’t tell the difference on most tracks.