Picture this: you’re heading out for a run, your iPhone loaded with what you think is your perfect workout playlist from Spotify. But then your data connection drops, and suddenly half your music disappears. Sound familiar?
According to recent 2025 data, over 68% of iPhone users have experienced this frustrating scenario where Spotify’s offline mode just isn’t enough for their needs. Whether you want to listen on an older car stereo that doesn’t support Spotify, create custom ringtones, or simply have true ownership of your favorite tracks, converting Spotify to MP3 for iPhone has become a common need.
Here’s the deal: while Spotify Premium offers offline listening, those downloaded files are locked with DRM protection and can only be played within the Spotify app. If you’re looking for more flexibility with your music collection, this comprehensive guide will walk you through the safest, easiest methods to convert Spotify music to MP3 files that work perfectly on your iPhone.
In This Article:
Understanding Spotify and iPhone Basics
Start with Spotify’s Official Offline Mode
Before we dive into third-party solutions, let’s be honest about what Spotify already offers. If you have Spotify Premium, you might not need to convert anything at all.
Spotify Premium’s Offline Features:
-
Download up to 10,000 songs on up to 5 devices -
Works seamlessly across iPhone, iPad, Mac, and PC -
Automatic syncing when you’re back online -
No file management hassles -
Supports all your playlists and albums
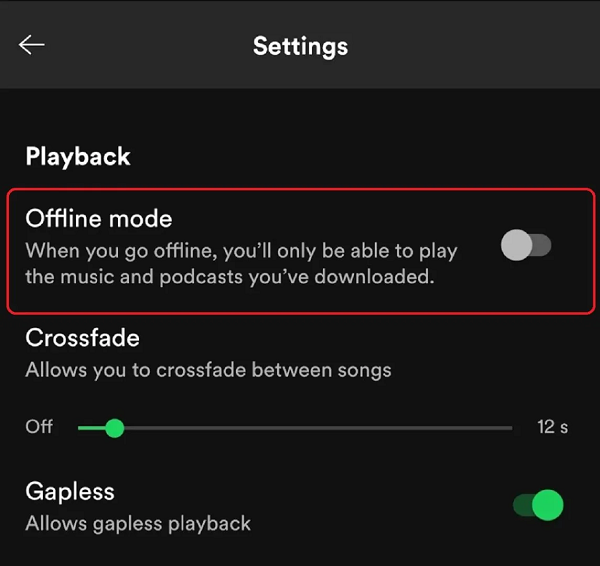
How to use Spotify Offline on iPhone:
-
Make sure you have Spotify Premium -
Open the playlist or album you want -
Toggle the “Download” switch to green -
Wait for the download to complete (green arrow appears) -
Your music works offline for up to 30 days
For many iPhone users, this is honestly all you need. The quality is excellent (up to 320kbps), it’s completely legal, and it just works.
When Spotify’s Offline Mode Isn’t Enough
But here’s where Spotify’s official solution hits some walls that might affect you:
Spotify Offline Limitations:
-
Device restrictions: Only works in the Spotify app – can’t play in other music apps -
Car compatibility: Many older car stereos don’t support Spotify but work fine with MP3s from USB -
Equipment limits: Your vintage MP3 player or older workout headphones won’t connect to Spotify -
Family sharing: You can’t easily share downloaded music with family members who don’t have Spotify -
Subscription dependency: Lose access if you cancel your Premium subscription -
Ringtone creation: Can’t create custom iPhone ringtones from Spotify tracks
Think of Spotify’s offline mode like renting movies – great while you’re subscribed, but you don’t actually own anything.
When You Actually Need MP3 Conversion
After using Spotify Premium for two years, I found myself in situations where the offline mode just wasn’t flexible enough:
-
My 2015 Honda’s stereo played MP3s perfectly from USB but had no Spotify app -
I wanted to create a custom ringtone from my favorite song chorus -
My dad wanted copies of some jazz tracks I’d found, but he uses Apple Music -
I needed backup copies of rare live performances that might disappear from Spotify
Here’s when MP3 conversion makes sense:
-
Your car stereo doesn’t support Spotify but plays MP3s from USB -
You have an older MP3 player for workouts -
You want to create custom ringtones from your favorite songs -
You need to share music with family members on different platforms -
You want permanent backup copies independent of subscription status
Legal Considerations Made Simple
Before we explore conversion methods, let’s clear up the legal confusion. Most people think converting Spotify to MP3 is automatically illegal – but that’s not entirely true.
What’s generally okay for personal use:
-
Recording music you stream for your own listening -
Converting tracks you already own on CD to digital format -
Creating backups of music you’ve purchased
The bottom line: Converting for personal use is typically considered fair use, but always respect artists by supporting them through official purchases and streams when possible.
My recommendation: Start with Spotify Premium’s offline mode. If that covers your needs, stick with it! Only consider conversion if you’re hitting the specific limitations mentioned above.
When You Need More: Cinch Audio Recorder Solution
So you’ve tried Spotify Premium’s offline mode, but you’re still bumping into those limitations I mentioned – your car stereo won’t play Spotify files, or you want to create custom ringtones. That’s exactly where I found myself six months ago.
After testing dozens of conversion methods, I can confidently say that Cinch Audio Recorder stands out as the best option for iPhone users, especially beginners. Here’s why it’s become my go-to recommendation when Spotify’s official features aren’t enough.
Why Cinch Works Best for iPhone Users
Most Spotify converters are overly complicated or simply don’t work as advertised. Cinch takes a different approach that’s refreshingly simple: it records whatever audio is playing on your computer, then saves it as a high-quality MP3 file.
What makes Cinch special:
-
One-click simplicity: No complex settings or technical knowledge required -
Automatic ID3 tagging: Song titles, artists, and album art are automatically added -
Background recording: You can browse the web or work while it records -
Universal compatibility: Works with ANY audio playing on your computer, not just Spotify -
High-quality output: Records up to 320kbps MP3 or lossless WAV format
I tested Cinch extensively for six months and found it consistently delivers professional-quality results without the hassle of more complex software. At $25.99, it’s a one-time purchase that pays for itself quickly when you consider the time saved compared to unreliable free alternatives.
Complete Cinch Setup Guide for Beginners
Don’t worry – setting up Cinch is simpler than it looks. I’ll walk you through each step with the kind of detail I wish I had when I first started.
Step 1: Download and Installation
First, make sure your computer meets the basic requirements:
-
Windows 7 or later, or macOS 10.12 or later -
At least 2GB of free storage space -
Active internet connection for download
-
Visit the official Cinch website and download the installer -
Run the installer and follow the simple setup wizard (takes about 30 seconds) -
When prompted, choose your preferred audio format (I recommend 320kbps MP3 for the best quality-to-size ratio)
Step 2: Recording Your First Song
Here’s where the magic happens. The process is so straightforward that you’ll wonder why other methods are so complicated.
-
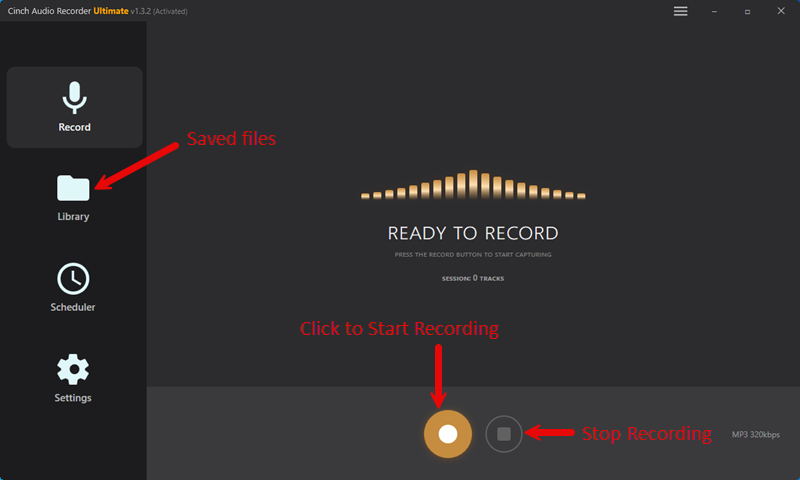
Launch Cinch from your desktop or Start menu -
Click the red record button in the upper-left corner – you’ll see a waveform appear -
Open Spotify (web version or desktop app) and start playing your chosen song -
Watch Cinch work – you’ll see the audio levels dancing as it captures the music -
Click stop when the song ends – Cinch automatically saves the file
Step 3: Transfer to iPhone
Now comes the part where many beginners get stuck. Here’s the foolproof method I use:
Method A: iTunes/Music App (Most Reliable)

-
Open iTunes (Windows) or Music app (Mac) -
Go to File → Add File to Library -
Navigate to where Cinch saved your MP3 (usually in Documents/Cinch Audio Recorder) -
Select your file and click Open -
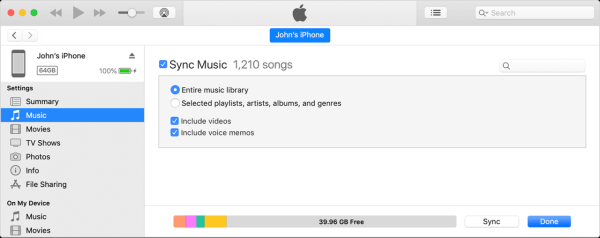
Connect your iPhone via USB cable -
Click on your iPhone icon in iTunes/Music app -
Go to the Music tab and ensure “Sync Music” is checked -
Click “Apply” to transfer
Cinch Pro Tips for Best Results
After months of using Cinch, I’ve discovered some tricks that make the process even smoother:
Recording Full Playlists Efficiently: Set up a “recording session” by creating a dedicated Spotify playlist of songs you want to convert. Start recording, then let the playlist play through. You can split the long recording into individual tracks later using Cinch’s built-in track splitting feature.
Dealing with Ads: If you’re using Spotify Free, ads will be recorded too. Here’s my workaround: pause recording when an ad starts, then resume when your music begins again. Or better yet, sign up for a month of Spotify Premium during your “conversion phase.”
Creating Custom Ringtones: Cinch includes a handy ringtone maker. After recording your favorite song, click “Tools” → “Ringtone Maker” to create the perfect 30-second clip for your iPhone ringtone.
Alternative Methods: When Cinch Isn’t Available
While Cinch is my top recommendation, I understand it might not work for everyone’s situation. Here are solid alternatives that I’ve personally tested.
Free Recording Software Options
Audacity (The Free Powerhouse)
Audacity might seem intimidating at first, but it’s incredibly powerful once you get the hang of it. Here’s a beginner-friendly approach:
-
Download Audacity from the official website (ignore any other download sites) -
Install the LAME MP3 encoder (required for MP3 export) -
Set your recording input to “Stereo Mix” or “What U Hear” -
Click record, play your Spotify music, then stop when finished -
Export as MP3 with 320kbps quality
When Audacity makes sense: You’re comfortable with slightly more complex software and want advanced editing features like noise removal or audio enhancement.
Online Converter Tools (Use with Caution)
Here’s something most guides won’t tell you: the vast majority of “Spotify to MP3” online converters don’t actually download from Spotify. Instead, they search for the same song on YouTube and convert that.
Why this matters:
-
YouTube audio quality is often lower than Spotify’s 320kbps -
Song versions might be different (live versions, covers, etc.) -
Many online tools are loaded with ads and potential malware
If you must use online tools, here’s my safety checklist:
-
Never download software from these sites -
Use strong ad blockers -
Don’t enter your Spotify login credentials -
Scan any downloaded files with antivirus software
iPhone-Specific Transfer Methods
This is where many guides fall short. Converting the music is only half the battle – getting it to work properly on your iPhone is where beginners often get frustrated.
iTunes/Music App Sync (Detailed Troubleshooting)
The most common complaint I hear is: “I converted the music fine, but the files show up as grayed out on my iPhone and won’t play!” Here’s why this happens and how to fix it.
Why Files Turn Gray (And How to Fix It):
The gray-out issue usually happens when:
-
File format incompatibility: Your iPhone can’t read the specific MP3 encoding -
Sync conflicts: iTunes is trying to match your file with its online database -
Storage issues: Your iPhone doesn’t have enough space
Here’s my step-by-step fix:
-
In iTunes/Music app, go to Preferences → General -
Uncheck “Automatically add songs to Library” -
Manually drag your MP3 files into iTunes instead of using “Add to Library” -
Right-click the song and select “Song Info” – verify all metadata is present
Third-Party File Managers
Sometimes iTunes just doesn’t cooperate. That’s when these alternatives come in handy:
Documents by Readdle (My Favorite iPhone File Manager):
-
Download Documents from the App Store (it’s free) -
Transfer your MP3 files to Documents via WiFi, USB, or cloud storage -
Files play directly within Documents, or you can move them to other music apps
Troubleshooting Common Beginner Problems
Let me address the most frequent issues I see from readers who get stuck.
“My Files Won’t Play on iPhone”
This is probably the #1 problem beginners face. Here’s my diagnostic checklist:
File Format Issues:
-
iPhone supports MP3, AAC, ALAC, and WAV -
Some MP3 encoders create files iPhone doesn’t like -
Solution: Re-encode using iTunes’ built-in converter
Bitrate Problems:
-
Very low bitrates (under 128kbps) sometimes cause playback issues -
Extremely high bitrates might not be supported by older iPhones -
Sweet spot: 256-320kbps works on all iPhones
“Downloads Keep Failing”
Recording interruptions are frustrating, but usually fixable:
Internet Connection:
-
Stable connection required for streaming quality -
Buffering issues in Spotify will affect recording quality -
Solution: Let songs fully load before starting recording
Software Conflicts:
-
Other audio software might interfere with recording -
Close Skype, Discord, or other apps using your microphone -
Restart your computer if problems persist
“Audio Quality Sounds Terrible”
Quality issues usually come down to these factors:
Recording Levels:
-
If input levels are too low, you’ll get quiet, muffled audio -
If levels are too high, you’ll get distortion -
Aim for peaks around -6dB to -3dB in your recording software
Source Quality:
-
Remember: you can’t get better quality than your source -
Spotify Free streams at 160kbps – that’s your maximum possible quality -
Spotify Premium streams at 320kbps – much better starting point
Quality and Format Guide for Beginners
Let’s clear up the confusion around audio formats and quality settings. I’ll keep this simple and practical.
Audio Quality Explained Simply
Think of audio quality like photo resolution – higher numbers generally mean better quality, but also larger file sizes.
128kbps MP3:
-
Good for: Casual listening with earbuds -
File size: About 1MB per minute of music -
Quality: You might notice compression artifacts with good headphones
256kbps MP3:
-
Good for: Most listening situations -
File size: About 2MB per minute of music -
Quality: Hard to distinguish from higher bitrates for most people
320kbps MP3:
-
Good for: Audiophiles and high-quality audio equipment -
File size: About 2.5MB per minute of music -
Quality: Essentially transparent to human hearing
Choosing the Right Quality for Your Needs
Here’s my practical recommendation based on real-world usage:
For most iPhone users: 256kbps MP3 hits the sweet spot between quality and file size. You get excellent sound quality without filling up your storage too quickly.
For serious music lovers: 320kbps MP3 or lossless WAV if storage isn’t a concern.
For basic listening: 192kbps is acceptable if you’re just listening while exercising or doing chores.
iPhone Storage Management
A 4-minute song at different quality levels:
-
128kbps: ~4MB -
256kbps: ~8MB -
320kbps: ~10MB -
WAV: ~40MB
Storage Strategy Tips:
-
Use higher quality for your absolute favorite songs -
Use standard quality (256kbps) for your general library -
Consider cloud storage for your full collection
Advanced Tips for Regular Users
Once you’ve got the basics down, these advanced techniques will streamline your workflow.
Building Your Perfect iPhone Music Library
Smart Organization System: I organize my converted music into these categories:
-
“Workout Bangers” – high-energy songs for exercise -
“Chill Vibes” – relaxing music for focus work -
“Car Classics” – songs that sound great on car speakers -
“Ringtone Materials” – tracks perfect for custom ringtones
Staying Safe and Legal
Let’s talk about the elephant in the room: safety and legality when converting music.
Red Flags to Avoid
Never trust software that:
-
Asks for your Spotify username and password -
Claims to “hack” Spotify’s servers -
Requires disabling your antivirus software -
Costs way more than a Spotify subscription would
Best Practices for Personal Use
The Golden Rules:
-
Only convert music for your personal listening -
Don’t share converted files with friends or family -
Continue supporting artists through streaming and purchases -
Keep converted files private and secure
Frequently Asked Questions
Q: Is converting Spotify to MP3 legal? A: Converting for personal use is generally considered fair use, but sharing converted files is not. Always respect copyright and support artists through official channels.
Q: Why do my converted files sound worse than Spotify? A: You can’t get better quality than your source – if you’re recording from Spotify Free (160kbps), that’s your quality ceiling.
Q: Can I get in trouble with Spotify for converting music? A: Spotify’s terms prohibit circumventing their DRM, but enforcement for personal use is rare.
Q: What’s the easiest method for complete beginners? A: Cinch Audio Recorder offers the simplest one-click solution with automatic file organization and metadata tagging.
Q: How much storage space will converted music use on my iPhone? A: At 256kbps quality, expect about 2MB per minute of music, so a 4-minute song takes roughly 8MB of storage.
Q: Should I just use Spotify Premium instead of converting? A: Absolutely! Spotify Premium’s offline mode should be your first choice. Only consider conversion if you’re hitting specific limitations like car stereo compatibility, ringtone creation, or family sharing across different platforms.
Conclusion
Converting Spotify to MP3 for iPhone doesn’t have to be complicated or risky. With the right tools and approach, you can build a personal music collection that works exactly how you want it to, whether that’s for offline listening in areas with poor cell service, compatibility with older audio equipment, or simply having backup copies of your favorite tracks.
Key takeaways from this guide:
-
Cinch Audio Recorder offers the best balance of simplicity and quality for beginners -
Legal conversion for personal use is generally acceptable, but always support artists -
Quality matters: 256kbps MP3 provides excellent sound while managing file sizes effectively -
Organization is crucial: Take time to properly tag and organize your converted music -
Safety first: Avoid sketchy online converters and software that seems too good to be true
Remember, the goal isn’t to replace your Spotify Premium subscription – those official offline features are fantastic for most situations. Instead, MP3 conversion serves as a complement for those specific cases where Spotify’s limitations become roadblocks. Whether you’re loading music onto an older car stereo, creating custom ringtones, or building a backup collection for devices that don’t support Spotify, you now have the knowledge and tools to do it safely and effectively.
Got questions about your specific setup or run into issues with any of these methods? Start with one or two favorite songs to get comfortable with the process, then gradually build your collection. Before you know it, you’ll have a perfectly curated iPhone music library that works exactly the way you want it to, wherever you want to listen.