Quick Summary
Spotify track won't work as a ringtone. Learn how to capture the chorus section, convert to M4R or MP3, and transfer to your phone—without risking your account.
Your favorite Spotify song won’t work as a ringtone out of the box.
Here’s why: Spotify uses DRM-protected OGG format, and phones need M4R (iPhone) or MP3 (Android). The workaround: record the 30-second chorus from your computer’s audio output, then convert and transfer. This avoids login-based tools that can get your account flagged.
Before You Start: Check These Three Things
You’ll need:
- A computer (Windows or Mac) – Phone-only methods exist but are more complicated
- Your Spotify account logged in on that computer – Through the desktop app or web player
- 30 minutes of uninterrupted time – For your first ringtone, including troubleshooting
Know your phone type: iPhone users need M4R format (we’ll cover this). Android users can use MP3 directly—skip to the Android section if that’s you.
No computer? Phone-only workaround (high-friction fallback)
If you only have an iPhone, the common workaround is this chain: screen-record while Spotify plays, extract audio in a converter app, trim/convert to M4R, then import into GarageBand and export as a ringtone.
It can work, but this is the easiest path to fail: too many steps, repeated format conversions, quality loss, and frequent import errors in GarageBand.
Use this only when you truly have no computer access. If you can borrow a laptop for 20 minutes, the desktop recording flow (like Cinch) is usually faster, cleaner, and far less frustrating.
Why Spotify Songs Don’t Work Directly
Spotify streams are DRM-protected OGG Vorbis files. Neither iPhone nor Android can use them as ringtones. This isn’t a setting—you need to capture the audio into a phone-compatible format.
Two barriers you’ll hit:
- iPhone requires M4R format (AAC codec), not MP3
- iPhone limits ringtones to 30-40 seconds
Most tutorials skip these constraints. That’s why your “converted” file never shows up in the ringtone list.
The 30-Second Intro Problem: Why Full Songs Make Terrible Ringtones
Here’s the core issue: iPhone ringtones stop after roughly 30 seconds. Most songs haven’t reached the vocals by then.
The first 20-40 seconds of your favorite track are usually:
- Instrumental buildup
- Quiet intro
- Repeated motifs without the main melody
When your phone rings, you’ll hear that dull opening. Then the call goes to voicemail—or you answer. The catchy chorus never plays.
The real task: Capture the 30-second section that sounds good as a ringtone. Not “download the song.”
How to find the chorus (the part people actually want to hear)
Look for these patterns:
- Pop songs: Chorus typically starts 45-60 seconds in, after the first verse
- EDM/electronic: The “drop” usually comes 60-90 seconds in
- Rock: Listen for the shift from verse rhythm to bigger, melodic sections
Quick method: Play the song on Spotify and watch the progress bar. Tap the 0:45 mark—if you hear vocals singing the main hook, that’s your chorus. If it’s still instrumental, jump ahead 15-20 seconds.
What if you get it wrong? You’ll know immediately—your ringtone will sound like the intro instead of the song you know. Just re-record and adjust your start time.
iPhone’s Format Trap: M4R and the Renaming Myth
Bottom line: Renaming song.mp3 to song.m4r does not work. iPhone checks the actual audio encoding inside the file.
M4R requires AAC codec. If iPhone sees MP3 codec data inside a .m4r file, it ignores the file.
What works:
- Convert audio to AAC format first
- Keep duration under 40 seconds (30 seconds is safer)
- Change extension from
.m4ato.m4r - Transfer via Finder (macOS), Apple Music/iTunes (Windows), or Files app (iOS 26+)
iOS 26 simplified ringtone setting—you can now select from the Files app directly. But format and duration limits remain unchanged. Tutorials claiming “any MP3 works now” are outdated.
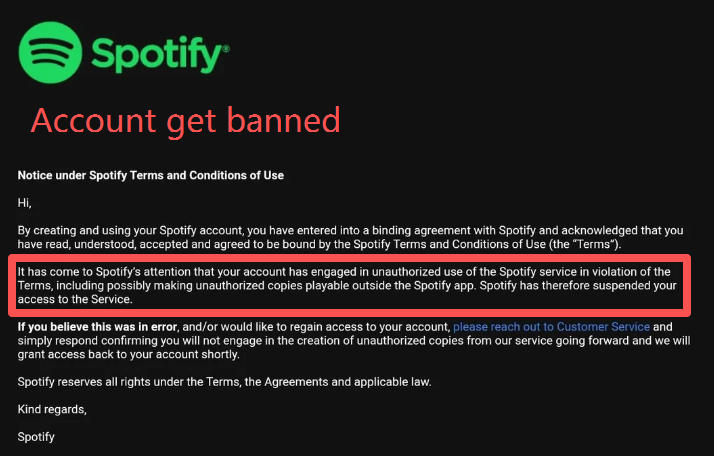
The Ban Risk: Is Your Spotify Account Worth a 30-Second Ringtone?
Tools like Sidify and NoteBurner ask for your Spotify username and password. They need these credentials to access Spotify’s API or simulate an authorized client.
Users on Reddit and Trustpilot have documented account warnings or temporary suspensions after using these tools. Spotify’s Terms of Service prohibit unauthorized downloading. Spotify reserves the right to flag accounts showing unusual access patterns.
Consider the math: You’re risking years of playlists, saved albums, and premium subscription history for a 30-second audio clip. Even if the ban rate isn’t 100%, one suspension means losing everything tied to that account.
Login-based downloaders solve “I want the file” but create “I might lose my library.”
The Safe Alternative: Recording Without Credentials
Recording system audio works differently. You’re capturing what’s already playing through your computer’s sound card—not downloading from Spotify. No login. No API access. No credentials stored in third-party databases.
Tools like Cinch Audio Recorder let you record directly from your audio output while Spotify plays in your browser or app. The software detects when music starts and stops, automatically splits tracks, and includes a built-in Ringtone Maker that exports M4R (iPhone) or MP3 (Android).
Trade-offs: Recording system audio may have slight quality loss depending on your sound card settings. It’s not bit-perfect like a direct download. But for a ringtone playing through a phone speaker, most users won’t notice the difference.
Free alternatives exist: If you don’t want to pay for Cinch, you can use Audacity (free, open-source) with a virtual audio cable, or Audials (subscription-based). These require more manual steps—see the “Free Alternative” section at the end if you prefer this route.
Cinch offers a free trial (up to 9 songs). A lifetime license removes the recording limit. Prices are subject to change.
Key advantage: You decide exactly which 30 seconds to capture. Jump to the chorus, hit record at the right moment, and stop after 30 seconds. The ringtone maker lets you fine-tune start/end times and preview before exporting.
Recording avoids the credential-sharing risk that makes login-based tools dangerous.
Recording Your 30-Second Chorus
Recording on your computer
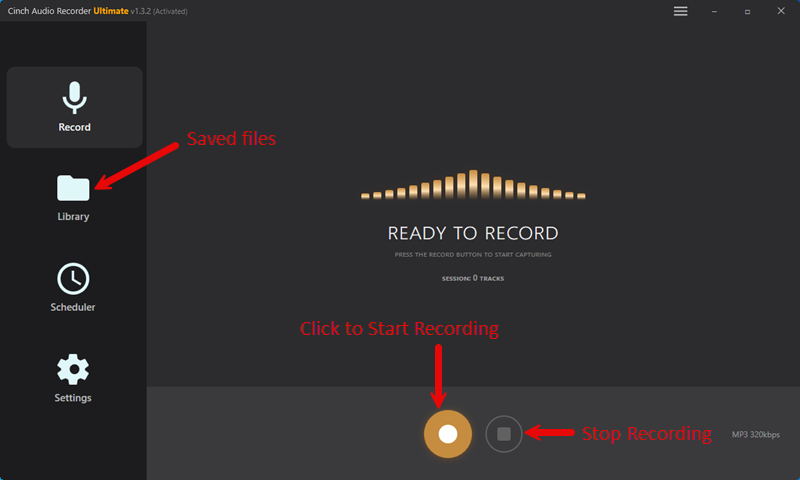
- Open Cinch Audio Recorder
- Click the Recording button (gold circle in the Record tab)
- Play your song in Spotify (web player or desktop app)
- Cinch automatically detects and starts recording when audio plays
- Jump to the chorus section in Spotify (usually 45-90 seconds into the track—see the section above if you’re unsure)
- Let Cinch capture roughly 30-35 seconds
- Stop playback in Spotify (Cinch stops when silence is detected, or stop manually)
What you should see: A new track appears in Cinch’s Library tab with the song title (if it can detect it) or “Track 1” with a timestamp. The waveform should show 30-35 seconds of audio.
Exporting as ringtone
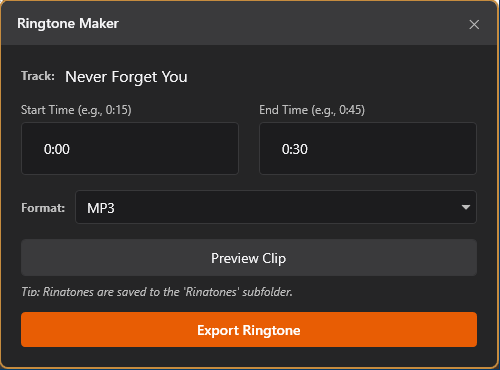
- Go to the Library tab in Cinch
- Right-click your recorded track
- Select Make Ringtone
- Set start and end times in the popup (e.g.,
0:00to0:30) - Choose format: M4R for iPhone or MP3 for Android
- Click Export
What you should see: A confirmation message showing the export location. The file saves to a Ringtones subfolder in your recording directory. iPhone gets M4R. Android gets MP3.
If the export fails: Check that your start/end times don’t exceed the actual recording length. The ringtone must be under 40 seconds total.
Transferring to iPhone: Finder, iTunes, or Files App
Method 1: Finder (macOS Catalina and later)
- Connect iPhone to Mac via cable
- Open Finder, select your iPhone from the sidebar
- Drag your
.m4rfile into the Finder window (or use sync under General > Manually manage music) - On iPhone: Settings > Sounds & Haptics > Ringtone
- Your custom tone should appear in the list under “Ringtones”
What you should see: The file appears in the ringtone list immediately after sync. If it doesn’t appear, check Finder’s sync status—sometimes you need to click “Apply” or “Sync” explicitly.
Method 2: Apple Music/iTunes (Windows or older macOS)
- Connect iPhone
- Open Apple Music app (or iTunes on older systems)
- File > Add File to Library, select your
.m4r - It appears under Tones section
- Sync your iPhone
- On iPhone: Settings > Sounds > Ringtone
Method 3: Files App (iOS 26+)
- Email the
.m4rfile to yourself or save to iCloud Drive - On iPhone, open Files app
- Locate the file
- Long-press, select “Save to Ringtones” (if available)
- Go to Settings > Sounds to select it
Note: iOS 26’s Files app method still requires proper M4R format and duration under 40 seconds. The improvement is about placement, not format.
Android Ringtone Setup: MP3 Placement
Android accepts MP3 files directly. Duration limits are more flexible, though 30 seconds still works best.
Steps:
- Get your audio as MP3
- Transfer to your phone
- Place in the
Ringtonesfolder (Samsung usesInternal Storage/Ringtones, Pixel usesFiles/Ringtones) - Open Settings > Sound > Phone ringtone
- Select your file
Real friction: Folder paths vary by manufacturer. If your ringtone doesn’t appear:
- Check your specific phone’s folder structure in Settings > Storage
- Try creating a “Ringtones” folder manually if it doesn’t exist
- Some carriers pre-install bloatware that can override custom ringtones—try restarting after placing the file
No format conversion. No special codec. No iTunes sync.
When Your Ringtone Doesn’t Show Up: Troubleshooting Guide
iPhone issues
| Symptom | Likely Cause | Fix |
|---|---|---|
| File not showing up | Not AAC-encoded M4R (renamed MP3 won’t work) | Re-export using proper AAC conversion |
| Duration error | File over 40 seconds | Trim to 30 seconds or less |
| Sync didn’t transfer | “Manually manage music” is off | Enable in Finder/iTunes > your device > General |
| Ringtone listed but silent | Zero audio data or corrupted export | Re-record the source audio |
| Shows up but sounds wrong | You captured the intro, not chorus | Re-record starting at the correct timestamp |
Android issues
| Symptom | Likely Cause | Fix |
|---|---|---|
| File not in ringtone list | Wrong folder or wrong format | Move to /Ringtones, confirm MP3 format |
| Plays wrong section | Intro was recorded instead of chorus | Re-record from correct timestamp |
| Format rejected | File is WAV, FLAC, or corrupted | Convert to MP3 first |
Still not working after trying the above? The most common hidden issue is file corruption during transfer. Try emailing the file to yourself and downloading it fresh, or use a different USB cable.
Free Alternative: Using Audacity
If you don’t want to pay for Cinch, here’s the free (but more technical) method:
Prerequisites:
- Download Audacity (free, open-source)
- Install a virtual audio cable like VB-Cable (free for basic use)
Steps:
- Set your computer’s audio output to the virtual cable
- Open Audacity, set input to the virtual cable
- Start recording in Audacity
- Play your song in Spotify, jump to chorus
- Stop recording after 30 seconds
- In Audacity: File > Export > Export as MP3 (Android) or M4A (then rename to M4R for iPhone)
Trade-off: More manual steps, no automatic silence detection, you’ll need to trim precisely yourself. But completely free and no account risk.
What To Do First
Before searching for converters, decide what you’re risking:
- Protecting a Spotify account you’ve used for years? Avoid any tool asking for login. Record audio instead.
- Want the chorus, not the intro? You need to capture a specific 30-second window. Full-song downloads won’t help.
- Using iPhone? Format is non-negotiable: M4R with AAC codec, under 40 seconds. No workaround exists.
Fastest working path:
- Use Cinch Audio Recorder’s free trial (9 songs) or Audacity (free)
- Play your track, jump to the chorus (usually 0:45-1:30 mark)
- Record 30 seconds
- Export as M4R (iPhone) or MP3 (Android)
- Transfer via Finder, iTunes, or Files app
No computer right now? Use the phone-only fallback (screen recording + converter app + GarageBand), but expect more retries and a higher failure rate.
You now have format compliance, duration limits, and account safety covered—no Spotify credentials shared with third-party tools.