Quick Summary
Downloaded a song from Audiomack but can’t find it in your ringtone list? Discover why and 3 simple ways to turn any track into a ringtone on Android or iPhone.
You found the perfect song on Audiomack and want it as your ringtone. You hit the download button, check your phone’s settings, and… nothing. The file isn’t there. Or maybe you can’t even find a download option in the first place.
Quick start:
First, check if your song allows downloads (look for a downward arrow in the Audiomack app). If yes and you’re on Android, try Method 1 below. If downloads are disabled or you’re on iPhone, skip to Method 3 for the easiest path.
Audiomack stores downloads in a protected sandbox that your phone’s ringtone settings can’t access. This guide explains three ways to extract or record Audiomack songs into ringtone-ready formats—whether the download button exists or not, and whether you’re on Android or iPhone.
Why You Can’t Directly Set Audiomack Songs as Ringtone
Two main obstacles stand between you and your custom ringtone.
First, Audiomack downloads live in a hidden sandbox. When you download a song in the Audiomack app, it’s stored inside the app’s private storage—not in your regular Downloads folder or anywhere your phone’s ringtone settings can see. This is intentional: it protects artists’ content and keeps the platform compliant with music licensing rules.
Second, ringtone formats don’t match what Audiomack gives you. iPhone requires M4R format (a special AAC variant), while Android needs MP3, WAV, or OGG. Audiomack’s cached files typically aren’t in these standard formats, and even if you could access them, your phone wouldn’t recognize them as valid ringtones.
One more catch: Not every song on Audiomack allows downloads. Artists decide whether to make a track downloadable for each song. If you don’t see a download icon under the song title, the artist has turned off that option—and there’s no official way to save that file.
The workaround? You need to get the audio out of Audiomack’s ecosystem and into a format your phone accepts. Here are three ways to do that.
Method 1: Official Download + File Extraction (Android Only, Free)
If you’re on Android and the song allows downloads, this method costs nothing but requires patience and some file-system digging.
Step 1: Download the song in Audiomack
Open the Audiomack app and find the song you want. Look for a downward arrow icon below the track title. If it’s there and clickable, the artist has allowed downloads. Tap it to download for offline listening.
If there’s no download icon, or it’s grayed out, skip to Method 2 or 3—the artist hasn’t permitted downloads for this track.
Step 2: Access the hidden file
Audiomack stores downloads in a protected location: Android/data/com.audiomack/files/. You won’t see this in a basic file manager.
You’ll need a file manager app that can access system directories, such as CX File Explorer or Files by Google with advanced settings enabled.
The path looks like this:
Android → data → com.audiomack → files
Look for audio files—they may have random filenames instead of song titles. Copy one to a public folder like Downloads or Music.
Note: On Android 11+, accessing the Android/data directory is more restricted. You may need to connect your phone to a PC and use ADB or manufacturer-specific tools to extract the files.
Step 3: Rename and verify the format
The copied file may not have an extension, or may have an unrecognized one. Rename it with .mp3 at the end (e.g., myringtone.mp3). Try playing it with a music player to confirm it works.
Step 4: Move to the Ringtones folder
Create a folder named Ringtones in your phone’s internal storage if it doesn’t exist. Move your MP3 file there.
Step 5: Set as ringtone
Go to Settings → Sound & vibration → Phone ringtone (or Ringtone on some phones). Your file should now appear in the list.
The trade-offs
This approach is Android-only—iOS doesn’t allow apps to access other apps’ sandbox storage. Worse, on Android 11+, digging through system directories often requires connecting your phone to a PC and running ADB command lines. Unless you enjoy spending an hour acting like a software engineer just to get a 30-second ringtone, skip this.
Method 2: Desktop Audio Recording (Audacity/OBS – Free but Technical)
Note: This method is best for users comfortable with technical setup. If you want a simpler solution, skip to Method 3.
This method works for most songs you can play—even if downloads are disabled. It records the audio as it plays on your computer, giving you a file you can then convert and transfer to your phone. The tradeoff: it requires technical setup and manual effort.
What you need
- A Windows or Mac computer
- Audacity (free, open-source audio editor) or OBS Studio (free recording software)
- The Audiomack song playing in a browser or the Audiomack desktop app
Step 1: Install Audacity
Download Audacity from audacityteam.org and install it.
Step 2: Configure recording
On Windows:
- Open Audacity
- Click the recording device dropdown (next to the microphone icon)
- Select WASAPI and choose your speakers or “loopback” option
On Mac:
- You’ll need additional software like BlackHole or Soundflower to capture system audio
- Install the virtual audio driver, then select it as your recording input in Audacity
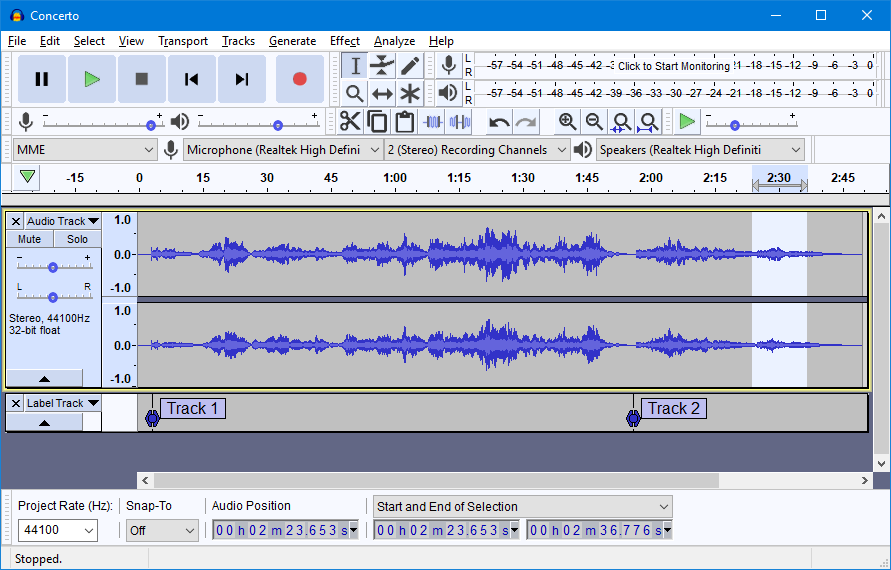
Step 3: Record the song
- Press the Record button in Audacity (red circle)
- Play the song on Audiomack
- Let it play through the portion you want (usually 30–40 seconds for a ringtone)
- Stop recording
Step 4: Edit and export
- Use the Selection tool to mark your desired segment
- Trim the selection (Edit → Remove Special → Trim Audio)
- Export as MP3 (File → Export → Export as MP3)
Step 5: Convert format for iPhone
For iPhone, you’ll need to convert the MP3 to M4R. Use a free online converter or a tool like iTunes to do this.
Things to keep in mind
You’ll have to name the file yourself—there’s no automatic identification. Trimming is manual, with no smart suggestions. And configuring loopback recording on Windows (or virtual audio on Mac) can take some trial and error. The final quality depends on your recording settings.
Method 3: Cinch Audio Recorder (Recommended for Easy Path)
Don’t learn ADB code or configure virtual soundcards just to get a 30-second ringtone. Your time is worth more than that. Cinch Audio Recorder automates the entire process for a one-time $35.95 lifetime license—no subscription, no recurring fees. Still skeptical? The free trial lets you record and cut up to 9 songs into ringtones before spending a dime.
What makes Cinch different
Cinch is a desktop app (Windows and Mac) that records whatever audio is playing on your computer. But unlike Audacity, it handles the entire ringtone creation process automatically:
- Records system audio – No need to configure loopback devices or install virtual drivers
- Auto-identifies songs – Uses audio fingerprinting to recognize the song and pull in title, artist, album art, and lyrics
- Built-in ringtone maker – Export directly to M4R (iPhone) or MP3 (Android) with a built-in trimmer
- No account needed – Works with any audio source; no login or password required
Step 1: Install Cinch
Download Cinch Audio Recorder from the official website and install it on your computer.
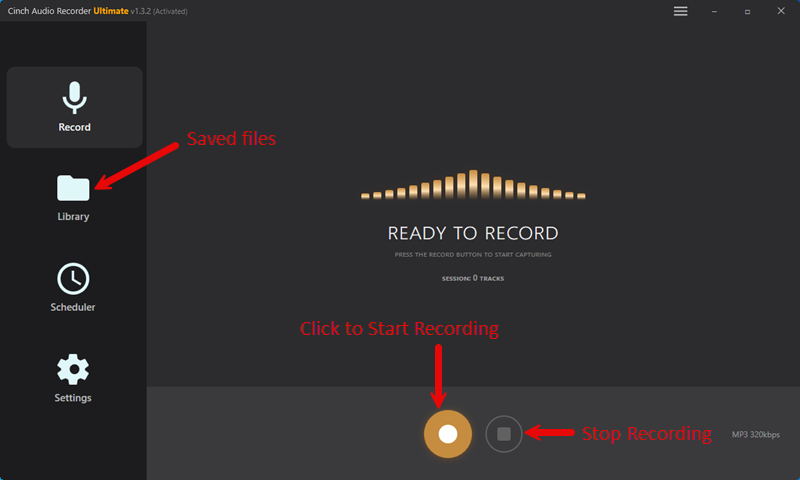
Step 2: Start recording
- Open Cinch and click the golden Recording button
- Play your song on Audiomack (in a browser or the desktop app)
- Cinch detects the audio and starts recording automatically
- Stop recording when the song or segment finishes
Step 3: Create your ringtone
- Go to the Library tab in Cinch
- Right-click the recorded song
- Select Make Ringtone
- In the popup, preview the song and set your start and end times (30–40 seconds works well)
- Choose your format: M4R for iPhone or MP3 for Android
- Click Export
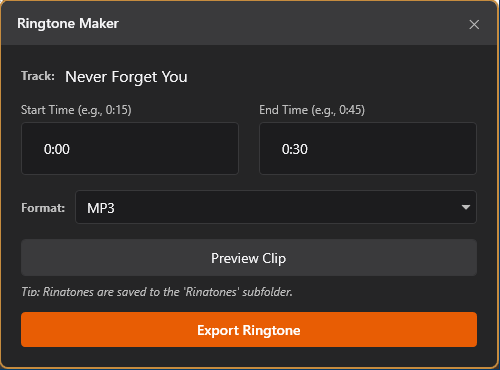
The ringtone saves to a Ringtones folder inside your Cinch recordings directory.
Step 4: Transfer to your phone
Follow the platform-specific steps in the next section to get the ringtone onto your device.
Why iPhone users prefer this method
iPhone ringtone setup is notoriously complex—you need M4R format and must sync through iTunes or Finder. Cinch handles the M4R conversion automatically, so you skip the format gymnastics. You still need to transfer via iTunes/Finder (covered below), but at least the file is ready to go.
How to Transfer and Set Ringtone on iPhone vs Android
Once you have your audio file (MP3 for Android, M4R for iPhone), here’s how to get it onto your phone and set it as your ringtone.
For iPhone
iPhone requires M4R format and syncing through a computer. You cannot simply copy a file to your phone and select it.
Step 1: Add the M4R file to iTunes/Finder
On macOS Catalina or later (or Windows with iTunes):
- Connect your iPhone to your computer
- Open Finder (Mac) or iTunes (Windows)
- Drag your M4R file into the Tones section in the sidebar
- Sync your iPhone
On older macOS with iTunes:
- Connect your iPhone
- Open iTunes
- Drag the M4R file to the Tones library
- Sync
Step 2: Select the ringtone on your iPhone
- Go to Settings → Sounds & Haptics → Ringtone
- Your custom ringtone should appear at the top under a “Custom” section
- Tap to select it
For Android
Android is more flexible—you just need the file in the right place.
Method A: Use the Ringtones folder
- Connect your phone to your computer via USB
- Create a folder named
Ringtonesin your phone’s internal storage (if it doesn’t exist) - Copy your MP3 file into that folder
- On your phone, go to Settings → Sound → Phone ringtone
- Your file should appear in the list
Method B: Use a file manager
- Copy the MP3 to any location on your phone
- Open Settings → Sound → Phone ringtone
- Tap “Add ringtone” or the + icon
- Use the file picker to locate your file
Ready to Make Your Ringtone?
Stop fighting hidden folders and file formats. Download the Cinch Audio Recorder free trial and make your first Audiomack ringtone in 60 seconds.