What if you could take your favorite Beatsource tracks with you anywhere – on that long flight, during your morning jog, or to that gig where the WiFi is sketchy at best? I’ve been there, frantically trying to stream music while my connection kept dropping. It’s frustrating when you’ve found the perfect track on Beatsource but can’t access it when you need it most.
Here’s the deal: Beatsource has become the go-to platform for open-format DJs and music enthusiasts, boasting over 10 million tracks from established and emerging artists. But like many streaming services, it comes with limitations that can leave you hanging when you need your music most. Whether you’re a weekend warrior DJ building your first library or a content creator looking to enhance your projects, this guide will show you exactly how to get your Beatsource favorites in MP3 format – legally and efficiently.
Trust me, by the end of this article, you’ll have multiple ways to build your offline music collection without breaking the bank.
In This Article:
Understanding Beatsource: Platform Overview and Download Realities

What Makes Beatsource Special for DJs and Music Lovers
Beatsource isn’t just another streaming service – it’s specifically designed for open-format DJs who need everything from hip-hop and R&B to Latin and dance music.
Unlike Beatport, which focuses heavily on electronic music, Beatsource covers the genres you’ll actually hear at weddings, clubs, and radio stations. According to Digital Music News, the platform has grown significantly among professional DJs since its launch.
The platform offers high-fidelity streaming with expertly curated playlists, and honestly? The music discovery is pretty solid. I’ve found tracks here that I couldn’t locate anywhere else, especially when it comes to clean versions and radio edits that DJs actually need.
The Download Dilemma: Official vs Alternative Methods
But here’s where things get tricky. Beatsource’s official download options can be… well, let’s just say they’re not exactly budget-friendly for most of us.
You’ve got two official routes:
- Individual purchases at $1.29-$2.99 per track (ouch, that adds up fast)
- Subscription with offline locker that doesn’t actually let you download files
I learned this the hard way when I first started DJing. Spent nearly $200 in my first month just trying to build a basic library. There had to be a better way, right?
The thing is, many DJs and music lovers hit the same wall: they love the platform but need a more practical solution for building their libraries. That’s exactly what we’re going to solve today.
Official Beatsource Download Methods: The Straightforward Approach

Individual Track Purchases
Let’s start with the official route – because honestly, for some users, this might be all you need.
Here’s how it works:
- Create your account (free signup)
- Browse and find your track
- Click “Buy” and add to cart
- Complete payment ($1.29-$2.99 per track)
- Download directly in your chosen format
Available formats include:
- MP3 (320kbps) – great for most uses
- WAV – uncompressed, larger files
- FLAC – compressed lossless (when available)
The good news? You get high-quality, legal files with proper metadata. No brainer if you only need a few tracks here and there.
The reality check? At $2 per track, building a 500-song library costs over $1,000. For most of us, that’s just not realistic.
Subscription-Based Offline Locker
Beatsource also offers subscription tiers with “offline lockers”:
| Plan | Price | Offline Tracks | Streaming |
|---|---|---|---|
| PRO | $12.99/month | 50 tracks | Limited |
| PRO | $34.99/month | 1,000 tracks | Full access |
Here’s the catch: These aren’t real downloads. The tracks are locked to your DJ software and can’t be exported as regular MP3 files. It’s convenient for gigging, but you don’t actually own the files.
I tried the PRO plan for three months. Great for gigs, but when I wanted to use a track for a podcast or share it with a friend? Nope, couldn’t do it.
Alternative Solution: Audio Recording with Cinch Audio Recorder
Why Choose Audio Recording Software?
Look, I get it – recording streaming music sounds complicated. But stick with me here, because this is where things get interesting.
After spending way too much money on individual track purchases, I discovered audio recording software. The math is simple: instead of paying $2 per track forever, you pay once for software that can capture unlimited music.
Here’s what changed my perspective:
- One-time cost vs ongoing expenses
- True file ownership (no DRM restrictions)
- Works with any streaming service
- High-quality output that rivals purchased files
Introducing Cinch Audio Recorder
Cinch Audio Recorder has become my go-to solution, and here’s why it stands out among streaming music recorders:
Key features that actually matter:
- Automatic track separation – no more manually splitting long recordings
- Smart ID3 tagging – automatically adds song titles, artists, and artwork
- Ad filtering – removes those annoying streaming ads
- Multiple format support – MP3, WAV, whatever you need
- Background recording – works silently while you do other things
The price point? $25.99 for a lifetime license. Do the math – that’s about 13 tracks at Beatsource’s individual pricing. For most DJs, this pays for itself in the first week.
Step-by-Step Recording Process
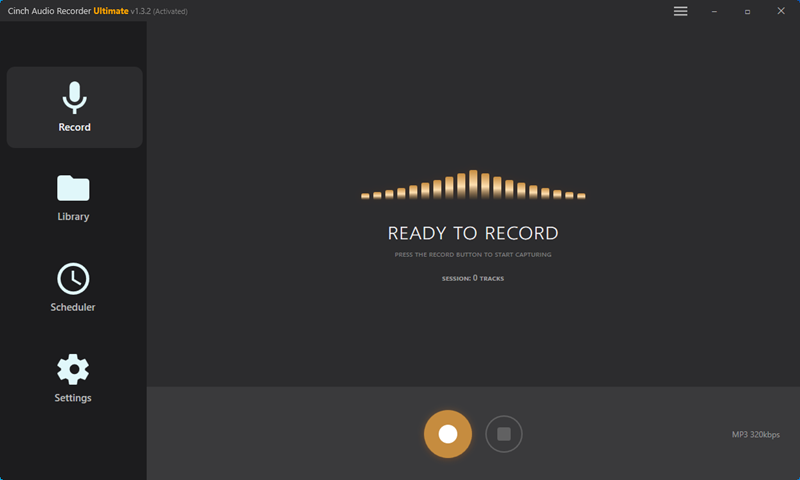
Step 1: Installation and Setup
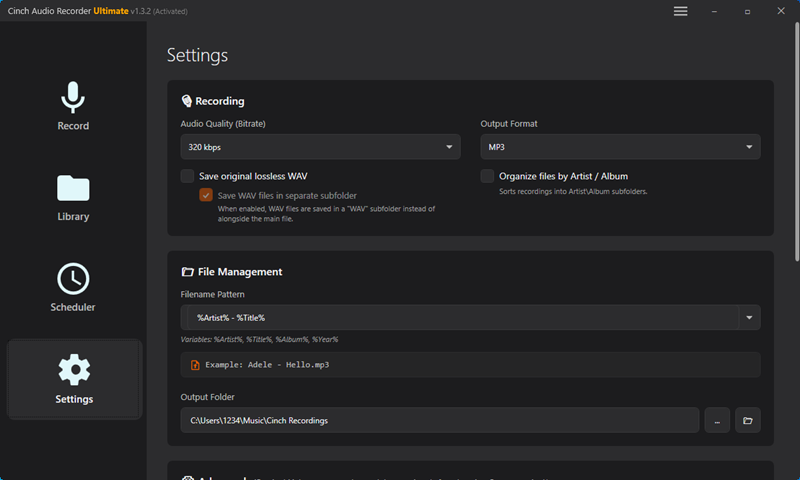
Download Cinch from their official website and install it. The setup is straightforward – no complicated configurations needed. For detailed instructions, check the user guide.


Once installed, click the Format dropdown to choose your preferred output:
- MP3 320kbps for most uses (smaller files, great quality)
- WAV for maximum quality (larger files, uncompressed)
Step 2: Preparing Your Recording Environment
Essential prep steps:
- Close other music apps
- Turn off system notifications
- Use Volume Mixer to mute everything except Beatsource
Step 3: Recording Your Beatsource Music

Here’s where the magic happens:
- Hit “Start” in Cinch
- Play music on your browser or Beatsource app
- Play your music on Beatsource
- Watch Cinch work – it automatically detects track changes and creates separate files
The software is smart enough to recognize when a new song starts, so you can play entire playlists and get individual track files. Pretty cool, right?
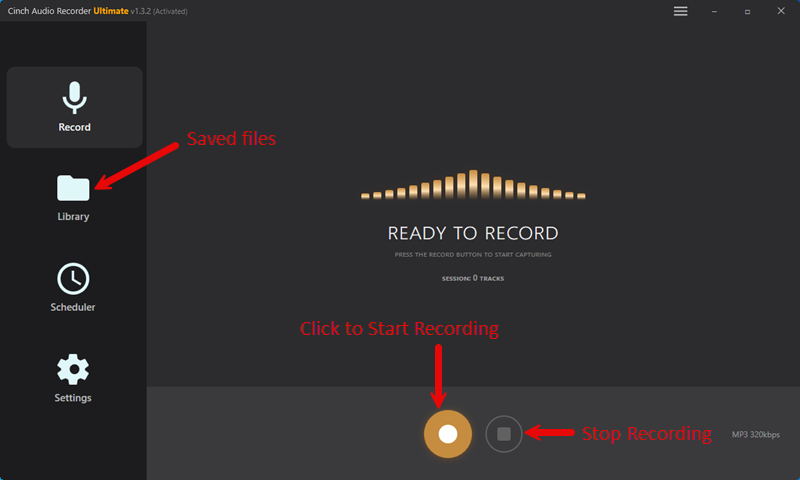
Step 4: Managing Your Recordings
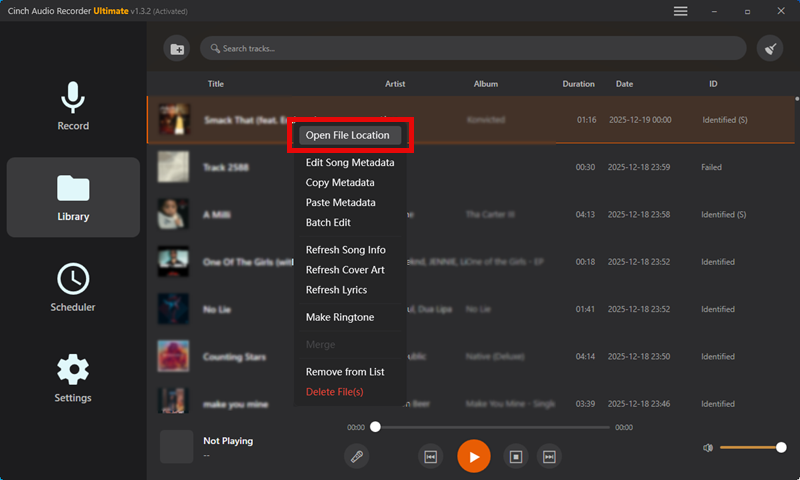
When you’re done, click “Stop” and then “Save”. All your recordings appear in the “History” section.
Click the “Open” icon to find your files on your computer. By default, they’re organized in folders by date, but you can customize this in settings.

Quick tip: I create a “Beatsource Recordings” folder and point Cinch to save everything there. Keeps things organized from day one.
Audio Quality Deep Dive: Making the Right Format Choice
MP3 vs WAV: The Quality vs Size Trade-off
Let’s talk about something that confused me for months when I started: audio formats. The choice between MP3 and WAV isn’t just technical – it affects your storage, your workflow, and yes, your sound quality.
WAV files are like the original recipe:
- Uncompressed audio (exactly what the artist intended)
- Larger file sizes (about 10MB per minute)
- Perfect for studio work and high-end systems
- Compatible with all DJ software
MP3 files are the practical choice:
- Compressed but smart about it
- Much smaller (about 2-3MB per minute at 320kbps)
- 99% of people can’t hear the difference
- Easier to manage large libraries
My recommendation: 320kbps MP3 is your sweet spot for most uses.
Bitrate Matters: 320kbps vs Lower Quality
320kbps MP3: Full 20kHz frequency response, CD-quality sound 128kbps MP3: Cuts off at 15kHz, sounds muffled – avoid this
Bottom line: Always choose 320kbps when recording. According to Audio Engineering Society, this bitrate provides optimal quality for most professional applications.
For DJs: Additional Format Considerations
FLAC: Compressed lossless format, 50% smaller than WAV Metadata: MP3 handles ID3 tags better than WAV Club systems: Most are optimized for MP3 playback
⚠️ Warning: Avoid These Common Quality Mistakes
- Never use YouTube or SoundCloud rips (heavily compressed)
- Don’t convert low-quality files to higher bitrates (garbage in, garbage out)
- Avoid recording with other audio playing in the background
Managing Your Music Library Like a Pro

ID3 Tag Management with Cinch
One thing I love about Cinch is how it handles metadata. The software automatically pulls track information when recording from Beatsource, but sometimes you’ll want to fine-tune things.
To edit ID3 tags manually:
- Select your track in Cinch’s history
- Click the “ID3 Editor” icon (second from the right)
- Edit the fields you want to change
- Hit “Save” and you’re done
Essential fields to check:
- Title – song name
- Artist – performer name
- Album – release information
- Genre – helps with organization
- BPM – crucial for DJs
- Artwork – makes browsing more visual
File Organization Best Practices
Recommended structure: Organize by genre (Hip Hop, R&B, Dance, Latin) Naming convention: Artist - Title (BPM) [Genre].mp3 Example: Drake - God's Plan (77) [Hip Hop].mp3
💡 Quick Tip: Library Organization Shortcuts
- Use Cinch’s auto-folder creation by genre
- Set up smart playlists in your DJ software
- Keep a “New Additions” folder for recent recordings
- Back up your library to cloud storage monthly
Troubleshooting Common Issues and Best Practices
Recording Problems and Solutions
Even with great software, things can go wrong. Here are the issues I’ve encountered and how to fix them:
Common Issues & Quick Fixes:
- System sounds in recording: Use Volume Mixer to mute other apps
- Poor audio quality: Set Windows audio to 24-bit, 48kHz
- Tracks not separating: Pause briefly between songs for auto-detection
- Audio ads in recordings: Cinch Pro automatically filters these out

Legal and Ethical Considerations
Personal use: Generally falls under fair use Commercial use: Consider purchasing official tracks Never: Share or sell recorded tracks Best practice: Support artists by buying your most-played tracks
Optimization Tips for Power Users
After using Cinch for over a year, here are some advanced tips:
Power User Tips:
- Record themed playlists in batch sessions
- Spot-check every 10th recording for quality
- Set up auto-import in your DJ software
- Use consistent file naming for easy searching
✅ Success Story: “Cinch paid for itself in the first week. Now I have 2,000 tracks without the monthly budget stress.” – Sarah, Wedding DJ
Frequently Asked Questions
Q1: Is recording from Beatsource legal? Recording for personal use typically falls under fair use, but laws vary by country. For commercial use, consider purchasing official tracks.
Q2: What’s the best audio quality for DJs? 320kbps MP3 is the sweet spot – excellent quality with manageable file sizes. Choose WAV only for professional production work.
Q3: How much does it cost compared to buying tracks? Cinch Audio Recorder costs $25.99 one-time versus $1.29-$2.99 per track. The software pays for itself after 10-15 tracks.
Q4: Can I use these files in my DJ software? Yes! Files work with all major DJ software including Serato, rekordbox, Virtual DJ, and Traktor with proper metadata intact.
Conclusion
Building a music library doesn’t have to drain your budget. Whether you choose official purchases or recording software like Cinch, find the approach that fits your needs.
Most DJs benefit from a hybrid approach: use recording for discovery and collection, then buy your most-played tracks. This supports artists while building an affordable library.
These techniques have helped me build 2,000 tracks without budget stress or internet dependency during gigs.