Converting Spotify music to WAV format enables you to enjoy superior sound quality and freedom from streaming limitations. Whether you’re an audiophile seeking the best possible sound, a DJ needing high-quality files for performances, or simply want reliable offline access to your music library, this comprehensive guide will walk you through the most effective methods to convert Spotify to WAV.
In This Article:
What is WAV Format?

WAV (Waveform Audio File Format) is an uncompressed, lossless audio format developed by Microsoft and IBM. Unlike compressed formats like MP3 or Spotify’s Ogg Vorbis, WAV files preserve the complete original sound quality of audio recordings without any data loss.
WAV files offer several technical advantages:
-
Bit depth options of 16-bit, 24-bit, or 32-bit (compared to compressed formats’ typical 16-bit)
-
Sample rates up to 192kHz (versus 44.1kHz for most compressed files)
-
No compression artifacts or quality degradation
-
Perfect reproduction of the original audio signal
Understanding Spotify’s Audio Format
Spotify uses Ogg Vorbis, a lossy compression format, to stream music. While this reduces file sizes for easier streaming, it also means some audio data is discarded during compression. Spotify offers different quality levels depending on your subscription:
- Free accounts: Up to 160kbps Ogg Vorbis
- Premium accounts: Up to 320kbps Ogg Vorbis
While 320kbps is considered high-quality for streaming, it still doesn’t match the uncompressed quality of WAV files, which typically have a bit rate equivalent to 1,411kbps for CD-quality audio.
Why Convert Spotify to WAV?
Converting Spotify tracks to WAV format offers numerous benefits:
- Offline listening without Spotify app dependencies: Access your music anywhere without requiring the Spotify app or an internet connection.
- Superior sound quality for audiophiles: Experience every detail of your music with uncompressed, lossless audio quality.
- Compatibility with media players, DJ equipment, and editing software: WAV is universally supported by virtually all audio devices and software.
- Archiving favorite music in lossless format: Create a personal library of high-quality music that won’t degrade over time.
- Using in projects requiring highest audio quality: Perfect for audio production, mixing, and professional applications.
Professional Spotify to WAV Converters
Cinch Audio Recorder (Featured Product)
Among the various conversion tools available, Cinch Audio Recorder stands out as our top recommendation for converting Spotify to WAV.
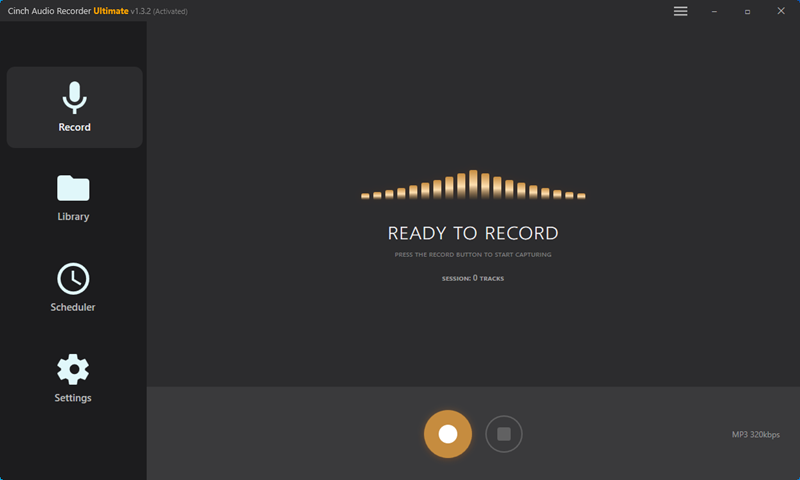
Cinch Audio Recorder uses a unique approach to capture Spotify audio directly through your computer’s sound card, ensuring the highest possible quality conversion. Unlike other tools that might compromise on quality, Cinch preserves the audio exactly as you hear it.
Key features:
– Unique sound card recording approach that captures audio with maximum fidelity
– Automatic ID3 tagging and metadata preservation, identifying songs, artists, and album information
– Support for both MP3 (320kbps) and lossless WAV recording options – Compatibility with over 500 streaming platforms including Spotify, Apple Music, YouTube Music, and more
– Simple and intuitive interface that makes recording straightforward even for beginners
Step-by-Step Tutorial
Converting Spotify tracks to WAV with Cinch Audio Recorder is straightforward:
Installation and Initial Setup
1. Download and install Cinch Audio Recorder from the official website, following the on-screen instructions.
2. Launch the program and complete the initial setup process.
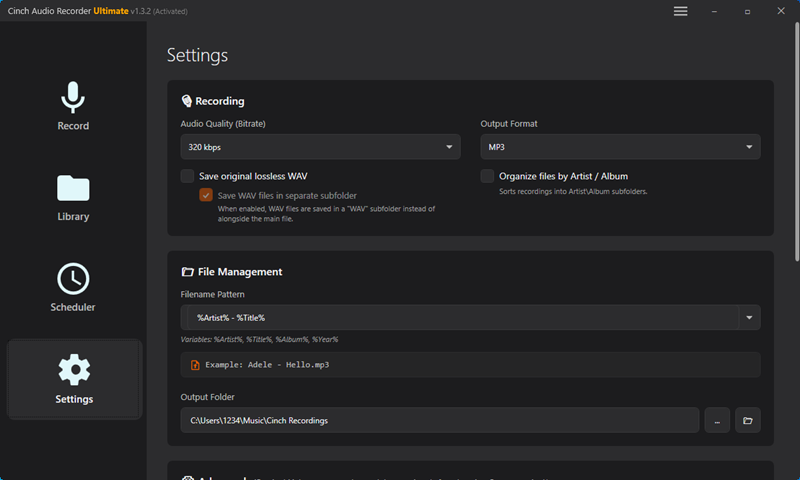
Configuring WAV Recording Settings
3. Click the settings icon (gear symbol) in the Cinch interface.
4. Under “Recording Format,” choose WAV instead of MP3.
5. Optionally adjust the sample rate and bit depth (standard: 16-bit/44.1kHz).
6. Ensure Automatic Tagging is enabled to preserve track information.
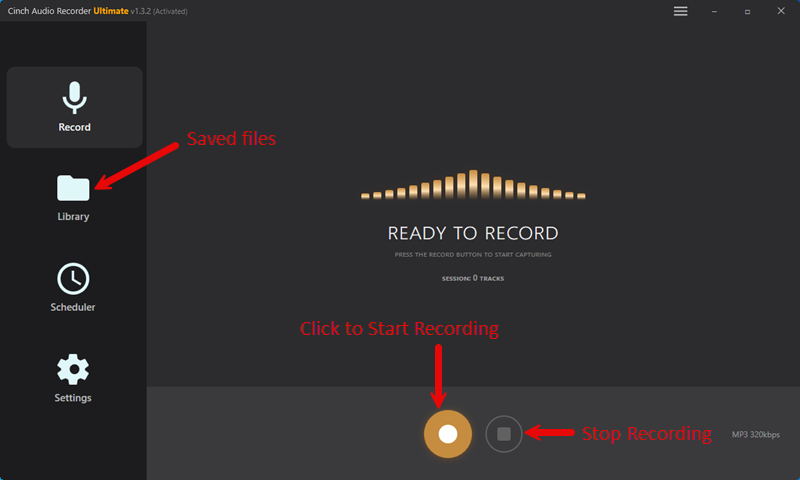
Recording from Spotify
7. Open Spotify and play the track, album, or playlist you want to record.
8. In Cinch, click the Record button.
9. Cinch will automatically detect, tag, and separate each track.
10. Click Stop Recording when done.
Managing and Exporting Files
11. Recorded files appear in the Cinch library, named with song title and artist.
12. Right-click any track to edit metadata if needed.
13. Export files to any folder on your computer for easy access.
Pros and Cons
Advantages: – High-quality preservation of audio without compression artifacts – Automatic metadata detection saves time on manual tagging – User-friendly interface makes recording simple – Works with all Spotify content, including exclusive releases – One-time purchase with no subscription fees
Limitations: – Windows-only support (not available for Mac users) – Real-time recording requirement (takes the full length of the content to record) – Cannot record in the background while using your computer for other audio tasks
AudFun Spotify Music Converter
Another popular option for converting Spotify to WAV is AudFun Spotify Music Converter.

Overview and Key Features
AudFun takes a different approach than Cinch, focusing on speed and batch processing:
- DRM removal capabilities that allow direct conversion of protected Spotify content
- 5X conversion speed that processes tracks faster than real-time
- ID3 tag preservation that maintains all song information
- Support for batch conversion of entire playlists and albums
Pros and Cons
Advantages: – Fast conversion that saves time, especially for large playlists – Preservation of metadata including artist, title, and album art – Batch processing capability for multiple tracks – No recording required, works directly with Spotify’s data
Limitations: – Paid software with a higher price point than some alternatives – Occasional issues with very large playlists – May require updates when Spotify makes changes to their platform
ViWizard Spotify Music Converter
ViWizard offers another solution for those looking to convert Spotify to WAV.

Overview and Key Features
ViWizard Spotify Music Converter provides: – Clean, intuitive user interface that’s easy for beginners – Multiple output format options including WAV, FLAC, MP3, and more – Adjustable conversion speed and quality settings – Preservation of ID3 tags and folder organization options
Step-by-Step Tutorial
- Download and install ViWizard Spotify Music Converter
- Launch the program (it will automatically detect Spotify)
- Copy and paste Spotify links or drag tracks directly from Spotify
- Click the “Format” button and select WAV as your output format
- Adjust quality settings to your preference
- Click “Convert” to start the process
- Access your WAV files in the output folder when conversion is complete
Pros and Cons
Advantages: – User-friendly interface that’s approachable for new users – Good quality output with minimal loss – Regular updates to maintain compatibility with Spotify
Limitations: – Subscription-based pricing model may not appeal to all users – Only available for Windows and Mac (no mobile support)
AudiFab Spotify Music Converter
AudiFab is another contender in the Spotify to WAV conversion space.

Overview and Key Features
AudiFab offers: – Support for multiple output formats including WAV, MP3, FLAC, and more – Preservation of original audio quality during conversion – Organized output folder structure – Batch conversion capabilities
Step-by-Step Tutorial
- Install AudiFab Spotify Music Converter
- Launch the program alongside Spotify
- Copy Spotify URLs or drag tracks from Spotify to AudiFab
- Set WAV as the output format in settings
- Configure your preferred WAV quality settings
- Click Convert to begin processing
- Find your converted files in the designated output location
Pros and Cons
Advantages: – Good quality conversion results – Simple and straightforward process – Compatible with various Spotify content types
Limitations: – Interface not as polished as some alternatives – Occasional minor bugs reported by users
Other Notable Spotify to WAV Converters
Several other options exist for converting Spotify to WAV:
- TuneFab Spotify Music Converter: Offers good conversion quality with a focus on preserving original audio characteristics.
- DRmare Spotify Music Converter: Features a sleek interface and reliable conversion capabilities.
- AudiCable Audio Recorder: Takes a recording approach similar to Cinch but with different interface design.
- StreamFox/Eassiy Converter: Budget option with basic but functional conversion tools.
- MusicFab Spotify Converter: Newer entrant with promising features and regular updates.
Recording Methods
General Audio Recording Software
General-purpose audio recording applications can capture Spotify playback:
- Download and install recording software like Audacity (free, open-source)
- Configure your recording settings:
- Set input to “Stereo Mix,” “What U Hear,” or similar system audio capture option
- Set quality to WAV format, 16-bit or 24-bit, 44.1kHz or higher
- Start recording in the software
- Play Spotify content you want to capture
- Stop recording when finished
- Edit if necessary to trim silence or split tracks
- Export as WAV files to your desired location
Setup for Optimal Quality: – Use the highest quality Spotify streaming setting (Premium required for 320kbps) – Ensure no other applications are producing sounds during recording – Turn off system notification sounds – Use a computer with a good quality sound card
Pros and Cons: – Free or low-cost solutions available – Flexible editing options – Can capture any audio played through your system – Manual process requires attention – May require additional setup for optimal quality – No automatic metadata tagging
Spytify
Spytify is a specialized tool designed specifically for recording Spotify:
- Download and install Spytify
- Select WAV as your output format
- Configure other settings like output folder
- Start recording and play Spotify content
- Tracks are automatically saved and split
Quality Assessment: Spytify produces good quality recordings when properly configured, with automatic track splitting as a helpful feature. However, it lacks some of the metadata features of premium tools like Cinch Audio Recorder.
If you prefer not to install dedicated software, alternative methods exist for converting Spotify to WAV.
Chrome Audio Capture
This browser extension offers another online approach:
- Install Chrome Audio Capture extension from the Chrome Web Store
- Open Spotify Web Player in your Chrome browser
- Activate the extension before playing music
- Play the track you want to record on Spotify
- Stop the recording when the track finishes
- Save the file in WAV format
Quality Assessment: Chrome Audio Capture can produce decent quality recordings, but they may include browser notification sounds or other system audio if they occur during recording. The quality depends greatly on your computer’s audio subsystem.
Advantages and Limitations: – Free browser-based solution – No additional software needed beyond Chrome – Records all browser audio (not just Spotify) – Quality varies based on your system – Manual process for each track – Potential for unwanted sounds in recordings
How to Convert Spotify to MP3: 12 Best Methods for 2025 [Free & Paid]
Using and Playing WAV Files
Once you’ve converted your Spotify tracks to WAV format, you’ll want to know how to use them effectively.
Playing WAV Files on Various Devices
CD Player in Home or Car
WAV files can be burned to CDs for playback in traditional CD players:
Using Windows Media Player: 1. Insert a blank CD-R into your computer’s disc drive 2. Open Windows Media Player 3. Create a new playlist with your WAV files 4. Select the “Burn” tab 5. Drag your WAV files to the burn list 6. Click “Start burn” 7. Wait for the burning process to complete
Using macOS: 1. Insert a blank CD-R 2. Open Music (formerly iTunes) 3. Create a new playlist with your WAV files 4. Select “File” > “Burn Playlist to Disc” 5. Choose “Audio CD” in the format options 6. Click “Burn” 7. Wait for the process to complete
Important: Be sure to select “Audio CD” and not “Data CD” when burning, or your CD player may not recognize the files.
Computers and Laptops
Most computers can play WAV files without additional software, but for the best experience:
Recommended Software: – Windows: Foobar2000, VLC Media Player, or MusicBee – Mac: VLC Media Player, Vox, or Music – Linux: VLC Media Player, Audacious, or Rhythmbox
Setting Up for Best Quality: – Configure your player for bit-perfect playback (no resampling) – Use WASAPI or ASIO output if available (Windows) – Connect quality headphones or speakers to fully appreciate WAV quality
Smartphones and Tablets
WAV files can be played on mobile devices, though they consume more storage:
iOS Apps for WAV Playback: – VLC for Mobile – VOX: MP3 & FLAC Music Player – Evermusic Pro
Android Apps for WAV Playback: – PowerAmp – USB Audio Player PRO – Neutron Music Player
Storage Considerations: WAV files are large (about 10MB per minute for CD quality), so be aware of storage limitations on mobile devices. Consider using external storage like SD cards for Android devices.
Adding WAV Files to Spotify
You can add your converted WAV files back to Spotify as local files:
Local Files Feature in Spotify
Spotify can play local audio files, though with some limitations:
- Spotify supports adding local files, but the WAV format is not fully supported on all platforms
- For maximum compatibility, you might need to convert WAV to MP3 format
- Local files work best on the desktop app and can be synced to mobile devices
Step-by-Step Guide
Adding Local Files to Spotify Desktop:
1. Open Spotify desktop app
2. Click your profile icon in the top-right corner
3. Select “Settings”
4. Scroll down to “Local Files”
5. Toggle on “Show Local Files”
6. Click “Add a Source” to select folders containing your WAV files
7. Your local files will appear under “Local Files” in the left sidebar
Creating Playlists with Local Files:
1. Navigate to your local files section
2. Select the tracks you want to add to a playlist
3. Right-click and select “Add to Playlist”
4. Choose an existing playlist or create a new one
Important Considerations
Legal and Ethical Considerations
When converting Spotify to WAV, it’s important to understand the legal landscape:
Personal Use Guidelines: – Converting Spotify tracks to WAV for personal, private use generally falls under fair use – Distribution, sharing, or commercial use of converted files is not permitted and violates copyright law – Always maintain a valid Spotify subscription if you continue to use their service
Ethical Approaches: – Use conversion tools for personal enjoyment only – Continue supporting artists through Spotify subscriptions, merchandise purchases, or concert attendance – Consider purchasing music directly from artists when possible
Quality Optimization
To get the best results when converting Spotify to WAV:
Source Quality Considerations: – Use Spotify Premium for the highest quality source (320kbps) – Set Spotify’s quality settings to “Very High” in the app preferences – Ensure other applications aren’t degrading system audio during recording
Recording/Conversion Settings for Optimal Results: – For standard quality, use 16-bit/44.1kHz WAV (CD quality) – For high resolution, consider 24-bit/96kHz if your converter supports it – Disable any audio enhancements or equalizers during recording
Avoiding Common Quality-Reducing Mistakes: – Don’t record at system volume levels that are too high (causing distortion) or too low (increasing noise) – Avoid wireless Bluetooth connections during recording (which add compression) – Close unnecessary applications that might interrupt audio
Audio Enhancement Options: Post-processing can sometimes improve converted files: – Light noise reduction if background hiss is present – Normalization to standardize volume across tracks – Avoid excessive processing that might degrade the audio
Troubleshooting Common Issues
Conversion Problems:
– Failed Conversions: Ensure Spotify and your converter are both updated to the latest versions
– Metadata Issues: Use software that properly preserves tags, or manually edit tags with a tool like Mp3tag
– DRM-Related Challenges: Some content may be more heavily protected; try alternative methods if one fails
Playback Issues:
– Compatibility Problems: If a device won’t play your WAV files, check if it supports the specific bit depth and sample rate
– Fixing Corrupted WAV Files: Tools like Audacity can sometimes repair corrupted files by importing and re-exporting
– Managing Large File Limitations: If size is an issue, consider using FLAC instead of WAV (lossless but smaller)
FAQs
Can Free Spotify Users Convert to WAV?
Yes—free accounts (max 160 kbps) can convert to WAV, but output won’t exceed the streamed quality. All methods work, though Premium (320 kbps) yields better-sounding files.
Does Conversion Affect Sound Quality?
WAV preserves whatever Spotify delivers—it never boosts quality. Recording methods mirror your playback quality; direct rips match Spotify’s top bitrate.
Is It Legal?
Personal-use conversions are generally tolerated; sharing or commercial use is prohibited. Backing up for private listening aligns with fair use.
WAV vs. FLAC
- Size: FLAC ≈50–60% smaller
- Compression: WAV uncompressed; FLAC lossless
- Metadata: FLAC better tagging
- Compatibility: WAV more universal
- Quality: Identical at same specs
Conclusion
Converting Spotify to WAV provides premium audio quality and freedom from streaming limitations. Cinch Audio Recorder stands out with its high-quality output, user-friendly interface, and automatic metadata detection.
When selecting a conversion method, consider your specific needs and storage constraints. WAV conversion enables CD burning, track editing, and building a high-quality music archive independent of internet connection or subscriptions. By following best practices outlined in this guide, you can enjoy your favorite music in WAV format while respecting artists’ rights.