In This Article:
Cinch Audio Recorder automatically records and identifies music playing on your Windows computer. It captures high-quality audio (24bit/48khz) from streaming services then automatically tags tracks with song information, artist names, and album art.
Program Installation
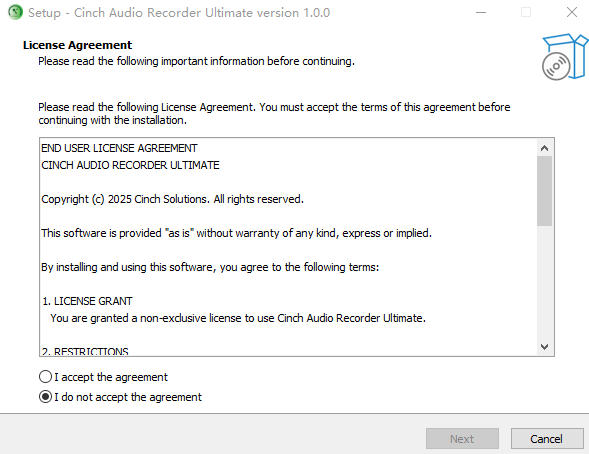
Once you’ve downloaded Cinch Audio Recorder Ultimate from our official website, simply double-click the CinchAudioRecorderUltimate .exe file to start the installation.
![]()
Then, just follow the on-screen instructions and click “Next” to complete the setup.
System Requirements
- Windows 10/11 (64-bit)
- Internet connection (for recognition and metadata)
- Disk space for recordings
First Launch Setup

Recording Your First Track
- Click the red “Recording button” in Record tab
- Play music from any source
- Cinch automatically starts recording when music plays
- Recording stops when silence detected or get inform from music player
- Track appears in Library tab with metadata and cover art
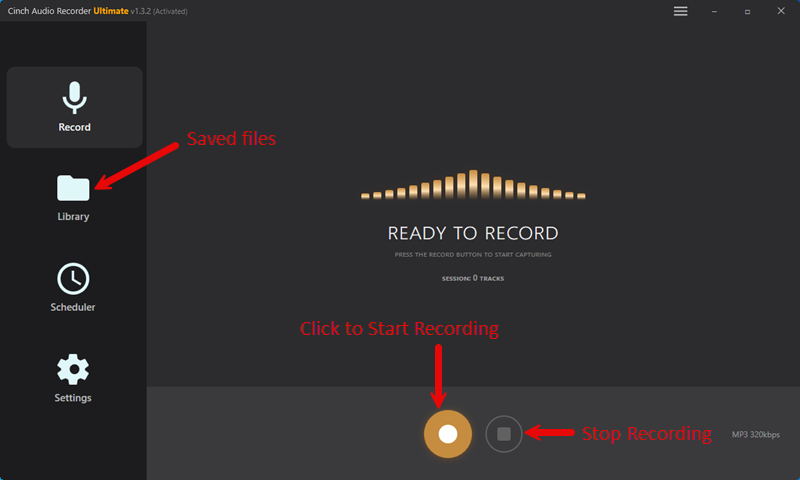
💡 Pro Tip: Leave Cinch running in background – it only records when music plays!
Scheduled Recording
Never miss a live radio show or a scheduled broadcast. The **Scheduled Recording** feature allows Cinch to automatically start and stop recording at specific times, even when you are away from the computer.

How to Set a Timer
- Click the “Scheduled” tab on the left sidebar (Clock icon).
- Click the “Add Task” button.
- Start Time: Enter the time to start recording (Format: HH:mm, e.g.,
14:30). - Duration: Enter how long to record in minutes (e.g.,
60). - Click OK to save the task.
Managing Tasks
The task list shows all your scheduled recordings.
- Enable/Disable: Use the toggle switch to activate or pause a task without deleting it.
- Delete: Right-click a task and select “Delete” to remove it.
- Status: Shows countdown or “Running” status.
⚠️ Important Requirement: Your computer must be turned on and awake at the scheduled time. Cinch cannot wake up your computer from Sleep/Hibernate mode. Please disable sleep mode in Windows Power Settings if you plan to record while away.
Song Recognition
Cinch uses advanced audio fingerprinting technology to automatically identify your recorded music. This feature works even when the music player doesn’t provide track information.
How It Works
- After a song finishes recording, Cinch analyzes the audio waveform
- A unique “audio fingerprint” is generated from the recording
- The fingerprint is matched against a database of millions of songs
- If matched, the song title, artist, album, and cover art are automatically filled in
Recognition Modes
- Automatic: Songs are identified immediately after recording (default)
- Manual: Right-click a track in Library → “Re-Identify” to trigger recognition
Tips for Better Recognition
- Recording Quality: Higher quality recordings (24-bit/48kHz) improve recognition accuracy
- Minimum Duration: Songs shorter than 10 seconds may not be recognized
- Clean Audio: Avoid recording with background noise or voice-overs
- Internet Required: Recognition requires an active internet connection
When Recognition Fails
If a song shows as “Unknown” or “Track 1, Track 2…”:
- Rare/Indie Music: Very obscure tracks may not be in the database
- Live Performances: Live versions often differ from studio recordings
- Remixes/Mashups: Modified versions may not match original fingerprints
- Network Issues: Check your firewall/antivirus settings (see Troubleshooting section)
💡 Pro Tip: You can always manually edit track information by right-clicking → “Edit Info” in the Library!
Lyrics Recognition
Cinch can automatically fetch song lyrics from online databases. Once a song is identified, lyrics are downloaded and embedded into the audio file.
Lyrics Sources
Cinch searches multiple online lyrics databases to maximize coverage, including sources optimized for both international and Asian music.
Lyrics Types
- Synced Lyrics (LRC): Time-stamped lyrics that scroll in sync with the music. Perfect for karaoke-style display.
- Plain Lyrics: Standard text lyrics without timestamps. Used when synced lyrics are not available.
How to View Lyrics
- Select a track in your Library
- Click the Lyrics button (🎤 icon) in the player bar, or right-click → “View Lyrics”
- A lyrics window will open showing the song’s lyrics
How to Refresh Lyrics
If lyrics are missing or incorrect:
- Right-click on the track in your Library
- Select “Refresh Lyrics”
- Cinch will search online databases again for updated lyrics
Requirements
- Song must be identified: Artist and Title information is required to search for lyrics
- Internet connection: Lyrics are fetched from online databases
💡 Pro Tip: Lyrics are embedded directly into your audio files (MP3/M4A), so they will display in most music players that support embedded lyrics!
Library Management

Features:
- 🔍 Search – Type to filter by title, artist, or album
- 🗂️ Sort – Click column headers (Date, Title, Artist, Duration)
- ▶️ Play – Double-click to play with built-in player
- 📝 Edit – Right-click → Edit Info to modify metadata
- 🗑️ Delete – Remove unwanted tracks
- 🔄 Re-Identify – Try recognition again
Track Status:
- 🔄 Pending – Recognition in progress
- ✅ Success – Fully identified with metadata
- ❌ Failed – Recognition failed (can re-try or edit manually)
- 🎵 Recording – Currently being recorded
Bulk Operations:
- Select multiple tracks (Ctrl+Click or Shift+Click)
- Right-click → Delete multiple at once
Quick Actions
🧹 Clean Short Audio
Quickly remove unwanted short recordings (ads, noise, test recordings). Click the Clean button (🧹 icon) in the top-right corner of the Library. Set minimum duration (e.g., 30 seconds), and Cinch will delete all recordings shorter than that threshold. Perfect for cleaning up after long recording sessions.
� Open Folder
Right-click any track → “Open Folder” to locate the file in Windows Explorer. Useful for copying files, checking disk usage, or manual file management.
🗑️ Remove vs Delete
- Remove from List: Removes track from Cinch library but keeps the file on disk
- Delete: Removes track from library AND deletes the file permanently
� Tip: Use “Remove from List” if you want to manage files externally but keep the recordings.
📥 Import / Rescan
Menu → Import / Rescan to add external audio files to your library. Cinch will scan the selected folder, import compatible audio files (MP3, M4A, FLAC, OGG, WAV), and attempt to recognize them. Also use this to rescan your recording folder after manual file operations.
🔗 Track Merge
Sometimes a single song may be split into multiple fragments due to buffering, network issues, or brief audio interruptions. Cinch provides both automatic and manual merge features to combine these fragments back into one complete track.
Auto Merge (Traditional Mode Only)
When recording in Traditional mode (SMTC disabled), Cinch automatically detects and merges consecutive fragments of the same song after successful recognition.
How it works:
- After a track is identified, Cinch checks if nearby tracks have the same Artist + Title
- Fragments recorded within 30 seconds of each other are considered candidates
- Each fragment must be under 7 minutes to qualify for auto-merge
- Merged tracks combine audio seamlessly and inherit the best metadata
💡 Note: Auto-merge only works in Traditional recording mode. SMTC mode typically doesn’t produce fragments since track boundaries are detected precisely.
Manual Merge
You can manually merge any selected tracks in your library:
- Select multiple tracks (Ctrl+Click or Shift+Click)
- Right-click → “Merge Selected”
- Tracks are combined in the order they appear in the list
- The merged file uses metadata from the first selected track
Use cases:
- Combining a song that was accidentally split
- Merging live performance segments
- Creating DJ mixes or medleys from multiple tracks
⚠️ Important: Manual merge creates a new file. Original files are preserved until you delete them.
Built-in Player
The integrated audio player appears at the bottom of the interface when you play a track.
Playback Controls
- ▶️ Play/Pause: Click play button or double-click any track
- ⏮ Previous: Play previous track in list
- ⏭ Next: Play next track in list
- 🔊 Volume: Adjust playback volume with slider
- ⏱️ Progress Bar: Drag to skip to any position
Keyboard Shortcuts: Space = Play/Pause | Arrow keys = Seek
💡 Tip: Player shows current track title, artist, and cover art with real-time progress.
📱 Ringtone Maker
Turn your favorite recordings into custom ringtones for your phone. Cinch includes a built-in audio cutter that makes it easy to select the perfect chorus or beat.
How to Create a Ringtone
- Go to your Library.
- Right-click on the song you want to use.
- Select “Make Ringtone” from the menu.
- In the Ringtone window:
- Play/Preview: Listen to find the exact part you want.
- Set Start/End: Enter the time codes (e.g.,
0:45to1:15) to crop the audio. - Format: Choose the output format:
- M4R: For iPhone/iOS (required).
- MP3: For Android and most other phones.
- Click “Export” to save your new ringtone.
💡 Tip: Ringtones are saved in a dedicated
Ringtonesfolder inside your recording directory for easy access.
Batch Metadata Editing
The Batch Metadata Editing feature allows you to quickly update metadata (artist, album, cover art, year, genre) for multiple songs at once. This is especially useful when managing compilations, soundtracks, or collections where many tracks share the same album or artist information.
✨ Key Features
- Copy & Paste Metadata: Copy metadata from one song and apply it to multiple others
- Batch Edit Dialog: Edit multiple songs with custom values in one operation
- Selective Field Update: Choose exactly which fields to update (Artist, Album, Cover Art, Year, Genre)
- Smart File Renaming: Automatically renames files based on updated metadata
- Cover Art Support: Handles local files, network URLs, and temporary file paths
🎯 Common Use Cases
| Scenario | Solution |
|---|---|
| Album Compilation | All tracks share the same album name and cover art |
| Artist Collection | Multiple songs from the same artist |
| Soundtrack Cleanup | Apply consistent metadata to movie/game soundtracks |
| Year/Genre Tagging | Add missing year or genre information to a group of songs |
Method 1: Copy & Paste Metadata
Best for: Copying complete metadata from one song to others

Steps:
- Select the source song (the one with correct metadata)
- Right-click on the song in your library
- Copy metadata
- Select “Copy Metadata” from the context menu
- You’ll see a confirmation message in the status bar
- Select target songs
- Hold
Ctrland click to select multiple songs - Or hold
Shiftto select a range of songs
- Hold
- Paste metadata
- Right-click on any selected song
- Select “Paste Metadata”
- Choose fields to apply
- A dialog will appear showing the copied metadata
- Check the fields you want to update
- Uncheck the fields you want to keep unchanged
- Apply changes
- Click “Apply”
- A progress dialog will show the update status
- Wait for completion
Method 2: Direct Batch Edit
Best for: Entering new custom values for multiple songs
Steps:
- Select multiple songs
- Hold
Ctrland click to select specific songs - Or hold
Shiftto select a range - Or press
Ctrl+Ato select all
- Hold
- Open Batch Edit dialog
- Right-click on any selected song
- Select “Batch Edit”
- Enter new values
- Check the checkbox next to each field you want to update
- Enter the new value in the text box
- Leave unchecked fields empty if you don’t want to change them
- Add cover art (optional)
- Check the “Cover Art” checkbox
- Click the “…” button to browse for an image
- Supported formats: JPG, PNG, BMP, WEBP
- Apply changes
- Click “Apply”
- Confirm any warnings about cover art location
- Wait for the batch update to complete
⚠️ Important Notes
Before Batch Editing:
- Stop playback if you’re playing one of the selected songs
- Backup important files if you’re unsure about the changes
- Check file permissions – ensure files are not locked by other programs
During Batch Editing:
- Don’t close Cinch while batch editing is in progress
- Progress dialog will show real-time status
- Partial failures won’t affect successful updates (each song is independent)
After Batch Editing:
- Review results – check the success/failure summary
- Check the log if any songs failed to update
- Library refreshes automatically to show updated metadata
🎨 Field Order in Dialog
The Batch Edit dialog fields are arranged in order of importance:
- Artist ✓ (checked by default)
- Album ✓ (checked by default)
- Cover Art (unchecked by default)
- Year (unchecked by default)
- Genre (unchecked by default)
Tip: Fields checked by default are the most commonly edited fields.
🖼️ Cover Art Handling
Supported Cover Art Sources:
| Source Type | Description | Behavior |
|---|---|---|
| Local File | Image on your computer | Directly embedded in tags |
| Network URL | HTTP/HTTPS link | Downloaded automatically during update |
| Temporary File | File in temp folder | You’ll be prompted to copy to a safe location |
Cover Art Recommendations:
- ✅ Recommended format: JPG or PNG
- ✅ Recommended size: 500×500 to 1000×1000 pixels
- ✅ Square images work best for album art
- ⚠️ Avoid very large files (>5MB) to keep tags small
📊 Performance Notes
- Small batches (1-10 songs): Instant update
- Medium batches (10-50 songs): ~2-5 seconds
- Large batches (50-200 songs): ~10-30 seconds
- Very large batches (200+ songs): May take 1-2 minutes
Note: Network cover art downloads will add extra time depending on image size and internet speed.
🔒 Data Safety
What Batch Editing Updates:
✅ Database metadata (shown in Cinch library)
✅ File ID3 tags (embedded in audio files)
✅ Cover art (embedded in supported formats)
✅ Filenames (if pattern includes metadata)
What Batch Editing Preserves:
✅ Audio data (original recording quality)
✅ File timestamps (except when renaming)
✅ Unselected metadata fields (only checked fields are updated)
Filename Pattern
Customize how Cinch names your recorded files using metadata placeholders. When you edit song information, files are automatically renamed to match.
Available Placeholders
%Artist%→ Artist name (e.g., “BLACKPINK”)%Album%→ Album name (e.g., “Born Pink”)%Title%→ Song title (e.g., “Shut Down”)%Year%→ Release year (e.g., “2022”)%Genre%→ Music genre (e.g., “K-Pop”)
Pattern Examples
| Pattern | Result |
|---|---|
%Artist% - %Title% |
BLACKPINK - Shut Down.mp3 |
%Artist% - %Album% - %Title% |
BLACKPINK - Born Pink - Shut Down.mp3 |
%Artist%\%Album%\%Title% |
BLACKPINK\Born Pink\Shut Down.mp3 (with folders) |
How to Change
- Settings → File Naming
- Enter your pattern (e.g.,
%Artist% - %Title%) - Click Save
New recordings and edited files will use the new pattern.
💡 Pattern Tips
✅ Most popular: %Artist% - %Title% (simple and clean)
✅ For large libraries: %Artist% - %Album% - %Title% (better organization)
✅ Auto folder creation: Use \ to create folders (e.g., %Artist%\%Title%)
⚠️ Special characters: Automatically replaced with _ (e.g., AC/DC → AC_DC)
Album Art Management
Features:
- High-resolution (500×500+)
- Embedded in audio file
- Saved separately in Covers folder
- Automatic retry if download fails
Manual Cover Change:
- Right-click track → “Change Cover”
- Select image from computer
- Cover embedded and updated
Settings & Configuration
Access settings through the hamburger menu (☰) in the top-right corner.
Recording Settings
Recording Device
Select which **playback device’s audio output** Cinch will capture.
- Auto (Default): Cinch follows your Windows default playback device. If you switch your system output to Bluetooth headphones, Cinch will record from there too.
- Specific Device: Lock Cinch to record from a specific device (e.g., “Speakers (Realtek)”), regardless of your current Windows default.
⚠️ Important Clarification:
This setting chooses which device’s mix to record from—it does NOT select which apps to record.What controls which apps are recorded?
- Windows Volume Mixer: Mute apps you don’t want recorded
- Windows App Volume Settings: Route specific apps to different output devices (Settings → System → Sound → App volume and device preferences)
If all your apps play through the same device, changing this setting will have no visible effect.
Note: Cinch’s Recording Device setting overrides whatever is shown in Windows Volume Mixer. Always trust Cinch’s setting as the source of truth for which device is being recorded.
When is this setting useful?
- You have multiple audio devices (built-in speakers, USB DAC, Bluetooth headphones)
- You want to record from one device while listening on another
- You use a virtual audio cable (e.g., VB-Audio Cable) to isolate recording sources
Example Setup:
- In Windows Settings → Sound → App volume preferences, set Spotify to output to “Speakers (Realtek)”
- Set your browser to output to “Bluetooth Headphones”
- In Cinch, set Recording Device to “Speakers (Realtek)”
- Result: Cinch only records Spotify; browser audio goes to your headphones and is not recorded
Recording Quality
- Bitrate: 128-320 kbps for MP3 | 256 kbps for AAC
- Sample Rate: 44.1 kHz (standard) or 48 kHz (high quality)
- Bit Depth: 16-bit or 24-bit (24-bit recommended)
- Format: MP3 (universal), AAC (smaller), FLAC (lossless)
💡 Critical System Setting:
To get true high-quality recordings, you must set your Windows Default Format to 24-bit, 48000 Hz (Studio Quality).How to set: Right-click Sound Icon → Sound Settings → More sound settings → Playback tab → Right-click your Device → Properties → Advanced → Default Format.
Output Settings
- Output Folder: Where recordings are saved (default: Music\Cinch Recordings)
- Keep WAV: Save lossless WAV copy alongside compressed file
- Filename Pattern: Customize using metadata placeholders (see Filename Pattern section)
Detection Behavior
- Min Song Duration: Ignore recordings shorter than this (default: 60s)
- Discard Short: Auto-delete recordings shorter than threshold (default: 5s)
- Silence Threshold: Audio level considered silence (0.001-0.1, default: 0.01) – Traditional mode only
- Silence Duration: How long silence before stopping (1-10s, default: 3s) – ⚠️ Ignored in SMTC mode
- Enable SMTC: Use System Media Transport Controls for instant metadata
- Auto-Identify: Automatically recognize songs using fingerprinting
⚠️ Note: When SMTC is enabled, silence detection settings are ignored. See SMTC Protection Mechanism for details.
Language
Menu → Language → Select English or 中文. Restart required for full translation.
Supported Audio Formats
Recording Output: MP3, AAC (M4A), FLAC
Import/Playback: MP3, M4A, FLAC, OGG, WAV
Detection Settings
SMTC Metadata (Recommended!)
What is SMTC? System Media Transport Controls – Windows feature allowing apps to share “Now Playing” info.
Benefits:
- ⚡ Instant identification (no waiting)
- 🎯 100% accurate (no misidentification)
- 📸 Original cover art from player
Supported Players:
- All popular music players
Setup:
- Settings → Check “Enable SMTC Metadata”
- Use Edge or Chrome browser for best compatibility
- That’s it!
⚠️ Important: SMTC Protection Mechanism
When SMTC mode is enabled, Cinch uses the music player’s track change signal (not silence detection) to separate songs. This means:
- Silence Duration setting is ignored – Your configured “Silence Duration” (e.g., 3s, 5s) won’t affect recording in SMTC mode
- 15-second minimum protection – Each recording is guaranteed at least 15 seconds before auto-stopping, preventing accidental cuts on short intros or buffering
- Track changes detected instantly – Cinch starts a new file when the player switches to the next song
Why? SMTC mode trusts the music player to know when tracks change, making silence detection unnecessary and preventing false splits during quiet song passages.
If you need precise silence-based cutting: Disable SMTC and use traditional mode, where your Silence Duration setting will work as expected.
💡 Pro Tip: Use Spotify web player with SMTC = unlimited free perfect metadata!
Detection Settings Table
| Setting | Default | Range | Purpose |
|---|---|---|---|
| Min Song Duration | 60s | 10-300s | Only record tracks longer than this |
| Discard Short | 5s | 1-60s | Auto-delete recordings shorter than this |
| Silence Threshold | 0.01 | 0.001-0.1 | Audio level considered silence |
| Silence Duration | 3s | 1-10s | Silence length before stopping |
Preset Modes
- Quality – Focus on full albums (90s min, very sensitive)
- Traditional – Balanced for streaming (5s min)
- Fast – Capture everything (10s min)
� Ad Removal / Filtering
Cinch can automatically filter out commercials and system sounds based on their length. Most ads are short (15s – 30s), while songs are usually longer.
How to set it up:
- Go to Settings.
- Set “Min Song Duration” to 45s or 60s.
- Any recording shorter than this time will be automatically discarded.
💡 Tip: If you record classical music or short interludes, lower this setting to 15s. For radio recording with lots of talk, keep it higher (60s+).
📂 Importing Existing Audio Files
Cinch is not just for recording; it can also identify and tag your existing music collection! You can import MP3 or WAV files from your hard drive, and Cinch will use its powerful fingerprinting technology to find the correct Title, Artist, Album, and Cover Art.
How to Import
- Click the Menu (≡) button in the top-right corner.
- Select “Import Files…”.
- Choose the audio files (MP3/WAV) you want to import. You can select multiple files at once.
- Cinch will add them to the list and immediately start the auto-identification process.
Supported Formats
- Input: MP3, WAV, FLAC, M4A (AAC)
- Processing: Files are analyzed but NOT modified/moved until you choose to save or edit them.
💡 Note: This feature consumes license credits (if in trial mode) or server requests just like recording a new song. Ensure you have a stable internet connection.
Tips & Tricks
Save Space:
- Use MP3 192 kbps (50% smaller than 320)
- Disable “Save Lossless WAV”
- Clean up failed/duplicate tracks regularly
- Set higher Min Song Duration
Disk Usage:
- MP3 320 kbps: ~2.4 MB/min
- MP3 192 kbps: ~1.4 MB/min
- AAC 256 kbps: ~1.9 MB/min
- WAV: ~10 MB/min
⚡ Performance Tips
For Large Libraries (1000+ tracks):
- Use search instead of scrolling
- Clean up duplicates regularly
- Delete failed attempts
Reduce CPU Usage:
- Wait for recognition to finish before starting more
- Close unnecessary browser tabs
- Lower bitrate if computer slow
License Activation
How to Activate
First-Time Activation
- Launch Cinch Audio Recorder
- If trial mode, you’ll see an Activation dialog automatically
- Or click Menu → Purchase to open activation window
- Enter your License Key (received via email after purchase)
- Click “Activate” and wait for server verification
- Success! Unlimited recordings unlocked
Check Activation Status
Menu → About shows your license status: Trial (X recordings left) or Activated (Unlimited).
Reactivation After Hardware Change
If you upgrade CPU, motherboard, or reinstall Windows:
- Open Cinch (will show “Hardware changes detected”)
- Re-enter your License Key
- Click “Reactivate”
If reactivation fails, contact support with your order email.
Trial Mode
- Free trial: Limited number of recordings (varies by promotion)
- Consumption: Each saved song = 1 trial recording
- When expired: Recording stops after a few seconds; purchase license to continue
💡 Tip: Keep your license key email safe for future reactivations.
💡 General Pro Tips
Tip 1: Prevent cover art issues during long recording sessions
- Disable computer sleep: Settings → Power → Never sleep
- Or use a “keep awake” utility
- Ensure stable internet connection
Tip 2: Organize by album before batch editing
- Use filter/search to group songs
- Select all songs from same album
- Use “Batch Edit” to fix metadata at once
Tip 3: Backup your library
- Periodically copy the entire “Cinch Recordings” folder
- Include the database file if accessible
- Backup cover art cache if you’ve customized many covers
Tip 4: Use SMTC mode for best accuracy
- Enable SMTC in Settings (default: ON)
- Works with all popular music player
- Provides instant metadata without fingerprinting
Tip 5: Clean up regularly
- Delete unwanted recordings (ads, duplicates)@
- “Batch Edit” to fix incomplete metadata
- Keep library organized by artist/album
❓ Troubleshooting & FAQ
🎙️ Recording Questions
Q: Why is the beginning of my recording cut off (missing ~1 second)?
A: This typically happens with songs that have a soft intro (fade-in). Cinch has a built-in silence detection to avoid recording blank audio.
Solution:
- If you’re using SMTC mode (System Media Transport Controls), this should be automatically fixed in version 1.1.0+
- For manual recording mode, you may need to start recording slightly earlier
- Adjust the silence threshold in Settings if it’s too sensitive
Q: Can I record without an internet connection?
A: Yes, you can!
- Recording: Works perfectly offline.
- Metadata: Automatic song recognition requires internet. Offline recordings will be saved as “Track 1”, “Track 2”, etc.
- Post-Processing: You can record offline now, and then use “Right-click -> Refresh Song Info” later when you are online to get the tags.
Q: Why is recognition rate low when using browser-based music services?
A: Browser-based music services (Amazon Music Web, YouTube Music, etc.) may have lower recognition rates due to browser throttling background tabs.
Best Practices for Browser Music:
- Keep the music tab in the foreground – Don’t switch to other tabs while recording
- Don’t minimize the browser window – Browsers limit background tab activity to save power
- Enable “Prevent Sleep” in Settings – Go to Settings → Advanced → Enable “Prevent Sleep” to keep screen on during recording
- Use desktop apps when possible – Spotify, Amazon Music, and Apple Music desktop apps provide better recognition than browser versions
Q: Recording stops unexpectedly
Possible Causes:
- Trial limit reached – Check if you’ve used all your trial recordings
- Low disk space – Ensure you have at least 500MB free space
- Audio driver issue – Try restarting the application
- System sleep/hibernate – Disable power saving during recording, or enable “Prevent Sleep” in Settings → Advanced
Solution:
- Check the log file for error messages
- Ensure your audio device is properly connected
- Verify you have sufficient disk space
Q: Too many short files (10s – 30s) are recorded
Cause:
- Recording ads or system sounds
- Internet buffering/lag causing silence gaps
- “Min Song Duration” setting is too low
Solution:
- Increase “Min Song Duration” in Settings (default: 45s)
- Check “Ad Filter” settings
Q: Recording sounds muffled, flat, or low quality
Symptoms:
- Recordings sound “muted” or “flat” compared to the original
- Audio quality is noticeably worse than the source
- You’ve already set Windows to 48kHz but the problem persists
Cause: Windows Audio Enhancements (also called “Device Default Effects”) are interfering with the recording. These features add audio processing (bass boost, virtual surround, room correction) that degrades recording quality, especially at 48kHz.
Solution:
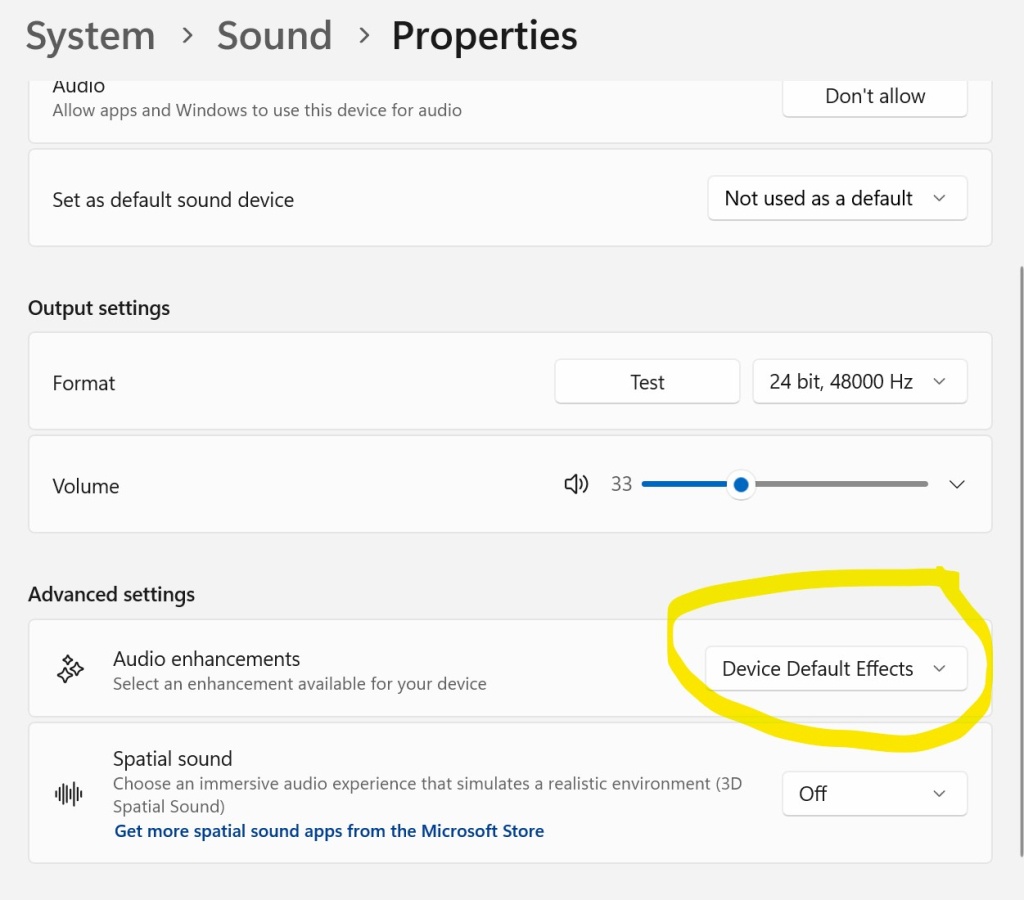
- Right-click the Speaker icon in your Windows taskbar
- Select “Sound Settings” (or “Sounds”)
- Click “More sound settings” (or go to “Device Properties”)
- Right-click your default Playback Device (Speakers/Headphones) → “Properties”
- Go to the “Enhancements” tab (or “Advanced” tab in Windows 11)
- Find “Audio Enhancements” or “Device Default Effects”
- Turn it OFF (uncheck all enhancements or select “Disable all enhancements”)
- Click “Apply” and “OK”
- Restart Cinch and try recording again
💡 Why this works: When you disable audio enhancements, Cinch can capture the pure, unprocessed audio stream directly from your sound card—which is exactly what you want for high-quality recordings.
Alternative fix (if the above doesn’t help):
- Try changing your Recording Device in Cinch settings to a different loopback device (e.g., “Stereo Mix” if available)
- Check if your sound card has its own audio enhancement software (e.g., Realtek Audio Console, Nahimic, Dolby Atmos) and disable those effects as well
🖼️ Cover Art Questions
Q: Cover art missing when using Web Players
Cause: Browser “Efficiency Mode” or “Sleeping Tabs” stops loading images in the background.
Solution:
- Edge: Settings -> System -> Turn off “Efficiency mode”.
- Chrome: Settings -> Performance -> Turn off “Memory Saver”.
- Or use the desktop app version.
Q: Why didn’t my song get cover art?
There are several reasons why cover art might fail to download:
Reason 1: Computer was in sleep/standby mode ⭐ Most Common
Symptoms:
- Song recorded successfully but has no cover art
- Previous songs have covers, but one or two are missing
- Usually happens after you wake up the computer
Solution:
- Prevent sleep during recording:
- Windows Settings → Power & Sleep → “Never” during AC power
- Or use “Keep computer awake” apps
- Manual fix after recording:
- Right-click the song → “Refresh Cover Art Only”
- System is fully awake, cover will download successfully
Reason 2: Network connectivity issues
Symptoms:
- Multiple songs missing covers (not just one)
- Happens consistently
Solution:
- Check your internet connection
- Disable VPN temporarily (some VPNs block API requests)
- Check firewall settings
- Try “Refresh Cover Art Only” when connection is stable
Reason 3: Music streaming service didn’t provide cover
Symptoms:
- Specific songs always missing covers
- Usually ads, trailers, or user-uploaded content
Why:
- Some content doesn’t have official cover art in databases
- Ads and promotional content rarely have covers
- User-uploaded content may lack metadata
Solution:
- Use “Batch Edit” to manually add cover art
- Or right-click → “Edit Song Metadata” → Browse for image
Reason 4: API rate limiting or service downtime
Symptoms:
- Many songs in a short time period missing covers
- Usually temporary
Solution:
- Wait a few minutes and try “Refresh Cover Art Only”
- Cinch automatically handles this, but extreme cases may fail
Q: How can I manually add cover art?
Method 1: Single song
- Right-click the song → “Edit Song Metadata”
- Click the cover art area
- Browse and select an image file
- Click “Save”
Method 2: Multiple songs (batch edit)
- Select multiple songs (Ctrl+Click or Shift+Click)
- Right-click → “Batch Edit”
- Check “Cover Art” checkbox
- Click “…” button to browse for image
- Click “Apply”
Recommended image specs:
- Format: JPG or PNG
- Size: 500×500 to 1000×1000 pixels
- Square images work best
Q: Cover art is low quality or pixelated
Cause: The source (SMTC, MusicBrainz, iTunes) provided a low-resolution image.
Solution:
- Try “Refresh Cover Art Only” – may find better quality
- Manually add high-quality cover art:
- Search on Google Images (filter by size: >500×500)
- Download from official artist websites
- Use album art from music services
- Use “Batch Edit” to apply to multiple songs
🎵 Metadata & Recognition Questions
Q: Song title shows as “Track 2780” instead of real name
Cause: Auto-identification failed (SMTC metadata not available, or fingerprint matching failed).
Solution:
- Right-click → “Refresh Song Info” (auto-identify again)
- If that fails, manually edit:
- Right-click → “Edit Song Metadata”
- Enter correct Title, Artist, Album
- Click “Save”
Q: Artist or album information is incorrect
Cause: Auto-identification matched the wrong song in the database.
Solution:
- Right-click → “Edit Song Metadata”
- Correct the information manually
- Click “Save”
- Files will be automatically renamed if your filename pattern includes metadata
Q: All songs from an album have different album names
Cause: Database inconsistencies (MusicBrainz may have multiple album versions).
Solution – Use Batch Edit:
- Select all songs from the same album (Ctrl+Click)
- Right-click → “Batch Edit”
- Check “Album” checkbox
- Enter the correct album name
- Optionally add cover art
- Click “Apply”
📁 File Management Questions
Q: Where are my recordings saved?
Default location:
C:\Users\[YourName]\Music\Cinch Recordings\
WAV files (lossless):
C:\Users\[YourName]\Music\Cinch Recordings\WAV\
Cover art cache:
C:\Users\[YourName]\AppData\Roaming\CinchAudioRecorderUltimate\Covers\
Change save location:
- Settings → Recording → “Output Folder”
Q: Why did my file get renamed unexpectedly?
Cause: Your filename pattern includes metadata placeholders (%Artist%, %Album%, etc.), and you edited the metadata.
Example:
- Original filename:
BLACKPINK - JUMP - JUMP.mp3 - You changed Artist to “BLACKPINK & Taeyang”
- New filename:
BLACKPINK & Taeyang - JUMP - JUMP.mp3
This is normal behavior to keep filenames synchronized with metadata.
If you don’t want auto-renaming:
- Change your filename pattern to exclude metadata placeholders
- Or use a static pattern like
recording_%timestamp%
Q: Are WAV and MP3 files synchronized?
Yes! If you have “Keep WAV” enabled:
- When MP3 is renamed, WAV is renamed too
- When MP3 is deleted, WAV can optionally be deleted
- Both files stay synchronized
⚡ Performance & System Questions
Q: Cinch is using too much CPU/memory
Possible Causes:
- Too many songs in library (>1000) – Consider archiving old recordings
- Large cover art files – Clean up unused covers in AppData
- Background enrichment – Wait for auto-identification to complete
Solutions:
- Close other applications during recording
- Disable “Auto-identify” for ads/short audio
- Clean up library regularly (delete unwanted recordings)
Q: Recording lag or choppy audio
Possible Causes:
- CPU overload
- Disk is full or slow (HDD vs SSD)
- Audio driver issues
Solutions:
- Close unnecessary applications
- Ensure sufficient disk space (>1GB free)
- Update audio drivers
- Lower recording quality if needed (Settings → Quality)
Q: Right-click menu appears in wrong location (top-left corner)
Cause: WPF DataGrid virtualization issue when scrolling quickly.
Solution: This has been fixed in version 1.1.0+. Update to the latest version.
🔐 License & Activation Questions
Q: My trial recordings ran out
Trial limits:
- Free trial: Limited number of recordings
- Each saved song consumes 1 trial recording
Solution:
- Purchase a license for unlimited recordings
- Visit: https://www.cinchsolution.com
Q: Activation failed or license deactivated
Possible Causes:
- Hardware change – CPU, motherboard, or Windows reinstall
- Network issues – Cannot reach activation server
- Invalid license key
Solutions:
- Check internet connection
- Re-enter license key (copy-paste to avoid typos)
- Contact support if hardware changed legitimately
- Check spam folder for activation email
Q: “Hardware changes detected” error
Cause: Major hardware change (CPU, motherboard, or Windows reinstall).
Why: License is tied to your hardware to prevent piracy.
Solution:
- Reactivate with your license key (usually works)
- If you legitimately upgraded hardware, contact support
General Debugging Steps
- Check the log file:
- Located in application folder or AppData
- Look for ERROR or WARN messages
- Share with support if needed
- Restart the application:
- Fixes many temporary issues
- Especially after system sleep/wake
- Update to latest version:
- Many bugs are fixed in newer versions
- Check for updates in Help menu
- Verify system requirements:
- Windows 10/11 (64-bit)
- .NET 8.0 Runtime
- Stable internet connection
- At least 500MB free disk space
- Contact support:
- Include log file and screenshots
- Describe exact steps to reproduce issue
🌐 Troubleshooting: Network & Recognition Issues
Issue: “Identification Failed” or “Unknown Track”
If Cinch consistently fails to identify songs (and shows “Track 1”, “Track 2″…), it is usually due to network blockage. Cinch relies on cloud services which require internet access.
Solution 1: Check Firewall / Antivirus
- Make sure
CinchAudioRecorder.exeis allowed in your Windows Firewall. - If you use 3rd-party antivirus (Norton, McAfee, Kaspersky), check if it blocked the connection.
- Test: Temporarily disable antivirus to see if recognition starts working.
Solution 2: VPN / Proxy Issues
- If you use a VPN, try disabling it, or ensure it’s set to “Global Mode” (not just browser plugin).
- If you are in a restricted network (Corporate/School), the recognition servers might be blocked.
Issue: “Network Timeout” or Slow Response
If the app feels sluggish or shows timeout errors:
- Check your internet stability.
- DNS: Try changing your PC’s DNS to Google (8.8.8.8) or Cloudflare (1.1.1.1).
Issue: Songs are not splitting (merged into one long file)
This happens when the music player blends songs together without any silence gap.
Solution 1: Enable SMTC Mode (Best Fix)
- Go to Cinch Settings and check “Enable SMTC Metadata”.
- SMTC uses the system’s “track change” signal to split files, so it works perfectly even with gapless music.
Solution 2: Disable Crossfade / Gapless (For Traditional Mode)
If you must use Traditional Mode (Silence Detection), you need to ensure there is actual silence between songs:
- Spotify: Settings → Playback → Turn OFF “Crossfade songs” and “Automix”.
- Apple Music / iTunes: Edit → Preferences → Playback → Uncheck “Crossfade Songs”.
- YouTube: Turn OFF “Autoplay” (sometimes helps) or use a playlist that has gaps.