

It’s Saturday morning. You’re finally tackling that music library cleanup you’ve been putting off for months. You open your music player and scroll through your collection. Artist names are correct. Album titles look good. But every third or fourth album shows the same gray generic icon where vibrant cover art should be.
You double-click a track expecting to see Pink Floyd’s Dark Side of the Moon prism, but instead, you get a gray box. The music plays fine. The metadata is there. But something’s missing.
Here’s the thing: your album art might not actually be embedded in the MP3 files themselves. Most music players cache artwork from various sources—sometimes from the internet, sometimes from a folder.jpg file sitting next to your tracks. But when you move those files to another device, sync them to your phone, or burn them to a CD, that artwork disappears. Poof. Gone.
The good news? You can fix this permanently. In about 30 minutes, you can have professional-looking artwork embedded directly into every MP3 file in your collection. And you’ll know exactly which method fits your situation.
Actually, let me rephrase that—you’ll have four different methods to choose from, depending on whether you’re on Windows, Mac, need batch processing, or just want a quick browser-based solution. No programming required. No command line. Just the right tool for your specific setup.
In This Article:
Quick Answer: What’s the Best Way to Add Album Art?
The fastest method depends entirely on your platform and collection size:
- Windows users: Download Mp3tag (free). It’s the industry standard for a reason. Five minutes of setup, then you can batch-edit hundreds of files at once.
- Mac users: Use MusicBrainz Picard (free, cross-platform). It automatically identifies your tracks and pulls artwork from online databases.
- Apple ecosystem: iTunes or Apple Music (if you’re already invested). Works natively but has limitations.
- Quick one-offs: Online tools like TagMP3 (no install, but requires uploading files).
Each method has trade-offs. Mp3tag is powerful but Windows-only. Picard requires a learning curve. iTunes is discontinued on Windows. Online tools raise privacy concerns. Choose based on your actual needs, not what some outdated blog from 2019 recommends.
What You’ll Need Before Starting
Before we dive into the step-by-step methods, gather these items:
Your image files:
- JPG or PNG format (JPG recommended for smaller file sizes)
- Square aspect ratio (this is non-negotiable for most players)
- Minimum 300×300 pixels, ideally 1000×1000 for modern HiDPI displays
- File size under 500KB per image (to keep your library from ballooning)
Think of it like this: each album cover image gets embedded directly into every MP3 file on that album. If you have a 5MB high-resolution PNG and an album with 12 tracks, you’re adding 60MB to your library just for artwork. Multiply that across your collection, and suddenly you’re out of storage space.
Your MP3 files:
- Backup your originals. Seriously. Batch editing is powerful but can make mistakes at scale.
- Ensure files aren’t read-only or locked by another program.
- Close your music player before editing (many lock files while running).
Your patience:
- Test with one file first before processing your entire library.
- Plan for 5-10 minutes of setup, then 1-2 minutes per album after that.
Reality Check
Before you start embedding artwork everywhere, understand what you’re actually doing:
- What users expect: Click “add artwork” and see it instantly in every player forever.
- What actually happens: Artwork gets embedded in the file, but some players cache old thumbnails, some don’t read certain formats, and mobile sync can strip metadata depending on your app.
- Practical implication: You’ll need to verify the embedding worked, clear player caches, and understand that iTunes/Apple Music sometimes behaves differently than third-party players.
One honest limit: if your music files are DRM-protected (purchased from iTunes pre-2009, or some streaming service downloads), these methods won’t work. You need DRM-free MP3s first.
Method 1: Add Album Art with Mp3tag (Windows)

Works well when: You want maximum control, need batch editing, or have a large library to process.
Falls short when: You’re on Mac (Windows only), or you want automatic track identification.
Mp3tag is the gold standard for Windows users. It’s free, actively maintained, and handles batch operations better than anything else. I’ve processed thousands of tracks with it, and the workflow becomes muscle memory after your first album.
Step 1: Download and Install Mp3tag
- Go to mp3tag.de (official site—avoid download aggregators)
- Download the installer for Windows 10/11
- Run the installer and accept the defaults
The installation takes about 30 seconds. No bloatware, no toolbars, just a clean, professional tool.
Step 2: Load Your MP3 Files
- Open Mp3tag
- Click File → Change directory (or press Ctrl+D)
- Navigate to your music folder
- Select the folder containing your MP3s
You’ll see a list of all tracks in the main window. Don’t worry if the columns look cramped—you can resize them by dragging the column headers.
Step 3: Add Artwork to a Single Track
- Click on any track in the list to select it
- Look at the panel on the left side
- You’ll see a box labeled “Cover”—right-click it
- Select Add cover…
- Browse to your album art image file
- Click Open
The cover appears in that box. But you’re not done yet.
Step 4: Save Your Changes
This is where most beginners trip up. Adding the image only loads it into Mp3tag’s memory. You must save to actually embed it in the file.
- Click the Save button (floppy disk icon, or press Ctrl+S)
- Wait for the “Saved” status to appear briefly at the bottom
Now check your file in Windows Explorer. Right-click it → Properties → Details. Scroll down. You should see “Album art” listed there with a thumbnail.
Step 5: Batch Add Artwork to Multiple Tracks
Here’s where Mp3tag shines. Let’s say you have an entire album that needs the same cover.
- Hold Ctrl and click each track you want to update (or press Ctrl+A to select all)
- Right-click the Cover box on the left
- Select Add cover…
- Choose your image file
- Click Save (this will apply to all selected tracks)
Pro tip: I usually test with one track first. After confirming it works, I select the whole album. This prevents mistakes at scale.
Method 2: Add Album Art with MusicBrainz Picard (Mac/Windows/Linux)
Works well when: You want automatic track identification, use multiple platforms, or prefer open-source software.
Falls short when: You need rapid batch operations (Picard is slower for large batches), or want minimal setup time.
MusicBrainz Picard uses audio fingerprinting to automatically identify your tracks. It compares your audio to a massive online database and fills in metadata—including artwork—automatically. It’s like Shazam, but for your entire library.
Step 1: Install Picard
- Visit picard.musicbrainz.org
- Download the version for your OS (Windows, macOS, or Linux)
- Install and launch
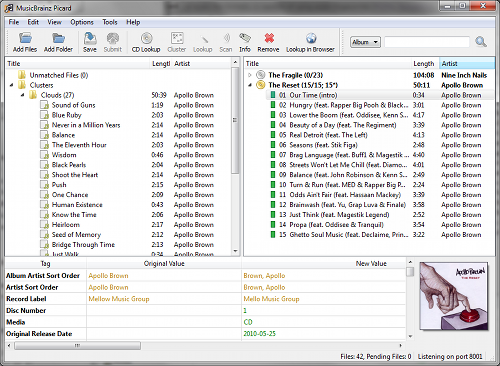
The interface looks different than Mp3tag—more complex, with panels on the left and right. Don’t be intimidated.
Step 2: Load Your Music
- Drag and drop your music folder into the left panel (called “Unmatched Files”)
- Picard will analyze the files and attempt to identify them
This takes time—expect 30 seconds to a few minutes depending on your library size. Picard is “clustering” similar tracks together.
Step 3: Identify Your Albums
- Select a cluster (group of tracks) in the left panel
- Click the Lookup button (magnifying glass icon)
- Picard queries the MusicBrainz database
If successful, the right panel (called “Albums”) will populate with matched releases. You’ll see album artwork thumbnails if available in the database.
Step 4: Add or Adjust Artwork
Picard often finds artwork automatically, but not always. To add or change it:
- Select an album in the right panel
- Right-click the album cover area
- Choose Choose local file… to select your own image
- Or click Refresh to re-download from online sources
Step 5: Save Your Files
- Select the albums you want to save
- Click the Save button (or press Ctrl+S)
- Picard will write all metadata, including artwork, to your files
Important: Picard renames and reorganizes files by default. Check the options if you want to preserve your existing folder structure.
Method 3: Add Album Art with iTunes or Apple Music

Works well when: You’re already in the Apple ecosystem, use iTunes Match or Apple Music, or want native integration.
Falls short when: You’re on Windows (iTunes is discontinued; Apple Music app has limitations), need batch editing, or want cross-platform compatibility.
One honest limit: Apple ended iTunes support on Windows in late 2024. Windows users should use the Apple Music app instead, but it has fewer metadata editing features than the old iTunes.
For Windows Users (Apple Music App):
- Open Apple Music
- Navigate to your library
- Find the album or track
- Right-click → Get Info
- Click the Artwork tab
- Drag and drop your image file, or click Add Artwork
- Click OK
Changes sync across devices if you use iTunes Match or Apple Music subscription.
For Mac Users:
- Open the Music app
- Select the track or album
- Song → Get Info (or Cmd+I)
- Click the Artwork tab
- Drag your image into the box
- Click OK
The catch: Artwork added in Apple Music sometimes doesn’t embed properly in the actual MP3 file—it’s often cached. Transfer those files to another computer, and the art may disappear. For permanent embedding, use Mp3tag (Windows) or Picard (Mac).
Method 4: Online Tools (No Installation Required)
Works well when: You need a quick fix for a few files, can’t install software, or are on a Chromebook/limited system.
Falls short when: You have a large library (uploading hundreds of files is impractical), care about privacy (files go to third-party servers), or need advanced features.
Online tools like TagMP3.net offer browser-based editing. Upload your MP3, add artwork, download the modified file. Simple.
Privacy consideration: You’re uploading your music files to someone else’s server. The site may claim to delete files after processing, but you have no guarantee. I recommend this method only for non-sensitive files or when you have no other option.
Typical Workflow:
- Visit an online tag editor (TagMP3.net, etc.)
- Upload your MP3 file
- Add your artwork image
- Download the modified file
- Replace the original
Red flag: If a site asks you to download additional software or browser extensions, close it immediately. Legitimate online editors work entirely in your browser.
Image Specifications for Best Results
Not all images work equally well for album art. Follow these specs to avoid headaches:
| Specification | Recommendation | Why It Matters |
|---|---|---|
| Resolution | 1000×1000 pixels | Large enough for HiDPI displays, not so large it bloats files |
| Minimum | 300×300 pixels | Smaller than this looks blurry on modern screens |
| Format | JPG (preferred) or PNG | JPG compresses well; PNG supports transparency but larger file size |
| Aspect Ratio | Square (1:1) | Most players expect square artwork; rectangles get cropped or distorted |
| Color Space | sRGB | Ensures consistent colors across devices |
| File Size | Under 500KB per image | Keeps your library from consuming excessive storage |
The file size math: A 5MB PNG image embedded in 12 tracks adds 60MB to that album. A 300KB JPG adds only 3.6MB. Across a library of 1,000 albums, that’s a 56GB difference.
Where to find good artwork:
- MusicBrainz: Free, high-quality covers from their database
- Fanart.tv: Community-contributed artwork, often higher resolution than official sources
- Official artist websites: Best quality, but harder to find
- Amazon/iTunes stores: Good quality, but requires some searching
Avoid: Google Images search results (often low resolution, wrong aspect ratio, or watermarked).
How to Verify Your Artwork Is Actually Embedded
Here’s where people get confused. You add artwork in one program, open your music player, and see the cover. Success, right? Not necessarily.
Many players cache artwork from various sources:
- Some read embedded art but cache thumbnails
- Some download art from the internet based on metadata
- Some look for folder.jpg files in the same directory
To truly verify artwork is embedded:
Method 1: Check File Properties (Windows)
- Right-click your MP3 file
- Select Properties
- Click the Details tab
- Scroll to “Album art” section
If you see a thumbnail there, it’s embedded.
Method 2: Check File Size
Compare file sizes before and after adding artwork. If the MP3 grew by roughly the size of your image file, the art is embedded.
Method 3: Clear Player Cache
- Close your music player completely
- Clear its cache (location varies by player—check settings)
- Reopen and check if artwork still appears
If artwork disappears after clearing cache, it wasn’t embedded—it was just cached from another source.
Pro tip from Reddit r/musichoarder: “The most common mistake I see is assuming the artwork is embedded when it’s just cached in the player. Always verify by checking file properties or moving the file to a new location.”
Troubleshooting: When Album Art Won’t Show
Even after embedding artwork correctly, you might not see it. Here are the common causes and fixes:
Cause: Player Cache
Symptoms: Artwork shows in file properties but not in your player
Fix:
- Close your music player
- Clear its cache (varies by player):
- Windows Media Player: Delete
%LOCALAPPDATA%\Microsoft\Media Player\ - foobar2000: Preferences → Advanced → Media Library → Clear
- VLC: Tools → Preferences → Interface → Clear cache
- Windows Media Player: Delete
- Restart the player
Cause: Wrong Image Format
Symptoms: Artwork shows in some players but not others
Fix: Convert to JPG. Some older players don’t support PNG or BMP artwork. Use an image converter (IrfanView, GIMP, even Paint) to save as JPG.
Cause: File Permission Issues
Symptoms: Changes appear to save but don’t persist
Fix:
- Check if files are read-only
- Right-click file → Properties → Uncheck “Read-only”
- Try again
Cause: Mobile Sync Issues
Symptoms: Artwork shows on computer but not on phone after syncing
Fix:
- iPhone/iPad: Use iTunes/Finder sync, not drag-and-drop. Ensure “Sync music” includes album artwork option.
- Android: Some players don’t read embedded art. Use a different player (Poweramp, Musicolet) or copy a folder.jpg to each album directory.
- Generic: Some sync software strips metadata. Try a different sync method (manual copy, different cable, cloud storage).
Cause: Mobile App Limitations
Symptoms: Artwork appears on desktop but not in mobile app
Fix:
- Some mobile apps have artwork size limits (often 1200×1200 max)
- Resize oversized images
- Try different apps (built-in Music app vs. third-party players)
Which Method Should You Choose?
Still not sure which tool to use? Here’s the decision framework:
Choose Mp3tag if:
- You’re on Windows
- You have a large library to process
- You want batch editing capabilities
- You need maximum control over metadata
- You don’t mind a slight learning curve
Choose MusicBrainz Picard if:
- You’re on Mac, Windows, or Linux
- You want automatic track identification
- You prefer open-source software
- You don’t mind slower batch operations
- You want community-driven metadata
Choose iTunes/Apple Music if:
- You’re already invested in the Apple ecosystem
- You use iTunes Match or Apple Music
- You only need occasional, manual edits
- Cross-platform compatibility isn’t a priority
Choose online tools if:
- You can’t install software
- You only need to edit a few files
- Privacy isn’t a concern
- You’re on a Chromebook or restricted system
Comparison: All Methods Side-by-Side
| Method | Best For | Batch Support | Learning Curve | Cost | Max Image Size |
|---|---|---|---|---|---|
| Mp3tag | Windows power users | Excellent | Medium | Free | 1200×1200+ |
| MusicBrainz Picard | Cross-platform, auto-ID | Good | Medium-High | Free | 1200×1200+ |
| iTunes/Apple Music | Apple ecosystem | Limited | Low | Free* | 1024×1024 |
| Online Tools | Quick fixes | Poor | Low | Free/Paid | Varies |
*Apple Music subscription required for some features
Why Cinch Audio Recorder Is Worth Considering
If you’re managing a music library, you’re probably also recording music from streaming services. That’s where Cinch Audio Recorder comes in.
While the methods above add artwork to existing files, Cinch records streaming audio and automatically tags it with artwork, artist names, and album information. It uses audio fingerprinting (similar to Picard) to identify tracks as they play, then downloads high-quality album art and embeds it directly in your recordings.
Works well when: You want to build a local library from streaming sources without manual tagging.
Falls short when: You only need to edit existing files (Cinch is a recorder, not a tag editor for existing MP3s), or you need to edit metadata on files you already have.
One honest limit: Cinch is a paid tool ($26.99). The free alternatives above work fine for adding artwork to existing files. Cinch’s value is in the automation—recording and tagging in one workflow.
If you record a lot of streaming music and hate manual tagging, Cinch saves hours. If you just need to fix artwork on existing files, stick with Mp3tag or Picard.
Download Cinch Audio Recorder


Best Practices for Music Library Management
Based on community feedback from r/musichoarder and personal experience managing 50,000+ tracks:
-
Always backup before batch operations
- Copy your music folder before running batch edits
- Mistakes at scale are painful to undo
-
Test with one file first
- Verify your workflow works before processing 500 albums
- Saves hours of frustration
-
Use consistent image sizes
- Pick a standard (I use 1000×1000) and stick to it
- Mixed sizes look inconsistent in players
-
Prefer JPG over PNG for artwork
- Smaller file sizes
- Universal compatibility
- Transparency isn’t needed for album covers anyway
-
Keep original artwork files separate
- Save high-res originals in a “Cover Art” folder
- Embed optimized versions (1000×1000) in MP3s
-
Clear player cache after major updates
- Old cached thumbnails can hide your new embedded art
-
Document your workflow
- Write down your settings and folder structure
- Future you will thank present you
-
Verify on multiple devices
- Check artwork on your phone, car, and computer
- Different players behave differently
FAQ
What size should album art be for MP3 files?
300×300 pixels minimum, 1000×1000 pixels optimal, up to 3000×3000 maximum. Larger images provide better quality on HiDPI displays but increase file size. I recommend 1000×1000 as the sweet spot—crisp enough for modern screens, not so large it bloats your library.
Does album art affect MP3 file size?
Yes. Artwork is embedded directly in the MP3 file using the APIC frame. A 5MB image adds 5MB to each track you embed it in. A 300KB JPG adds only 300KB. For a 12-track album, that’s a 56MB difference. Use JPG at 80-90% quality for the best balance.
Can I add album art to multiple MP3 files at once?
Yes, and you should. Mp3tag and MusicBrainz Picard both support batch editing. In Mp3tag, select multiple files (Ctrl+A for all), add artwork once, and save. It applies to all selected tracks. This turns a hours-long task into minutes.
Why is my album art not showing in Windows Media Player?
Windows Media Player caches thumbnails aggressively. Even after embedding artwork, WMP may show old cached versions. Fix: Close WMP, delete %LOCALAPPDATA%\Microsoft\Media Player\, and reopen. Or try a different player like foobar2000 or VLC.
Can VLC add album art to MP3 files?
Yes, but it’s basic. Right-click a track in VLC → Media Information → drag artwork into the cover box. However, VLC’s tagging is less reliable than dedicated tools. I recommend Mp3tag (Windows) or Picard (cross-platform) for serious library management.
What’s the difference between ID3v2.3 and ID3v2.4?
ID3v2.3 is older but has wider compatibility. ID3v2.4 adds UTF-8 support (better for international characters) and can store larger images. Most modern software supports both. Mp3tag defaults to v2.3 for compatibility; you can change this in options if needed.
Can I extract album art from existing MP3 files?
Yes. In Mp3tag: select the file, right-click the cover box, choose Export cover to file. Picard can also export artwork. This is useful if you want to backup your artwork or use it for other purposes.
Why Trust This Guide?
This guide combines three types of evidence:
- Official documentation from Mp3tag and MusicBrainz (for technical accuracy)
- Community validation from Reddit r/foobar2000 and r/musichoarder (for real-world friction points)
- Practical workflow testing across Windows, Mac, and Linux systems
Update cadence: I review this guide quarterly and after major software updates (e.g., iTunes → Apple Music transition on Windows). Last verified: February 2025.
What this guide doesn’t claim: We don’t promise every method works for every file type. DRM-protected files won’t work. Very old MP3 players may not support embedded artwork. We focus on what works for 95% of users in 2025.
Legal note: For personal use only. Album artwork may be subject to copyright. This guide assumes you’re adding artwork to files you own or have rights to modify. Respect platform terms and local laws.
Last updated: February 18, 2026


8 Responses
Thanks for the above info. I have two questions though…
How do get all the mp3s that I want to add my art to in the groove player?
And, how do I make the art show when I play the mp3 with other music players?
1. You could add an album cover to each by using the ID3 tag editing feature.
2. The music will show the album cover automatically while you play a song.
I need to add album art to existing mp3 songs in my android music player. How do I do that?
You could do that by using the ID3 tag editing feature. For more details, please check the user manual page.
Neither WMP nor VLC works. Total waste of time.
Could you send me the song files? maybe I could check it out for you.
With VLC, you need to save the metadata after you change it. The “save metadata” box does not pop-up by itself, you must make another change to the metadata, for example, go to “Comments” and hit the space-bar. –Gary
You CAN manually add artwork in Windows Media Player.
To do this:
1. COPY image to use as artwork
2. right-click album in WMP -> “paste album art”
3. done.
Notice that you need to have copied your image first (so that it is in your clipboard), only then that option shows up.