Quick Summary
Learn how to add album art to MP3 files on Windows, Mac, Android, and online. Step-by-step instructions for music fans and beginners.
It’s Saturday morning. You’re finally tackling that music library cleanup you’ve been putting off for months. You open your music player and scroll through your collection. Artist names are correct. Album titles look good. But every third or fourth album shows the same gray generic icon where vibrant cover art should be.
You double-click a track expecting to see Pink Floyd’s Dark Side of the Moon prism, but instead, you get a gray box. The music plays fine. The metadata is there. But something’s missing.
Here’s the thing: your album art might not actually be embedded in the MP3 files themselves. Most music players cache artwork from various sources—sometimes from the internet, sometimes from a folder.jpg file sitting next to your tracks. But when you move those files to another device, sync them to your phone, or burn them to a CD, that artwork disappears.
The fix is straightforward: embed the artwork directly into each MP3 file. Once embedded, the cover travels with the file—whether you copy it to another computer, sync it to your phone, or burn it to a CD.
You have four main options depending on your situation: Windows users should grab Mp3tag (free, powerful batch editing). Mac users are better off with MusicBrainz Picard (automatic track identification). Already in the Apple ecosystem? Apple Music works, but with caveats. Need to edit one or two files without installing anything? Online tools exist, but they come with privacy trade-offs.
Quick Answer: What’s the Best Way to Add Album Art?
The fastest method depends entirely on your platform and collection size:
Windows users: Download Mp3tag (free). It’s the industry standard for a reason. Five minutes of setup, then you can batch-edit hundreds of files at once.
Mac users: Use MusicBrainz Picard (free, cross-platform). It automatically identifies your tracks and pulls artwork from online databases.
Apple ecosystem: Apple Music app (works natively but has limitations; also, DRM-protected files—like old iTunes purchases from before 2009—can’t be edited).
Quick one-offs: Online tools like TagMP3 (no install, but requires uploading files).
Each approach has trade-offs. Mp3tag is powerful but Windows-only. Picard has a learning curve. Apple Music’s embedding sometimes doesn’t stick. Online tools mean uploading your files to someone else’s server. Pick based on what you actually need—not what some blog from 2019 recommends.
What You’ll Need Before Starting
Before touching any files, do this:
-
Pick one album to test with – Choose an album with 3-5 tracks for your first attempt. Don’t start with your entire library.
-
Find or prepare your cover image: You need a square JPG or PNG (300×300 pixels minimum, ideally 1000×1000). We’ll cover where to find good artwork later.
-
Close your music player – Most players lock files while running, which will block you from saving changes.
-
Make a backup – Copy your test album folder somewhere safe. Batch editing is powerful but mistakes happen.
Quick check: Right-click one of your MP3 files → Properties → Details. If you see “Album art” with a thumbnail, you already have embedded artwork. If not, keep reading.
One critical limitation upfront: DRM-protected files (old iTunes purchases from before 2009, or streaming downloads) cannot be edited. This guide only works with DRM-free MP3s.
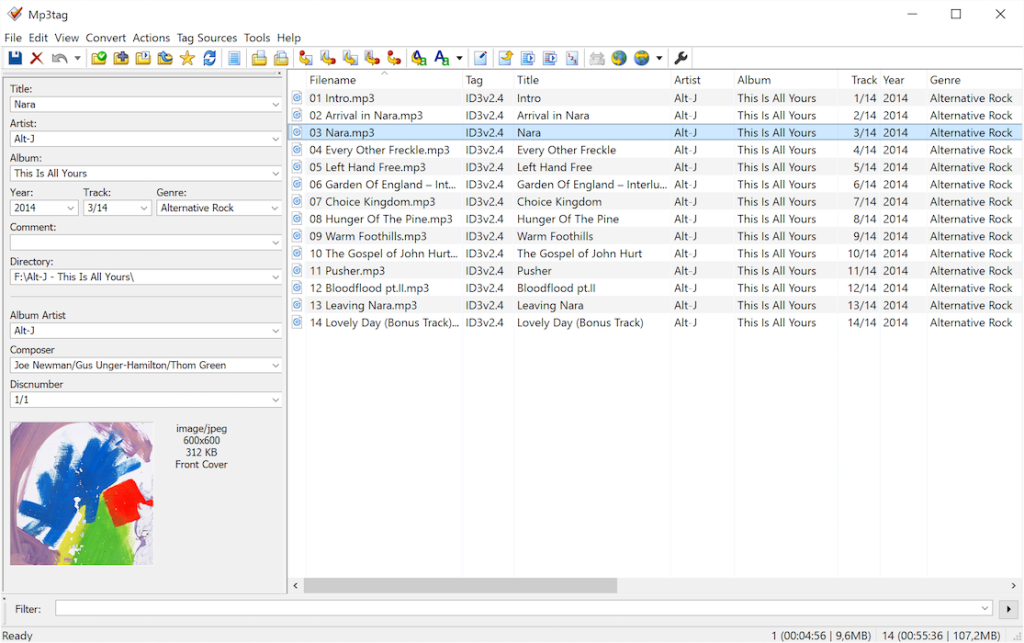
Method 1: Add Album Art with Mp3tag (Windows)
Mp3tag is the go-to tool for Windows users. It’s free, actively maintained, and handles batch operations better than anything else. The workflow becomes muscle memory after your first album.
Best for: Maximum control, batch editing, and large libraries. Not available on Mac, and doesn’t offer automatic track identification.
Step 1: Download and Install Mp3tag
- Go to mp3tag.de (official site—avoid download aggregators)
- Download the installer for Windows 10/11
- Run the installer and accept the defaults
The installation takes about 30 seconds. No bloatware, no toolbars, just a clean, professional tool.
What you should see: After installation, Mp3tag opens with an empty window. The left panel shows “Cover” box, the right shows a file list area.
Step 2: Load Your MP3 Files
- Open Mp3tag
- Click File → Change directory (or press Ctrl+D)
- Navigate to your music folder
- Select the folder containing your MP3s
You’ll see a list of all tracks in the main window. Don’t worry if the columns look cramped—you can resize them by dragging the column headers.
Step 3: Add Artwork to a Single Track
- Click on any track in the list to select it
- Look at the panel on the left side
- You’ll see a box labeled “Cover”—right-click it
- Select Add cover…
- Browse to your album art image file
- Click Open
The cover appears in that box. But you’re not done yet.
Step 4: Save Your Changes
This is where most beginners trip up. Adding the image only loads it into Mp3tag’s memory. You must save to actually embed it in the file.
- Click the Save button (floppy disk icon, or press Ctrl+S)
- Wait for the “Saved” status to appear briefly at the bottom
How to verify it worked: Now check your file in Windows Explorer. Right-click it → Properties → Details. Scroll down. You should see “Album art” listed there with a thumbnail. If you see it, the artwork is permanently embedded in the file. If not, go back to Step 3 and try again.
Step 5: Batch Add Artwork to Multiple Tracks
Here’s where Mp3tag shines. Let’s say you have an entire album that needs the same cover.
- Hold Ctrl and click each track you want to update (or press Ctrl+A to select all)
- Right-click the Cover box on the left
- Select Add cover…
- Choose your image file
- Click Save (this will apply to all selected tracks)
A practical habit: test with one track first. After confirming it works, select the whole album. This prevents mistakes at scale—once you batch-apply the wrong artwork to 500 tracks, undoing it is tedious.
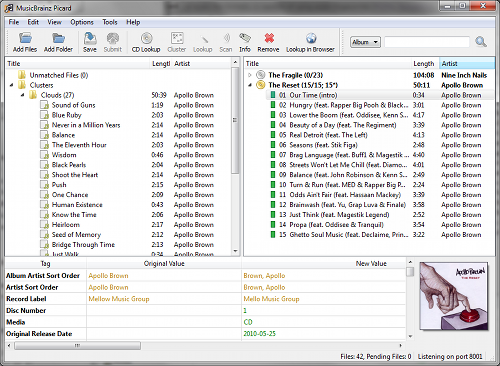
Method 2: Add Album Art with MusicBrainz Picard (Mac/Windows/Linux)
MusicBrainz Picard uses audio fingerprinting to automatically identify your tracks. It compares your audio to a massive online database and fills in metadata—including artwork—automatically. It’s like Shazam, but for your entire library.
Best for: Automatic track identification, cross-platform use, and open-source fans. Slower for large batches and requires more setup time than Mp3tag.
Step 1: Install Picard
- Visit picard.musicbrainz.org
- Download the version for your OS (Windows, macOS, or Linux)
- Install and launch
The interface looks different than Mp3tag—more complex, with panels on the left and right. Don’t be intimidated.
Step 2: Load Your Music
- Drag and drop your music folder into the left panel (called “Unmatched Files”)
- Picard will analyze the files and attempt to identify them
This takes time—expect 30 seconds to a few minutes depending on your library size. Picard is “clustering” similar tracks together.
Step 3: Identify Your Albums
- Select a cluster (group of tracks) in the left panel
- Click the Lookup button (magnifying glass icon)
- Picard queries the MusicBrainz database
If successful, the right panel (called “Albums”) will populate with matched releases. You’ll see album artwork thumbnails if available in the database.
Step 4: Add or Adjust Artwork
Picard often finds artwork automatically, but not always. To add or change it:
- Select an album in the right panel
- Right-click the album cover area
- Choose Choose local file… to select your own image
- Or click Refresh to re-download from online sources
Step 5: Save Your Files
- Select the albums you want to save
- Click the Save button (or press Ctrl+S)
- Picard will write all metadata, including artwork, to your files
Important: Picard renames and reorganizes files by default. Check the options if you want to preserve your existing folder structure.
Method 3: Add Album Art with iTunes or Apple Music
Best for: Apple ecosystem users with iTunes Match or Apple Music subscriptions. Not ideal for Windows users (Apple Music app has fewer metadata features), batch editing, or cross-platform needs.
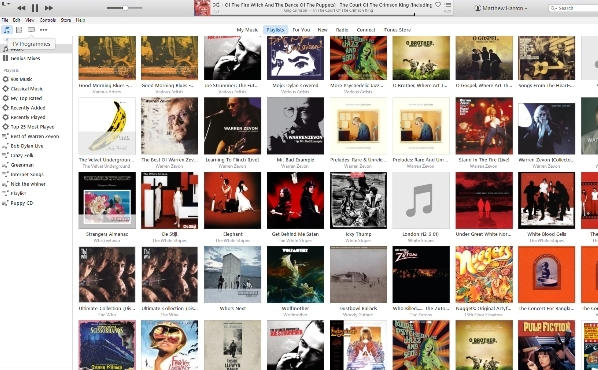
For Windows Users (Apple Music App):
- Open Apple Music
- Navigate to your library
- Find the album or track
- Right-click → Get Info
- Click the Artwork tab
- Drag and drop your image file, or click Add Artwork
- Click OK
Changes sync across devices if you use iTunes Match or Apple Music subscription.
For Mac Users:
- Open the Music app
- Select the track or album
- Song → Get Info (or Cmd+I)
- Click the Artwork tab
- Drag your image into the box
- Click OK
The catch: Artwork added in Apple Music sometimes doesn’t embed properly in the actual MP3 file—it’s often cached. Transfer those files to another computer, and the art may disappear. For permanent embedding, use Mp3tag (Windows) or Picard (Mac).
Method 4: Online Tools (No Installation Required)
Best for: Quick fixes for a few files, systems where you can’t install software, or Chromebook users. Not suitable for large libraries (uploading is impractical), privacy-conscious users, or advanced features.
Online tools like TagMP3.net offer browser-based editing. Upload your MP3, add artwork, download the modified file. Simple.
Privacy consideration: You’re uploading your music files to someone else’s server. The site may claim to delete files after processing, but you have no guarantee. I recommend this method only for non-sensitive files or when you have no other option.
Typical Workflow:
- Visit an online tag editor (TagMP3.net, etc.)
- Upload your MP3 file
- Add your artwork image
- Download the modified file
- Replace the original
Red flag: If a site asks you to download additional software or browser extensions, close it immediately. Legitimate online editors work entirely in your browser.
Image Specifications for Best Results
For album art that displays correctly everywhere:
- Format: JPG (preferred) or PNG. Avoid WebP—many car stereos and older players can’t read it.
- Size: 1000×1000 pixels is the sweet spot. Minimum 300×300, maximum 3000×3000.
- Aspect ratio: Must be square (1:1). Rectangles get cropped or stretched.
- File size: Under 500KB per image. A 5MB image × 12 tracks = 60MB extra per album.
- Color space: sRGB for consistent colors across devices.
Where to find good artwork:
- MusicBrainz: Free, high-quality covers from their database
- Fanart.tv: Community-contributed artwork, often higher resolution than official sources
- Official artist websites: Best quality, but harder to find
- Amazon/iTunes stores: Good quality, but requires some searching
Avoid: Google Images search results (often low resolution, wrong aspect ratio, or watermarked).
How to Verify Your Artwork Is Actually Embedded
The definitive test:
- Right-click your edited MP3 file → Properties → Details
- Scroll to “Album art” section
- If you see a thumbnail there, it’s truly embedded
Alternative check: Compare file sizes before and after. If the MP3 grew by roughly the size of your image, the art is embedded.
Cache clearing (if artwork shows in file properties but not in your player):
- Close your music player completely
- Clear its cache (location varies by player)
- Reopen and check again
If artwork disappears after clearing cache, it was never embedded—just cached from another source.
Troubleshooting: When Album Art Won’t Show
Problem: Artwork shows in file properties but not in your player
Cause: Player cache
Fix: Close the player, clear its cache, restart:
- Windows Media Player: Delete %LOCALAPPDATA%\Microsoft\Media Player\
- foobar2000: Preferences → Advanced → Media Library → Clear
- VLC: Tools → Preferences → Interface → Clear cache
Problem: Artwork shows in some players but not others
Cause: Wrong image format
Fix: Convert to JPG. Some older players don’t support PNG.
Problem: Changes appear to save but don’t persist
Cause: File permissions
Fix: Right-click file → Properties → Uncheck “Read-only”
Problem: Artwork shows on computer but not on phone after syncing
Cause: Mobile sync issues
Fix:
- iPhone/iPad: Use iTunes/Finder sync, not drag-and-drop
- Android: Some players don’t read embedded art. Try Poweramp or Musicolet, or add a folder.jpg to each album directory.
Problem: Artwork appears on desktop but not in mobile app
Cause: Mobile app limitations
Fix: Resize oversized images (some apps have 1200×1200 max limits). Try different apps.
Which Method Should You Choose?
Windows users: Mp3tag. Free, excellent batch editing, precise control. Learning curve is worth it for libraries larger than a few albums.
Mac users: MusicBrainz Picard. Automatic track identification saves time. Slower for large batches and renames files by default (can be disabled).
Apple ecosystem: The Music app works for occasional edits, but artwork sometimes stays in cache rather than embedding permanently. Use Picard for permanent embedding.
Can’t install software? Online tools like TagMP3 work for 1-2 files, but you’re uploading your music to third-party servers.
| Method | Best For | Batch Support | Learning Curve | Cost |
|---|---|---|---|---|
| Mp3tag | Windows power users | Excellent | Medium | Free |
| Picard | Cross-platform, auto-ID | Good | Medium-High | Free |
| Apple Music | Apple ecosystem | Limited | Low | Free* |
| Online Tools | Quick fixes | Poor | Low | Free/Paid |
*Apple Music subscription required for some features
Bonus: How to Avoid Manual Tagging Completely
Fixing your existing library manually with Mp3tag or Picard is a one-time project. But what about the new music you add to your collection?
If you’re building a local library from streaming platforms, manually tagging every new track becomes exhausting. This is where an automated tool like Cinch Audio Recorder changes the workflow.
Instead of downloading nameless files and running them through taggers, Cinch captures streaming audio and automatically embeds the high-res album art, artist names, and ID3 tags in real-time. By the time the song finishes playing, you have a perfectly tagged MP3 ready for your phone or car stereo.
Your Next Step
- Pick one album (3-5 tracks) for testing
- Download Mp3tag (Windows) or Picard (Mac)
- Follow the steps for your chosen method
- Verify by checking file properties (right-click → Properties → Details → Album art)
- Once verified, scale up to your full library
Time estimate: 5-10 minutes for setup, then ~1 minute per album once you’re comfortable.
Two habits that pay off:
- Keep original high-res artwork backed up separately
- Test on multiple devices after batch editing—what works in Windows Media Player might not appear the same on your phone or car stereo
FAQ
What size should album art be?
1000×1000 pixels is ideal. Minimum 300×300, maximum 3000×3000.
Does album art affect MP3 file size?
Yes. A 300KB JPG adds 300KB to each track. A 5MB PNG adds 5MB per track.
Can I add art to multiple files at once?
Yes. Mp3tag and Picard both support batch editing—select multiple files, add artwork once, save to all.
Why doesn’t my artwork show in Windows Media Player?
WMP caches aggressively. Close it, delete %LOCALAPPDATA%\Microsoft\Media Player, then reopen.
What’s the difference between ID3v2.3 and ID3v2.4?
v2.3 has wider compatibility. v2.4 supports UTF-8 and larger images. Most software supports both.
Can I extract album art from existing MP3s?
Yes. In Mp3tag: select file → right-click cover box → Export cover to file.


Thanks for the above info. I have two questions though…
How do get all the mp3s that I want to add my art to in the groove player?
And, how do I make the art show when I play the mp3 with other music players?
1. You could add an album cover to each by using the ID3 tag editing feature.
2. The music will show the album cover automatically while you play a song.
I need to add album art to existing mp3 songs in my android music player. How do I do that?
You could do that by using the ID3 tag editing feature. For more details, please check the user manual page.
Neither WMP nor VLC works. Total waste of time.
Could you send me the song files? maybe I could check it out for you.
With VLC, you need to save the metadata after you change it. The “save metadata” box does not pop-up by itself, you must make another change to the metadata, for example, go to “Comments” and hit the space-bar. –Gary
You CAN manually add artwork in Windows Media Player.
To do this:
1. COPY image to use as artwork
2. right-click album in WMP -> “paste album art”
3. done.
Notice that you need to have copied your image first (so that it is in your clipboard), only then that option shows up.