You are in the car at 7:40 AM, your phone flips between weak LTE and no signal, and the playlist you queued for the commute suddenly stalls even though you thought you had everything “downloaded.” This is the trap. Spotify offline mode helps inside the app, but it does not give you normal WAV files you can move to any player, USB stick, or editor.
Here is the good news: you can still build a stable Spotify-to-WAV workflow if you pick the method that matches your real goal instead of grabbing the first “one-click converter” page. My rule is simple: I start with a 30-second sample capture, confirm sound and file size, then run the full playlist.
If you need app-only offline playback, pick Method 1. If you need portable files, pick Method 2 or Method 3.
Here’s the thing: most people do not need every method. If you only want app playback, stay in Spotify. If you want free WAV files and can handle setup, use Audacity + WASAPI. If you want smoother daily workflow with fewer manual steps, a recorder like Cinch is practical.
In This Article:
Quick Summary
- Spotify does not provide direct WAV export, so all workable paths are recording-based in practice.
- WAV keeps what you capture; it does not create detail that is missing in the source stream.
- Method choice is mostly about workflow risk: app-only convenience, free manual control, or paid automation.
Quick Answer
If your goal is true file portability, you need a recording workflow, not an in-app download workflow. Start with either Audacity + WASAPI (free, more setup) or Cinch (faster day-to-day workflow), then optionally clean filenames or transcode with FFmpeg. For a deeper recording baseline, see this recording-focused Spotify guide.
Best for App Users: Spotify Offline Mode.
Best Free Method: Audacity (manual recording).
Best Automated Method: Cinch Audio Recorder.
Fair Use Warning
Use Spotify recording workflows for personal archiving or time-shifting only. Do not redistribute recorded files, and always follow local copyright law and platform terms.
Why Can’t Spotify Export WAV Directly?
Spotify is built for licensed streaming playback, not open file export. Premium gives offline access in the app, but that is different from getting normal WAV files on disk that any device can read.
Official Source “On Premium, you can download albums, playlists, and podcasts… You need to go online at least once every 30 days to keep your downloads.” – Spotify Support Source: https://support.spotify.com/us/article/listen-offline/ Why it matters: This defines offline playback rights inside Spotify, not open-format export rights.
So when people search “spotify to wav,” they are usually trying to solve a portability problem, a car playback problem, or an editing problem. They are not just asking for a new extension.
Reality Check
- What users expect: one-click export from Spotify to standalone WAV files.
- What the platform allows: offline listening in app context, tied to account and app state.
- Practical implication: if you need portable files, pick a recording workflow and set quality expectations correctly.
Which Method Should You Choose?
- If you only need offline playback in Spotify app: stay with Spotify offline mode.
- If you need free WAV files and can accept setup time: use Audacity + WASAPI.
- If you need repeatable workflow with less manual effort: use Cinch.
- If you already have recordings and want cleanup or format processing: use FFmpeg as a post step.
From my experience, this selector saves more time than any long “top tools” list, because it prevents the classic mistake of choosing a method that solves a different problem than the one you actually have.
What’s Possible? Can WAV Improve Spotify Quality by Itself?
WAV can preserve captured audio very well, but it cannot magically add detail that was not present in the stream to begin with. The catch is: many pages mix up “lossless container” with “lossless source.”
Spotify documents quality tiers up to approximately 320 kbit/s and also notes a lossless rollout context on supported plans and devices. In most cases, your final WAV quality ceiling is bounded by what you played at capture time, your system audio path, and your recording settings.
Official Source “Spotify has a range of audio quality options… Very high: approximately 320kbit/s… Lossless: up to 24-bit/44.1kHz FLAC.” – Spotify Support Source: https://support.spotify.com/us/article/audio-quality/ Why it matters: Output format choices should respect source and playback quality boundaries.
To be more precise, WAV is best understood as a stable editing and transfer format, not as an audio-upgrade button.
A quick storage reality check:
| Capture target | Typical bitrate/depth context | Approx file size per minute | Practical note |
|---|---|---|---|
| WAV 16-bit/44.1kHz stereo | PCM | ~10 MB/min | Good baseline for editing and CD workflows |
| WAV 24-bit/48kHz stereo | PCM | ~16 MB/min | Larger files; useful when your chain supports it |
| MP3 320k | Lossy | ~2.4 MB/min | Smaller, easier transfer, less edit headroom |
For a 45-minute road-trip playlist, WAV can quickly cross 450 MB, so planning storage early matters.
Method 1: Stay in Spotify Offline Mode (No WAV Files)
This method is valid when your only goal is app-based offline listening on phone, tablet, or desktop.
Steps:
- Use Premium and download playlists/albums inside Spotify.
- Confirm at least one online session every 30 days.
- Keep app and device storage healthy to avoid download invalidation.
Works well when: you only need Spotify app playback and zero file management.
Falls short when: you need USB transfer, DAW editing, standalone media players, or archive control.
Typically, this is the fastest path for commuters who never leave the Spotify ecosystem.
Method 2: Record Spotify to WAV with Audacity + WASAPI
This is the most common free route on Windows when you need real WAV files.
Core setup:
- Install Audacity.
- Set host to Windows WASAPI.
- Pick loopback input for the same playback device used by Spotify.
- Choose WAV export target and sample format.
- Start Spotify playback, then record in Audacity.
- Stop, trim silence, and export WAV.
Official Source “On Windows, you can choose the Windows WASAPI Audio Host and then the (loopback) input… This is the recommended method of recording audio playing on the computer on Windows with Audacity.” – Audacity Manual Source: https://manual.audacityteam.org/man/tutorial_recording_computer_playback_on_windows.html Why it matters: It is a stable, documented capture path for computer playback.
Practical checklist before long sessions:
- Disable system sounds on the same playback device.
- Keep Spotify and recorder on the same output path.
- Run a 30-second sample test to check clipping and levels.
Works well when: budget is zero and you do not mind manual steps.
Falls short when: you need frequent batch runs, cleaner auto-tagging, or lower operational friction.
If you want a focused walk-through for this route, this Audacity-focused walkthrough can help with setup details.
I was frustrated the first time because I forgot to match playback and loopback devices, so recording looked fine but captured the wrong path. That failure is common.
Why Cinch Is a Practical Option
If you record often, Cinch can reduce repetitive setup work, especially around metadata and day-to-day file handling. This was not the original goal in my own workflow, but I stumbled on this while trying to fix tagging cleanup after several commute playlists, and it turned out to be the step that removed the most friction.
When to choose Cinch:
- You run recording workflows every week.
- You care about automatic track info and faster organization.
- You want a simpler “open, capture, review” routine.
When not to choose Cinch:
- You only do occasional one-off captures.
- You are fully comfortable with manual Audacity flow.
- You do not need metadata automation.
One honest limitation: Cinch is still real-time capture and it is a paid tool. Real-time capture only.
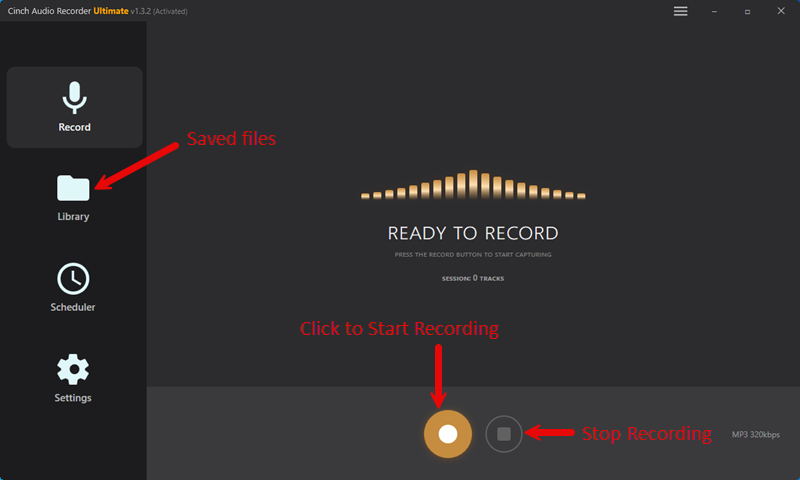
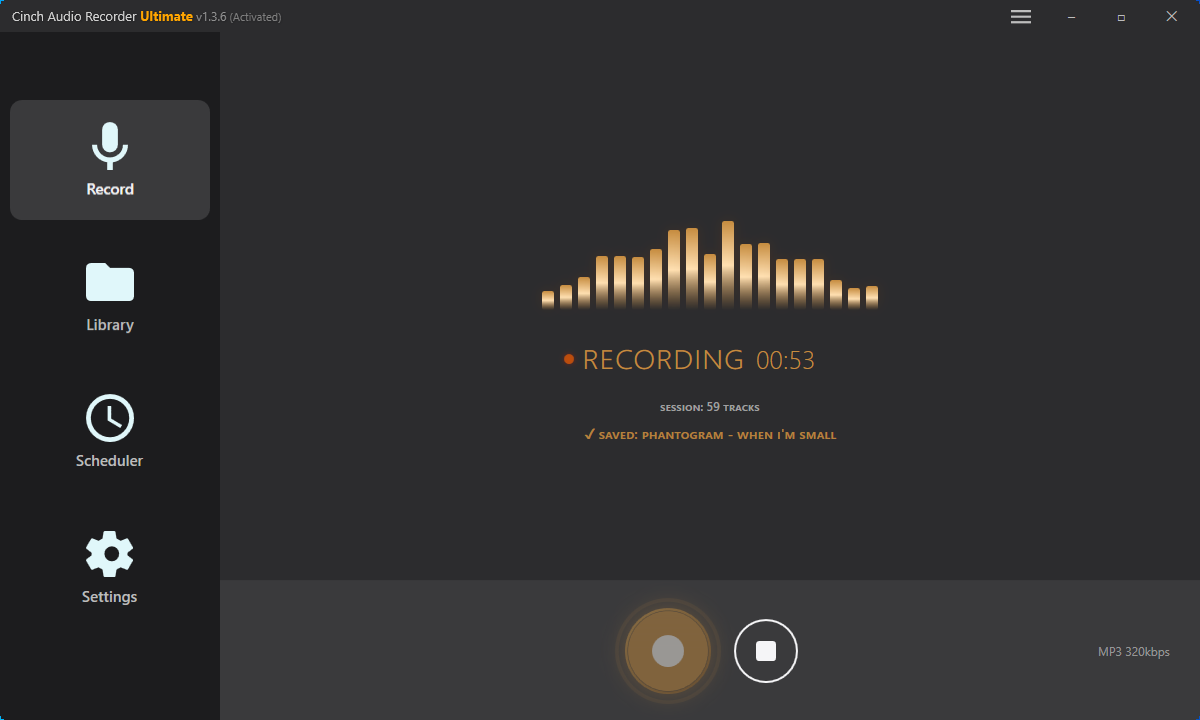
Practical flow with Cinch
- Install and open Cinch Audio Recorder.
- Set recording quality and output folder.
- Start Spotify playback and let capture run.
- Review tracks, clean short fragments if needed, and export.

Download Cinch Audio Recorder


Works well when: you want consistent workflow and less manual cleanup.
Falls short when: you want fully free tooling or non-real-time conversion.
Based on what I have seen, this is where paid workflow value lives: less operational drag, not magical sound quality.
Method 3: Post-process WAV with FFmpeg (Power Users)
FFmpeg is useful after capture, especially when you need batch rename pipelines, normalization stages, or delivery variants.
Typical post steps:
- Keep original capture WAV as archive.
- Create derived copies for device-specific needs.
- Apply consistent naming and folder conventions.
Example command pattern:
ffmpeg -i "input.wav" -c:a pcm_s16le -ar 44100 "output_44k.wav"
This command standardizes your file to CD quality (16-bit/44.1kHz), which improves compatibility with most car head units.
Reference: https://ffmpeg.org/ffmpeg-formats.html
Works well when: you need reproducible processing on many files.
Falls short when: you still have no clean source capture, because FFmpeg cannot repair a broken input chain.
Comparison Table: Which Path Fits Your Goal?
The best path depends on your objective, not on marketing claims.
| Method | Max realistic quality | Failure risk | Best for | Time cost | Setup complexity |
|---|---|---|---|---|---|
| Spotify offline mode | In-app playback quality only | Low for app usage, high for export goals | People staying fully in Spotify | Low | Low |
| Audacity + WASAPI | Equivalent to captured playback chain | Medium (device/path setup errors) | Free workflow users and learners | Medium | Medium to high |
| Cinch recording workflow | Equivalent to captured playback chain | Low to medium (after setup) | Frequent capture and organized libraries | Medium | Low to medium |
| FFmpeg post-processing | No source upgrade; processing consistency only | Low if input is clean | Power users with batch pipelines | Low to medium | Medium |
Hard truth: free Audacity and paid Cinch can reach the same practical audio ceiling if source and settings are identical. The difference is workflow effort, not miracle quality.
For related format context, this Spotify to OGG explainer helps clarify codec and container expectations.
Best Practices for Cleaner Spotify-to-WAV Results
- Start with a 30-second sample before full playlists.
- Match playback device and recording input path first; this avoids silent failures.
- Keep system notifications off during capture sessions.
- Use consistent folder and naming rules from day one.
- Validate one exported file on your target device before batch runs.
- Track storage growth early, especially for 24-bit WAV sessions.
- Keep expectations grounded: record quality and workflow stability matter more than tool labels.
Think of it as meal prep: if your containers are labeled and your portions are set, every day is easy; if not, even good food becomes messy fast.
Troubleshooting (Cause + Fix)
Problem: Recording is silent or near-silent
Cause: Loopback input points to a different playback device than Spotify output.
Fix: Set Spotify and recorder to the same playback target, then rerun a short sample capture.
Problem: WAV sounds clipped or distorted
Cause: Output level is too high or system effects are coloring the signal.
Fix: Lower output level, disable sound enhancements, and capture another 30-second check file.
Problem: Too many tiny files appear
Cause: Ad fragments, notification sounds, or pause/resume behavior split tracks.
Fix: Raise minimum-duration filters, mute non-music apps, and capture in a cleaner session window.
Problem: Metadata is missing or inconsistent
Cause: Manual workflows usually do not fill tags automatically.
Fix: Use a tagging pass after capture or a recorder workflow that can fill metadata during capture.
Problem: Exported file plays on PC but fails in car head unit
Cause: Car system support varies by sample rate, bit depth, and file naming quirks.
Fix: Create a compatibility copy at 16-bit/44.1kHz WAV and test one file before copying full folders.
At first this feels backwards, but the fastest way is still test-small-first, then batch.
Why Trust This Guide?
This guide is built from official Spotify support pages, official Audacity documentation, captured SERP patterns, and live community friction signals, then filtered through a skeptic rule: no fake audio-upgrade promises and no one-size-fits-all recommendation.
As of 2026-02-18, all policy and quality references in this draft were rechecked against their source pages.
User Feedback “Sound quality is not equally good on all devices.” – Trustpilot reviewer (Spotify review page) Engagement: Trustpilot page lists 5,000+ total reviews What it implies: Real-world friction often appears at the playback chain and device layer, not only at conversion step labels.
Source: https://www.trustpilot.com/review/spotify.com
Update cadence: this page should be reviewed quarterly or when Spotify policy and quality settings change.
Scope boundary: this is workflow guidance, not legal advice.
FAQ
Is converting Spotify to WAV legal?
Laws vary by region, and platform terms still apply. Use recordings for personal use only and avoid sharing copyrighted material.
Can WAV make Spotify sound better than the source stream?
No. WAV can preserve what you captured, but it cannot restore detail that was not present in the source playback chain.
Should I pick Audacity or Cinch first?
If you capture rarely and want free tooling, start with Audacity. If you capture often and want less manual cleanup, start with Cinch.
Why do online Spotify download tools fail so often?
More often than not, they depend on unstable scraping paths, changing platform behavior, or limited backend quality controls.
What settings should I use for broad playback compatibility?
A safe baseline is WAV 16-bit/44.1kHz stereo for widest device support, then adjust upward only if your full playback chain benefits.
Can I move captured files to USB for car playback?
Yes, if your head unit supports the file format and naming. Test one file first, then transfer the full folder. This Spotify to USB workflow can help with transfer checks.
Final Recommendation
Pick the method that matches your actual destination:
- staying in Spotify app,
- building portable files,
- or running frequent capture workflows.
Start small first. Then scale.
If you only remember one line, remember this: the right Spotify-to-WAV result comes from matching goal, method, and capture chain, not from chasing the loudest promise on a converter page.