Ever spent hours curating the perfect DJ playlist on Spotify, only to realize you can’t load those tracks into Serato? It’s a frustration every working DJ knows too well. You’d think Spotify and Serato would play nice together by now, but here’s the reality: they don’t, and it’s not changing anytime soon.
The good news?
There’s a reliable workaround that lets you bring your entire Spotify library into Serato DJ. In this guide, I’ll show you exactly how to convert Spotify music to Serato-compatible formats and import them properly—whether you’re running Serato DJ Pro or Lite.
In This Article:
Can You Use Spotify with Serato DJ? (Spoiler: Not Directly)
Let me start with the straight answer: No, Serato DJ does not support Spotify—not Pro, not Lite, not any version.
Before you wonder if you missed some hidden setting, I’ll save you the trouble: Spotify integration simply doesn’t exist in Serato. I’ve spent years DJing and tested every possible workaround, so trust me when I say there’s no secret menu option hiding somewhere.
Why Serato DJ Doesn’t Support Spotify Directly
The main roadblock is Spotify’s DRM protection (Digital Rights Management). Every single song you stream or download from Spotify—yes, even with Premium—is encrypted in a proprietary OGG Vorbis format. Think of DRM like a digital lock that prevents you from using files outside Spotify’s ecosystem. Even those “offline” downloads you save for airplane mode aren’t actually yours to use freely—they’re encrypted files that only work within the Spotify app.
Here’s what makes this extra frustrating: Serato DJ technically supports these audio formats:
- MP3 (most common, up to 320kbps)
- WAV (uncompressed lossless)
- FLAC (compressed lossless)
- AIFF (Apple’s lossless format)
- AAC/M4A (common in iTunes)
- OGG (but only unencrypted versions)
See the problem? Spotify’s encrypted OGG files won’t work, even though Serato technically supports OGG. It’s like having the right key shape but wrong key pattern.
For context, Serato DOES integrate with several streaming services—TIDAL, Beatport LINK, Beatsource LINK, and SoundCloud Go . These platforms signed licensing deals with Serato, allowing DJs to stream directly in the software. Spotify, despite being the world’s largest music platform, hasn’t entered into any such partnership. Rumors suggest it’s due to licensing complexities and Spotify’s strict DRM policies, but officially, both companies remain silent on the topic.
The Workaround That Actually Works for DJs
So how do working DJs actually solve this?
The answer is format conversion. By converting your Spotify tracks into standard MP3, WAV, or FLAC files, you effectively remove the DRM barrier and create files that Serato can read just like any other music in your collection.
Now, I know what you’re thinking: “Isn’t that illegal?” Here’s the nuanced reality. For personal DJ use—spinning at private parties, clubs, or even small-scale events where the venue has proper performance licenses (ASCAP/BMI)—this generally falls under fair use principles in most jurisdictions. You’re not redistributing the files, selling them, or uploading them to the internet. You’re simply shifting the format for your own performance purposes.
That said, there are clear boundaries you shouldn’t cross:
⚠️ Legal Boundaries: Never share converted files on torrent sites, cloud storage, or social media. Don’t sell them or claim ownership. If you’re DJing at a commercial venue, confirm they have proper public performance licenses.
The bottom line: Conversion for personal DJ library building occupies a legal gray area that most copyright experts consider acceptable under fair use, but commercial distribution or resale crosses into illegal territory.
The Best Solution: Cinch Audio Recorder for Spotify to Serato DJ
After testing nearly a dozen Spotify converters, I consistently recommend Cinch Audio Recorder for DJs. Here’s why it stands out.
Why Choose Cinch Audio Recorder Over Other Tools
Cinch uses a recording-based approach—capturing audio as it plays, like placing a high-quality microphone next to speakers. This method is completely safe and doesn’t put your Spotify account at risk.
✓ Works with ANY Spotify account
Both Free and Premium accounts work perfectly. Premium gives better source quality (320kbps vs 160kbps).
✓ No virtual audio cable needed
Many competitors require VB-CABLE installation. Cinch eliminates this hassle entirely.
✓ No API dependency = account safety
Cinch doesn’t interact with Spotify’s API, so there’s zero risk of triggering anti-bot detection.
✓ Real-time quality capture
Recording happens in real-time using CAC (Computer Audio Capture) technology, pulling directly from your sound card.
Key Features for DJs
🎵 Multiple Format Support
Record to MP3 (up to 320kbps), WAV, FLAC, AIFF, M4A, AAC, OGG, or ALAC. For DJ use, I recommend 320kbps MP3 (great quality, manageable size) or WAV for lossless needs.
🏷️ Automatic ID3 Tag Recognition
Cinch automatically captures song title, artist, album name, and album artwork. Everything’s organized when you import into Serato—no manual tagging.
✂️ Auto-Split Tracks
Cinch detects silence between tracks and automatically splits recordings into individual song files.
🚫 Ad Filter for Spotify Free
Using Spotify Free? Cinch includes a one-click filter that removes audio ads from your library.

🔇 Silent Recording Mode
Mute your computer speakers while recording. As long as Spotify itself isn’t muted, Cinch captures everything perfectly.
How to Use Cinch Audio Recorder to Record Spotify Music
Step 1: Download and Install
Visit the Cinch Audio Recorder page and download the Windows or Mac version. Installation takes under 2 minutes—just double-click the .exe or .dmg file and follow the prompts.
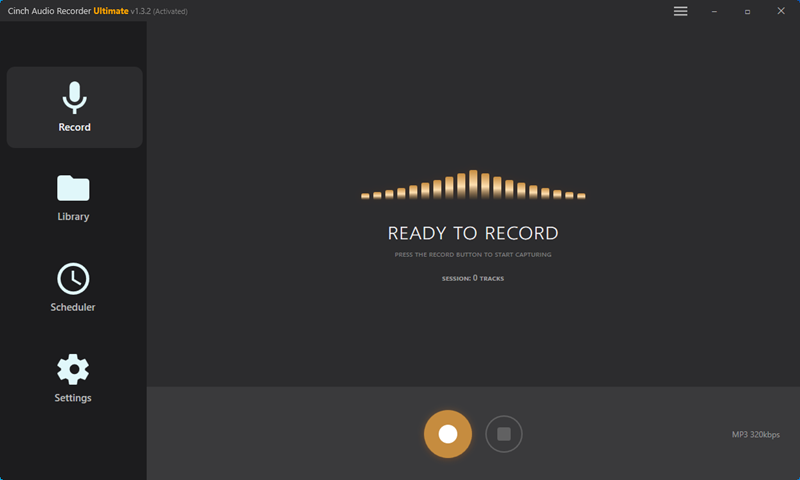
Step 2: Start Recording
- Launch Cinch Audio Recorder
- Click the red “Record” button
- Open Spotify and play your playlist
- Let it run (you can mute speakers if needed)

💡 Pro Tip: Set Spotify playback volume to 80-100%. Recording quality depends on player volume, not system volume. You CAN mute system speakers without affecting quality.
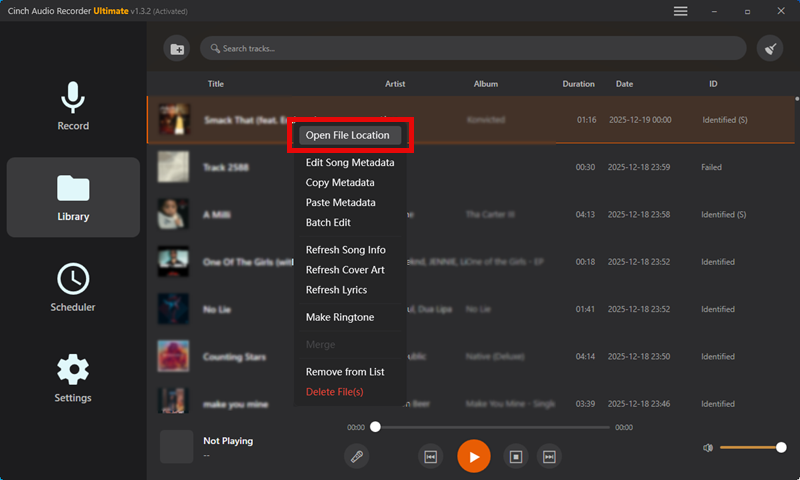
Step 3: Find Your Files
- Click “Library” tab in Cinch
- Right-click any song, select “Open File Location”
- Your tracks are saved as individual MP3 files with all metadata and album art
Download Cinch Audio Recorder:

Alternative Method: Third-Party Spotify Converters
While Cinch is my top pick, understanding the broader converter landscape helps you make informed choices.

Recording vs. Downloading: Which Approach Won’t Get You Banned?
Recording-Based Tools (like Cinch)
Capture audio in real-time. Safe for your account, works with any subscription level. The tradeoff? Conversion happens at 1x speed—a 60-minute playlist takes 60 minutes to record. But here’s the thing: you can run it overnight or while working on other tasks.
Download-Based Converters
Claim 5x-35x speed downloads. Sounds tempting, right? The catch: most use Spotify’s API, violating Terms of Service. I’ve seen accounts suspended for using these. Not worth risking your carefully curated playlists.
💡 Time Management Tip: Start converting your core 50-track setlist a week before your gig. Record overnight—wake up to a ready library.
Common Pitfalls to Avoid When Choosing Converters
❌ API-Dependent Converters
Tools requiring Spotify login or boasting “lightning-fast” conversion likely use Spotify’s API, risking account suspension.
❌ Virtual Cable Complexity
Older tools requiring VB-CABLE add unnecessary system complexity and can cause audio routing conflicts.
❌ “Lossless from Streaming” Claims
Spotify streams at maximum 320kbps (Ogg Vorbis). No converter creates true lossless from this source—just inflated file sizes.
📌 Quick Recommendation: Stick with recording-based tools for safety and reliability. Speed isn’t worth risking your Spotify account.
Step-by-Step: Importing Converted Spotify Music to Serato DJ Pro
Now let’s get your converted tracks into Serato. I’ll cover the two main methods.

Method 1 – Direct Import to Serato DJ Library
This is the quickest approach I use 90% of the time.
Step 1: Locate your converted music folder (use Cinch’s “Open File Location” feature)
Step 2: Launch Serato DJ Pro
Step 3: Click “Files” button in Serato
Step 4: Navigate to your music folder in the Files panel
Step 5: Drag files to the “All…” icon at top of crates section
Serato scans and imports files with full metadata intact.
🎯 Pro Tip: Create a crate like “Spotify – [Genre]” before importing. Drag files there instead of “All…” for better organization from day one.
Method 2 – Import via iTunes/Music App
If you manage music through iTunes or Apple Music, this integrates seamlessly.
Step 1: Add converted files to iTunes (File > Add to Library)
Step 2: Enable XML sharing
- iTunes Preferences > Advanced
- Check “Share iTunes Library XML with other applications”
Step 3: Configure settings
Uncheck these two:
- ❌ “Keep iTunes Media folder organized”
- ❌ “Copy files to iTunes Media folder when adding to library”
This prevents Serato from losing track of files if iTunes reorganizes them.
Step 4: In Serato, go to Settings > Library Display and check “Show iTunes Library”
Pro Tip: Organizing Your DJ Library with Crates
This is where most beginner DJs (and honestly, even some experienced ones) miss out on massive time savings. Serato’s crate system is incredibly powerful once you learn to use it strategically. Here’s my personal organization system that’s evolved over years of live performances:
🎵 Genre-Based Crates
Create genre-specific crates like “House – Spotify”, “Hip-Hop – Spotify”, “Techno – Spotify”. This lets you quickly filter by style when building a set. I go even deeper with sub-genres: “House – Deep”, “House – Tech”, “House – Vocal”.
⚡ Energy-Level Organization
This is my secret weapon for smooth set flow. I tag tracks with energy levels:
- “Low Energy (Warm-Up)” – 70-80 BPM, chill vibes
- “Mid Energy (Build)” – 100-120 BPM, getting people moving
- “High Energy (Peak)” – 125 BPM, dance floor packed
During a live set, I can instantly find the right track to shift the room’s mood. No more desperately scrolling through 2,000 tracks at 1 AM.
🎹 BPM Range Crates
For mixing-focused genres (house, techno, trance), I create BPM folders: “120-125 BPM”, “126-130 BPM”, etc. Makes beatmatching prep so much faster. When I’m playing a 128 BPM track and need a transition, I pull from my “126-130” crate instead of checking BPM on every track.
🎨 Color Coding Your Favorites
Serato lets you color-code tracks. Right-click any track and hover over “Set Crate Color” to try this. My system:
- Red: Crowd favorites that never fail (Drop these when energy dips)
- Blue: New tracks I’m still testing (Use early in sets when experimenting is safer)
- Green: Reliable set fillers (Solid tracks that work anywhere)
- Orange: Niche tracks for specific crowds (Underground edits, local favorites)
This color system has literally saved me mid-set when someone requests a specific vibe and I need to pivot quickly.
Serato DJ Pro vs. Lite: Which Version Do You Need?
Both versions handle imported Spotify tracks identically. If you only need to play converted music, Serato DJ Lite (free) works fine. But key differences matter:
| Feature | DJ Lite | DJ Pro |
|---|---|---|
| Import Local Files | ✓ | ✓ |
| Recording Formats | WAV only | MP3, WAV, AIFF |
| Effects | Echo Out only | Full FX suite |
| Hardware Support | Entry-level | Professional |
| Smart Crates | ✗ | ✓ |
| Price | Free | $9.99/mo or $299 |
Choose DJ Lite if you’re learning, practicing at home, or just experimenting.
Choose DJ Pro if you’re performing gigs, need pro effects, want streaming integration (TIDAL/Beatport), or use pro hardware.
My Take: Start with Lite while building skills. Upgrade to Pro when you book your first paid gig or feel limited by features.
Audio Quality Considerations for DJing
Let’s address the elephant in the room: Does converting Spotify ruin audio quality?
Best Format Settings for Serato DJ
🎧 320kbps MP3 – The Sweet Spot
Nearly indistinguishable from lossless on club systems. File size: ~7-10MB per song. This is what I recommend for 95% of DJs.
🔊 WAV – For Audiophiles
Uncompressed lossless. File size: ~40-50MB per track. Honestly, most DJs can’t hear the difference in club environments due to room acoustics and ambient noise.
💾 FLAC – Balanced Option
Lossless but compressed (~30-40% smaller than WAV). Good middle ground if storage matters.
🚫 Skip These:
- 128kbps or 160kbps MP3 (sounds thin on big systems)
- Anything below 256kbps for professional use
How to Keep Your Tracks Sounding Club-Ready
Source Quality Matters
Spotify Premium streams at 320kbps; Free at 160kbps. For DJ-quality audio, Premium is essential. I learned this the hard way when a Free-sourced track sounded muddy on a festival PA system.
Recording Settings Checklist:
- Set Spotify to “Very High” quality (Settings > Audio Quality)
- Keep Spotify playback volume at 80-100%
- Close bandwidth-heavy apps during recording
- Check your first track before batch recording overnight
⚠️ Rookie Mistake I Made: Never convert MP3 to WAV hoping to improve quality. That just inflates file size without recovering lost data. Record once to your final format.
Storage Planning
- 50 tracks at 320kbps MP3: ~500MB
- 50 tracks in WAV: ~2.5GB
- Full 500-track library (MP3): ~5GB
Troubleshooting Common Issues
Files Won’t Import to Serato
Solutions:
- Check file format (use 320kbps MP3 or WAV)
- Verify files aren’t still DRM-protected
- Windows: Check file path length (max 260 characters—move files closer to root)
- Corrupted tags: Use Mp3tag to clean metadata
Missing Metadata or Album Art
Solutions:
- Re-run conversion with metadata enabled in Cinch
- Use Serato’s built-in editor: right-click track > Edit Tags
- Batch correction: Use Mp3tag or MusicBrainz Picard
🎨 Pro Tip: High-res album art (600x600px ) looks better in Serato’s waveform display.
Audio Quality Issues
Solutions:
- Check recording volume (Spotify player should be 80-100%)
- Verify source quality (Spotify set to “Very High”)
- Inspect waveforms in Serato for clipping or weak signal
Mistakes I Made So You Don’t Have To
❌ Recording with system sound muted
I once recorded an entire 2-hour playlist thinking my muted speakers wouldn’t affect the output. Wrong. Always check Spotify’s player volume, not system volume.
❌ Not testing one track first
Record one test track, check it in Serato, THEN batch-record overnight. Saves you from waking up to 50 unusable files.
❌ Skipping the backup
Hard drives fail. Cloud sync your converted library to Dropbox or Google Drive. Losing 500 tracks you spent weeks converting is heartbreaking.
Conclusion
You now have everything to bring your Spotify library into Serato DJ:
- Convert tracks using Cinch Audio Recorder
- Choose 320kbps MP3 (or WAV for lossless)
- Import to Serato via direct drag-drop or iTunes
- Organize with crates and color coding
The real advantage? Ownership. Unlike streaming integrations that disappear when subscriptions lapse, these files are yours to keep, mix, and play anywhere—even offline.
Start with a few playlists that define your sound. Your next gig is waiting.
FAQs
Q1: Can I record an entire Spotify playlist overnight?
A: Yes! This is actually the best approach. Queue up your playlist, hit record in Cinch, and let it run while you sleep. A 100-track playlist takes about 6-7 hours.
Q2: Will Serato detect these as converted files?
A: No. Once converted to MP3 or WAV, these are standard audio files. Serato treats them like any other track in your library.
Q3: Is it legal to convert Spotify music for DJ use?
A: For personal DJing at events with proper venue licensing, this generally falls under fair use. Don’t distribute files publicly or sell them.
Q4: How much storage do I need for 500 converted tracks?
A: At 320kbps MP3: ~5GB. In WAV format: ~25GB. Start with MP3 unless you absolutely need lossless quality.
Q5: Will converting Spotify reduce audio quality?
A: Recording from Spotify Premium at 320kbps to 320kbps MP3 results in minimal, imperceptible quality loss on club systems.
Q6: Can I use Spotify Free account for this?
A: Yes, but Free streams at 160kbps vs Premium’s 320kbps. The difference is noticeable on professional sound systems.
Q7: What’s the best format for DJ mixing?
A: 320kbps MP3. It balances quality and file size perfectly. Use WAV only if you’re an audiophile with ample storage.