Quick Summary
Your Spotify subscription is ending and you don't want to lose your playlists. Here's how to record Spotify songs to MP3 files you can keep forever.
Your Spotify subscription expires in a few days, and you just realized something uncomfortable: those “downloaded” songs in your library won’t work anymore. They’re not MP3 files you can keep. They’re encrypted cache files locked inside Spotify’s app.
If you want to preserve your playlists permanently—without paying for Premium forever—you need to record the audio as it plays.
Important: Recording happens in real-time. A 3-minute song takes 3 minutes to record, and you need to let the playlist play through from start to finish.
Quick Answer: The fastest working method for most users is Cinch Audio Recorder—it requires no Spotify login, no virtual sound card installation, and automatically tags your files with artist names, album art, and lyrics. You can try it free on up to 9 songs before deciding if it’s worth paying for. If you have more time than budget, Audacity is a legitimate free alternative, but expect 30-60 minutes of setup and manual song-splitting.
Why You Can’t Just “Download” from Spotify
Before we get to solutions, one hard fact: Spotify’s offline downloads are not real files.
When you hit “Download” on a playlist, Spotify saves encrypted cache files to your device. These files only work inside the Spotify app, and only while your subscription is active. Cancel Premium, and they become unplayable. Copy them to another device, and they won’t open at all.
This is DRM (Digital Rights Management) protection—Spotify’s way of preventing file sharing. According to Spotify’s support documentation, even their “Local Files” feature doesn’t convert Spotify tracks to MP3; it only lets you play music you already own from other sources.
Some software claims they can 10X speed download Spotify music at accelerated speeds, but this is false—they actually download from YouTube or other unknown sources.
Instead of trying to decrypt Spotify’s files, recording software captures the audio signal as it plays through your speakers or headphones. You end up with a standard MP3 or WAV file that plays anywhere—your car, your phone, a USB drive, or even a burned CD.
Note that recording is not the same as DRM removal. Recording captures the audio you hear; DRM removal tries to decrypt the encrypted file directly. This guide focuses on recording, which is generally considered lower-risk for personal use.

Method 1: Cinch Audio Recorder (Recommended for Most Users)
If you want the shortest path from “Spotify playlist” to “MP3 files I own,” this is it.
Why It’s the Easiest Option
Cinch solves three problems that trip up most users:
- No virtual sound card needed. Other recording tools require you to install a virtual audio driver (like VB-Cable on Windows or BlackHole on Mac), then configure your system to route audio through it. Cinch handles this internally—you just install and record.
- No Spotify login required. Many “Spotify downloaders” ask for your username and password, which is both a security risk and a Terms of Service violation. Cinch records the audio signal directly; it doesn’t need access to your Spotify account at all.
- Automatic tagging. Cinch identifies songs while recording and adds artist name, album title, cover art, and even lyrics. Other tools dump out generic files like “Recording-001.mp3” that you have to rename manually.
According to Cinch’s official user guide, the software supports Windows 10/11 and macOS 13.5+, and outputs to MP3, AAC, FLAC, or WAV formats.
The Honest Tradeoffs
- Trial limit: You can record 9 songs in trial mode. This lets you test the software before paying—useful for confirming it works on your specific setup. The full version removes this limit.
- It’s paid software. As of 2026, Cinch costs around $35 for a lifetime license. Here’s the real math: if your time is worth more than $1 per minute, Cinch pays for itself after one 30-minute playlist recording session. Free tools need that much setup time before you even record your first song.
- Quality note: Cinch records at 320kbps MP3 by default. Spotify streams in Ogg Vorbis format at roughly 160kbps (Premium) or 96kbps (Free)—so paradoxically, the recorded MP3 may have a higher bitrate than the source. That said, you’re still converting between formats, which introduces minor quality loss. For casual listening, you won’t notice; for audiophile-grade comparisons, it’s not “identical.”
Step-by-Step Instructions
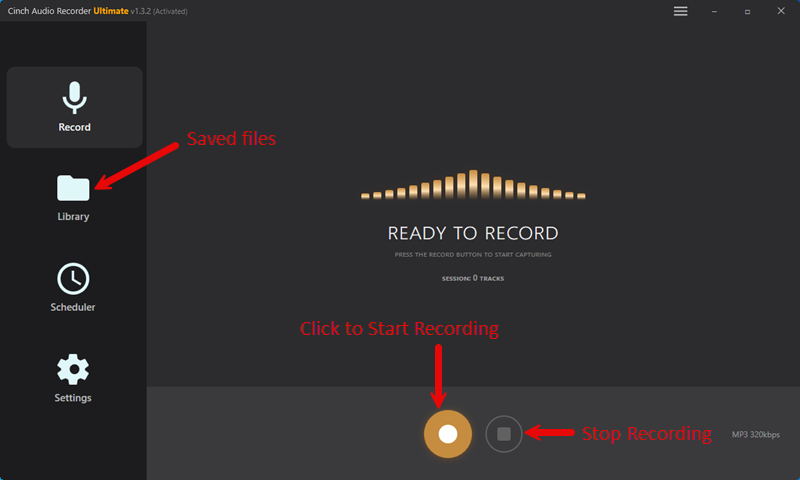
- Download and install Cinch Audio Recorder from the official website. Both Windows and Mac versions are available.
- Open Spotify (either the desktop app or web player) and queue up your playlist or album. You don’t need to log into Spotify through Cinch.
- Click the Record button in Cinch, then start playing your music in Spotify. Cinch will detect each song automatically.
- Let it play. Cinch records in real-time, so a 10-song playlist takes about 30-40 minutes depending on song lengths. You can minimize the window and do other things while it runs.
- Check your recordings. Cinch saves files to a default folder (you can change this in settings). Each song should have proper metadata—artist, album, cover art.What you should see: Open the output folder and verify each file shows the correct song title (not “Recording-001”), and when you play it in any music player, the artist name and album art display correctly.
- If using the free trial: You’ll be limited to 9 recordings. After that, you’ll need to purchase a license to continue.
Cinch automatically skips ads when recording. If you’re using Spotify Free, you won’t end up with ad interruptions in your final files.
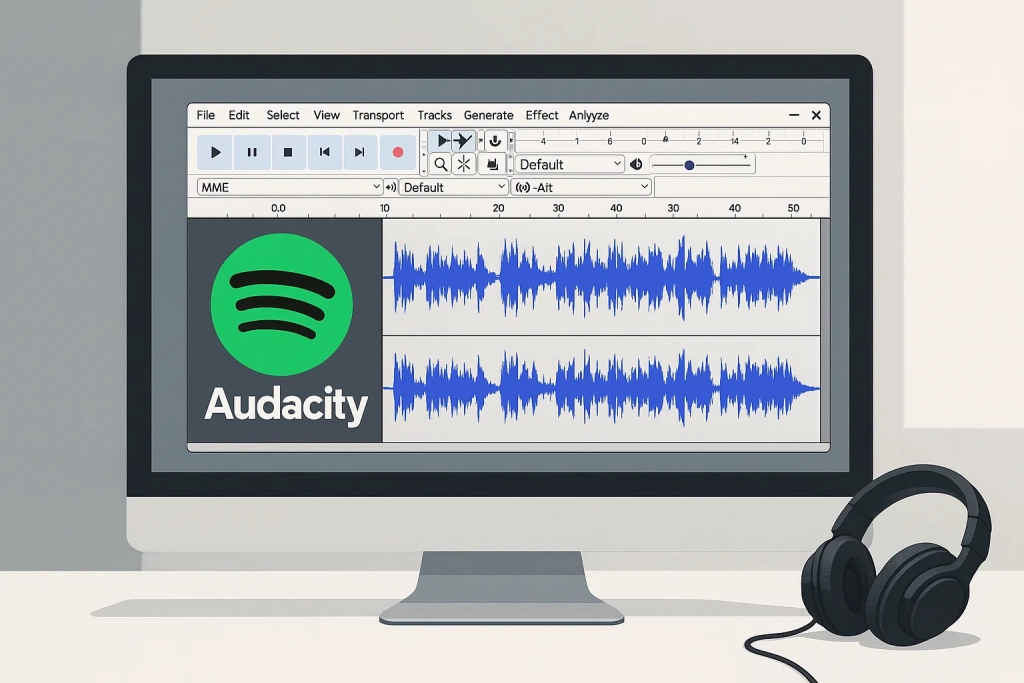
Method 2: Audacity (Free but Hands-On)
Audacity is the go-to recommendation for “free audio recording,” and it works—but calling it “easy” would be misleading.
What You’re Getting Into
Audacity is powerful, free, open-source software that runs on Windows, Mac, and Linux. It’s been around for over 20 years and has a massive community. The official manual documents the recording process extensively.
But here’s the reality: recording one song is manageable. Recording an entire playlist is tedious.
- Virtual audio cable required. Audacity cannot record system audio out of the box. You must install a virtual audio driver (VB-Cable on Windows, BlackHole on Mac) and configure your system to route audio through it. Users on the Audacity forums frequently report confusion at this step—especially when the virtual cable “takes over” their system audio and they can’t figure out how to switch back.
- Manual song splitting. Audacity records one long audio file. If you play a 10-song playlist, you get a single 40-minute recording. You then need to manually cut and export each song, or hope Audacity’s “Sound Activated Recording” splits them automatically (it often doesn’t work cleanly with streaming audio).
- No automatic tagging. Your files export as “Track-001.mp3” with no metadata. You’ll need to manually add artist names, album art, and other information—or use a separate tagging tool.
- Learning curve. Audacity’s interface is dense with options. Tutorials you find online may use older versions of the software, and menu locations can change between versions. For a beginner, this adds time and frustration.
Time investment: Expect 30-60 minutes for initial setup (installing Audacity, installing virtual audio cable, configuring routing), plus 5-10 minutes of manual work per song if you’re splitting a long recording into individual tracks.
When Audacity Makes Sense
Audacity is worth considering if:
- You only need to record a few songs
- You’re comfortable with technical setup
- You already have audio editing experience
- You’re on a strict $0 budget and have time to invest
If you’re trying to preserve a large playlist before your subscription ends, the manual effort adds up quickly.
Quick Setup Outline
Windows:
- Install VB-Audio Virtual Cable (free)
- Open Windows Sound Settings → set “CABLE Input” as your default playback device
- Install Audacity
- In Audacity, set the recording device to “CABLE Output”
- Play Spotify and hit Record in Audacity
- Export as MP3 (requires installing the LAME encoder, which Audacity will prompt you to download)
Mac:
- Install BlackHole (free, open-source)
- Create a “Multi-Output Device” in Audio MIDI Setup that includes both BlackHole and your speakers/headphones
- Set this Multi-Output Device as your system output
- In Audacity, set the recording device to BlackHole
- Play Spotify and hit Record
- Export as MP3
Common failure: If you hear silence or your own voice in the recording, the input device is configured incorrectly. Double-check that Audacity is recording from the virtual cable output, not your microphone.
What you should see: When you hit Record and play Spotify, Audacity’s recording meter (the bouncing bar) should move in time with the music. If it stays flat or only moves when you speak, your audio routing is wrong.
Method 3: Spytify (Windows-Only, Spotify-Specific)
Spytify is a free, open-source tool specifically designed for recording Spotify. It’s more automated than Audacity—but it comes with its own constraints.
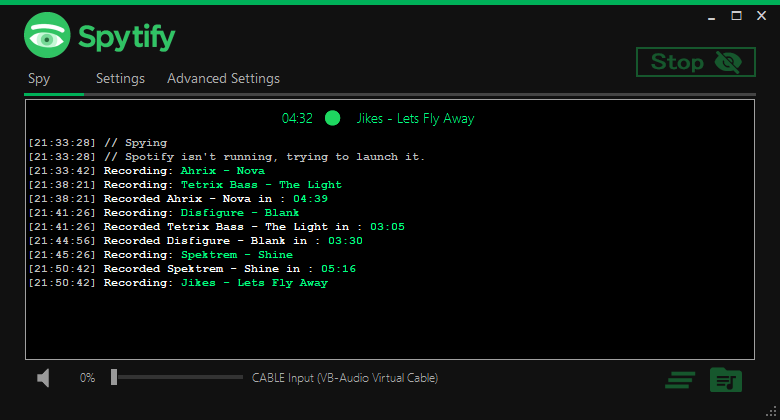
What It Does Well
- Automatic song detection. Spytify recognizes when one song ends and another begins, so you get individual files instead of one long recording.
- Metadata tagging. It pulls song information from Spotify’s API, so your files are properly named and tagged.
- Ad skipping. Like Cinch, Spytify can automatically skip ads during recording.
The Spytify FAQ confirms the software is Windows-only and requires the Spotify desktop application installed. The web player won’t work.
The Hidden Complexity
Virtual audio cable is still required for best results. Spytify can use Windows’ built-in WASAPI loopback, but many users report better reliability with a virtual audio cable. If you choose this route, follow the same VB-Cable setup steps outlined in the Audacity section above.
Spotify desktop app required. Spytify needs to communicate with the Spotify desktop application to read metadata—the web player won’t work. The Spytify documentation recommends using a “dummy” Spotify account for API access rather than your main account, as heavy API usage could potentially trigger issues.
API disconnection issues. Users have reported that Spytify sometimes loses its connection to the Spotify API during long recording sessions. GitHub issue #370 documents cases where the recording timer freezes but Spotify keeps playing, resulting in untagged files. The fix involves re-authorizing the API connection.
When Spytify Makes Sense
- You’re on Windows with the Spotify desktop app already installed
- You’re comfortable with moderate technical setup
- You want more automation than Audacity but don’t want to pay for Cinch
- You’re recording in batches of 10-15 songs (to minimize API disconnection risk)
Quick Setup Outline
- Install the Spotify desktop app and create or log into a Spotify account
- Install Spytify from the official GitHub releases
- If using virtual audio cable: install VB-Cable and configure routing (same as Audacity setup)
- Launch Spytify and follow the initial API authorization (it will walk you through creating a Spotify Developer app)
- Add your playlist to the recording queue and start recording
- Monitor for API disconnections—restart Spytify if the timer freezes
How to Burn Recorded Spotify Music to CD
If your car stereo only plays CDs, or you simply prefer physical media, here’s how to get from recorded MP3s to a playable audio CD.
What You’ll Need
- A CD burner drive. Most modern laptops don’t have built-in CD drives anymore, so you may need an external USB CD/DVD burner.
- Blank CD-R discs. Standard audio CDs hold about 700MB (roughly 80 minutes of audio). CD-R discs can be written once; CD-RW discs can be rewritten but are less compatible with older car stereos.
- CD burning software. Built-in options include Windows Media Player (Windows) and iTunes/Music app (Mac). Third-party options like VLC Media Player or dedicated burning software (like ImgBurn on Windows) also work.
Step-by-Step Process
- Record your Spotify playlist using one of the methods above. Save the files as MP3 or WAV.
- Insert a blank CD-R into your burner drive.
- Open your burning software. For Windows Media Player: go to the “Burn” tab. For iTunes/Music: create a new playlist, then right-click and select “Burn Playlist to Disc.”
- Add your recorded songs to the burn list. Keep the total under 80 minutes per CD (most software will warn you if you exceed the limit).
- Select “Audio CD” format. This is important: do not select “Data CD.” Audio CD format converts your MP3s to standard CD audio that plays in car stereos and CD players. Data CDs just store the MP3 files, which older players can’t read.
- Start the burn. A full CD takes 5-10 minutes to burn. Don’t eject the disc or interrupt the process.
- Test the CD in your car or CD player before deleting your source files. If the CD doesn’t play, try burning at a slower speed (most burning software has a “Burn Speed” option—select 4x or 8x instead of maximum).
This process creates a standard audio CD. If you want to keep the MP3 files on your computer as well, make sure you don’t delete them after burning—they’re separate copies.
Troubleshooting Common Problems
Problem: “Audacity is recording my microphone, not Spotify”
Cause: Audacity defaults to your microphone. You need to tell it to capture system audio instead.
Fix:
- In Audacity, click the dropdown next to the microphone icon (recording device selector)
- Select “Windows WASAPI” as the audio host
- Choose your speaker or headphone device with “(loopback)” in the name
- If no loopback option appears, install VB-Audio Virtual Cable and set it as both your system playback device and Audacity’s recording device
Problem: “I’m hearing silence in my recordings”
Cause: Audio is being routed incorrectly—the recording software isn’t receiving the Spotify output.
Fix:
- Check that your virtual audio cable is installed correctly
- Verify that Spotify is playing through the cable input (Windows: Sound Settings → Playback device should show “CABLE Input”)
- Verify that your recording software is set to record from the cable output
- Test by playing any audio (YouTube, system sounds) while watching the recording meter in your software
Problem: “Spytify stopped working mid-playlist”
Cause: API connection lost during a long session.
Fix:
- Stop and close Spytify completely
- Go to the Spotify Developer Dashboard
- Delete your existing Spytify app registration
- Create a new app with the correct redirect URI (default: http://localhost:4002)
- Copy the new Client ID and Client Secret into Spytify settings
- Restart Spytify and resume recording
Prevention: For long playlists, record in batches of 10-15 songs instead of one giant session.
Problem: “Ads are showing up in my recordings”
Cause: Spotify Free plays ads between songs. If your recording tool doesn’t skip them, they get captured.
Fix:
- Cinch: Ads are skipped automatically by default—no action needed
- Spytify: Turn on “Skip ads” in settings before starting your recording session
- Audacity: No automatic ad skipping. Your options: manually cut ads during editing, or pause recording when an ad starts and resume when it ends
Which Method Should You Choose?
Subscription ending in 3 days? Start with Cinch’s free trial. Record your 9 most-played songs first. If the quality and tagging work on your setup, the $35 license is worth it—you’ve just saved 30-60 minutes of troubleshooting free tools, and your music is preserved.
Tight budget, flexible timeline? Pick one: Audacity (works on Mac and Windows, steeper learning curve) or Spytify (Windows only, more Spotify-specific automation). Block out an hour for setup. Test with 3 songs before committing to a full playlist. If virtual audio cable routing gives you trouble (silent recordings, microphone input instead of Spotify), check the troubleshooting section above.
Burning to CD for an older car? Don’t rush the burn step. Record your full playlist first, listen through to confirm there are no glitches or ads, then burn. A bad burn wastes a disc; a bad recording wastes your time. If your car stereo is very old (pre-2000), test with one song on a CD-RW first before using CD-R discs.
Dozens of playlists to preserve? Be realistic about time. Cinch handles batch recording with zero manual splitting. Free tools require per-song monitoring and manual export. If you value your time at more than $1/hour, paying for Cinch on your core playlists makes financial sense.
Important reminder: Recording captures everything playing through your speakers. Close email notifications, silence your phone, and avoid watching videos while recording—those sounds will be captured too.
Recording for your own offline listening is generally tolerated under fair use / private copying doctrines in most countries. Sharing, selling, or uploading those files violates copyright law and Spotify’s Terms of Service. Keep the files for yourself.