Last month, I was getting ready for a road trip when I hit a wall. All those playlists I’d carefully curated on Amazon Music? Completely useless for my car’s USB player. My old Honda doesn’t have Bluetooth—just a USB port and my trusty iPhone.
Not gonna lie, I was frustrated.
Here’s the thing though. After spending way too much time on forums and testing different methods, I found a workflow that actually works. Turns out, moving Amazon Music to iTunes isn’t complicated once you understand which music you’re dealing with and pick the right approach.
Let me walk you through exactly what I learned.
In This Article:
Understanding Amazon Music and iTunes in 2025
Before we jump into the how-to part, let’s clear up something important. Not all Amazon Music is created equal, and that matters when you’re trying to move it to iTunes.
Amazon Music Types: What You’re Actually Paying For
Amazon offers three different flavors of music service, and they behave very differently:
Amazon Purchased Music is stuff you actually bought—individual songs or albums. These come as standard MP3 files without any protection. You own them. They’re yours to download and use wherever you want.
Amazon Prime Music comes free with your Prime subscription. Limited catalog, maybe 2 million songs? Can only stream within the Amazon Music app. DRM protected.
Amazon Music Unlimited is the full subscription service—100 million songs, all the latest releases. Also DRM protected, also locked to the app.
Here’s what it actually means: If you bought songs from Amazon’s digital store, you’re golden. Downloaded those MP3 files once, and you’re done. But if you’re streaming with Prime or Unlimited? Those tracks are encrypted and tied to the Amazon app.
Quick way to check what you have: Open Amazon Music, go to Library. If there’s a “Purchased” section with songs in it, those are the free-and-clear MP3s. Everything else? That’s subscription streaming.
Why iTunes Still Matters (Even in 2025)
Yeah, I know. iTunes feels old-school in the Spotify age. But hear me out.
When you have music in iTunes, you actually control it. No monthly subscription required to access your own library. Sync it to your iPhone once, and it’s there—forever. Works offline, works in cars with USB-only stereos, works on your old iPod if you still have one.
I actually went back to iTunes after getting tired of juggling three different music subscriptions. Turned out I didn’t need unlimited streaming—just wanted my favorite albums in one place where no company could take them away.
Plus, iTunes sync to iPhone is still the smoothest way to manage local music files. Android has good options too, but if you’re in the Apple ecosystem, iTunes (or Music app on newer Macs) just works.
The DRM Problem Explained Simply
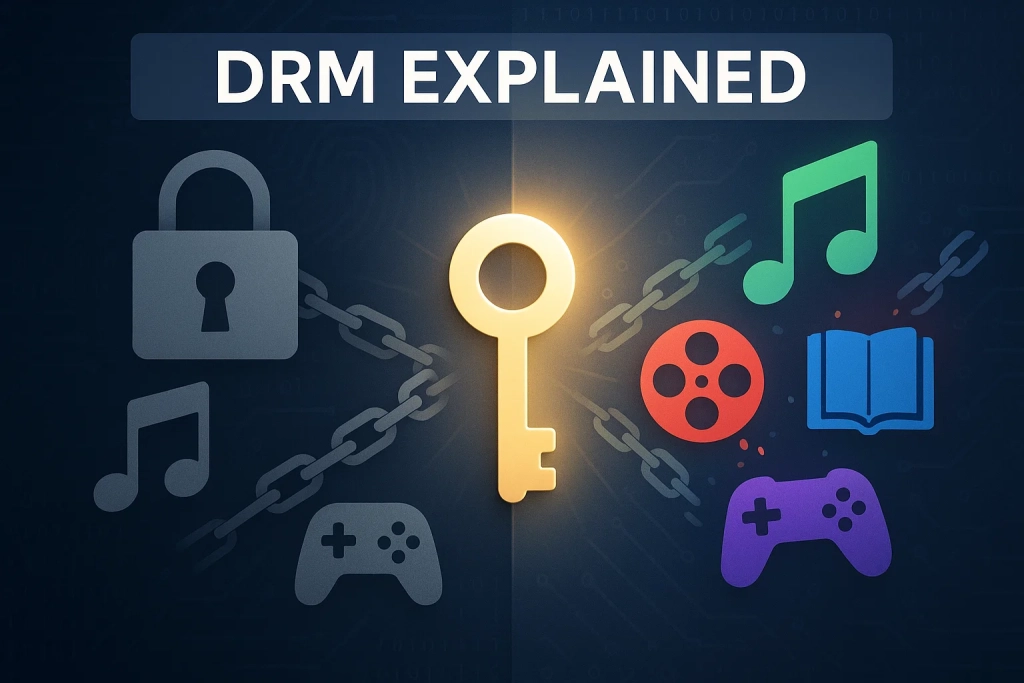
DRM stands for Digital Rights Management. Think of it like a lock on music files that only works with specific apps.
Amazon puts DRM on Prime and Unlimited music to prevent you from saving songs when you stop paying for the subscription. Makes sense from their business perspective. Less fun when you want music in your car.
That’s why purchased Amazon music transfers easily—no lock on those files. But subscription music? We need a workaround for that.
Free Method: Transfer Amazon Purchased Music
If you’ve actually bought songs from Amazon (not just subscribed), this part is straightforward. Actually, maybe too straightforward.
Step 1: Download Your Purchased Songs
Open a web browser and head to Amazon Music web player. Log in, then navigate to Library → Purchased.
You’ll see all the songs and albums you’ve bought over the years. To download them:
- Find the track or album you want
- Click the three-dot menu next to it
- Select “Download”
- Choose where to save the files (I recommend creating a dedicated “Amazon Music” folder)
The downloads come as MP3 files, usually 256kbps or 320kbps. Good enough for most people’s ears.
⚠️ Important: This only works for purchased music. If you’re trying to download songs from your Prime or Unlimited subscription, you’ll hit a wall here. Those songs don’t have a download option—by design.
💡 Quick Tip: Before downloading everything, check your storage space. A 100-song collection is roughly 500MB.
Step 2: Import to iTunes Library
Now open iTunes. Wait, on newer Macs—Catalina and later—it’s called the Music app, not iTunes. Same thing, different name. Apple likes keeping us on our toes.
The import process:
- File → Add File to Library (or Add Folder to Library if you downloaded a whole album)
- Navigate to your Amazon Music download folder
- Select the MP3 files
- Click Open
iTunes will copy the files into its library and start reading the metadata. Song titles, artist names, album art—should all come through automatically since Amazon embeds that info in the MP3 files.
This part usually takes 10-15 seconds per album. Maybe longer if you’re importing a huge collection.
Step 3: Sync to Your iPhone
Connect your iPhone to your computer with a cable. USB-C or Lightning, depending on your model.
In iTunes (or Finder on newer Macs):
- Click the device icon that appears
- Go to the Music tab
- Check “Sync Music”
- Select which playlists or albums you want on your phone
- Click Apply at the bottom right
Here’s a gotcha I learned the hard way: If you have iCloud Music Library turned on, the sync button might be grayed out. You can’t manually sync music when iCloud is managing your library.
To fix this, go to Settings on your iPhone → Music → turn off “Sync Library.” Then try syncing again.
The first sync takes a while—10-20 minutes for a couple hundred songs. After that, it only syncs changes, which is much faster.
Convert Amazon Unlimited/Prime Music for iTunes
Okay, here’s where most people get stuck. You want to use your Unlimited or Prime subscription music in iTunes, but Amazon won’t let you download those files.
Why the Official Method Has Limits
Most people start with Amazon’s download feature in the mobile app. That works fine if you bought the songs.
I actually used the Amazon Music app for months, thinking I could somehow export my playlists later. Didn’t work. The “downloaded” songs in the app aren’t real files—they’re encrypted data that only the Amazon app can read.
Here’s the annoying part:
- Can’t transfer to iTunes
- Can’t play on USB car stereos
- Can’t move to an MP3 player
- Lose access when subscription ends
That DRM lock we talked about earlier? This is where it bites you.
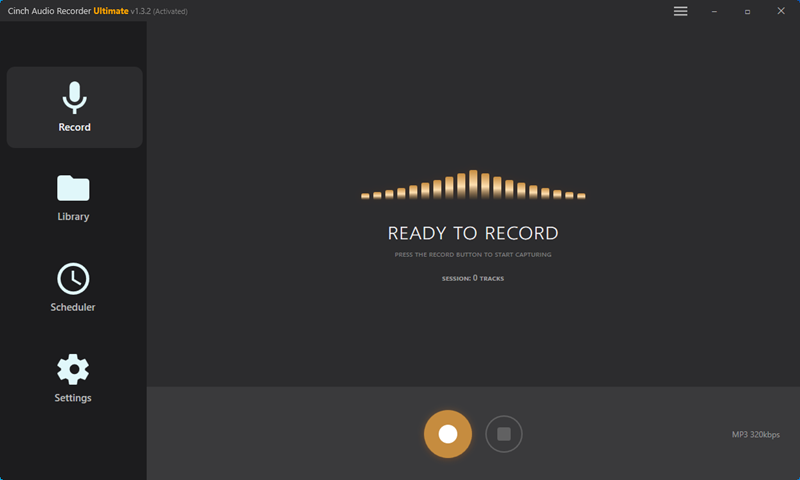
The Real Solution: Cinch Audio Recorder
That’s when I started using Cinch Audio Recorder.
Not as a replacement for Amazon Music—more like a backup plan for when you need actual files you can use anywhere. Here’s why it actually helps:
What it does: Cinch records the audio output from your computer while Amazon Music plays. Think of it like having a recorder next to your speakers, except it captures digital audio directly from the sound card. Crystal clear, no background noise.
Why it’s different: Most screen recorders or audio capture tools give you one giant file. Cinch automatically splits tracks as they play and adds song info—title, artist, album art—without you doing anything.
The formats: Saves as MP3, M4A, WAV, FLAC, or other formats. I stick with M4A at 256kbps because that’s what iTunes and iPhones handle best. File sizes stay reasonable, and honestly, I can’t hear the difference from the original stream.
Silent recording: Here’s a feature I didn’t know I needed. You can mute your computer speakers while recording. Cin uses something called CAC technology to grab audio before it reaches your speakers. Means you can record a whole album while working or watching videos with headphones on.
It’s not free—costs $25.99, I think?—but it’s a one-time payment, not another subscription. After months of juggling streaming services, that felt worth it to me.
My Setup Process (Step-by-Step)
Here’s exactly how I set it up. Took about 5 minutes, maybe 7 if you include downloading the installer.
Step 1: Download Cinch from the official site. Installation is straightforward. No VB-CABLE needed—that’s nice. Some audio recorders require that extra virtual cable thing. Cinch doesn’t.
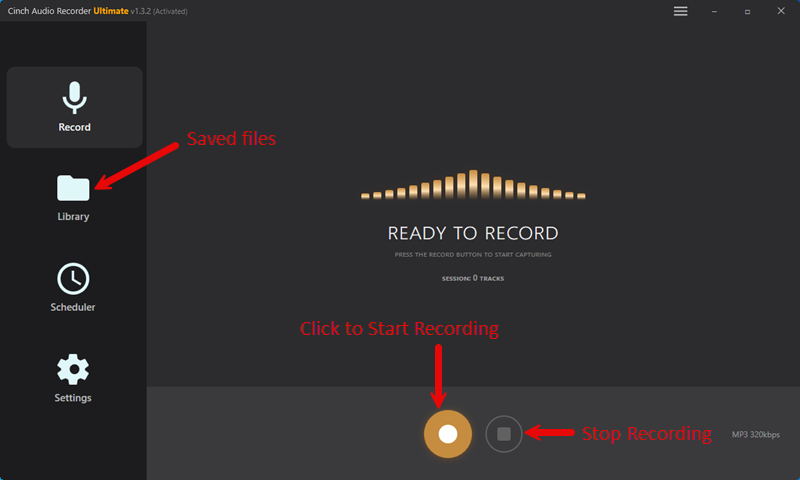
Step 2: Launch Cinch and go to the Record tab. The interface is clean, maybe a bit dated looking, but functional.
Step 3: Click the big red Record button. Cinch is now listening for audio from any app on your computer.
Step 4: Switch to Amazon Music (web player or desktop app, either works). Start playing your playlist or album.
Step 5: Sit back. Cinch automatically detects when songs start and stop, splits them into separate files, and fetches metadata from its database.
I keep my Amazon Music player volume at around 70%. Full volume works too, but I found 70% gives the cleanest recording without any digital clipping.
The auto-split feature surprised me the first time. I expected to manually edit one long recording into tracks. Nope. Cinch just… does it. Each song becomes its own file with proper ID3 tags.
Recording happens in real-time, so a 40-minute album takes 40 minutes to record. Not the fastest method, but it’s hands-off. You can start it before lunch and come back to a finished album.
What I Like (Honest Review)
After using Cinch for a few months, here’s what stood out:
The ID3 tags come through clean. Artist names, album titles, cover art—all there automatically. With some other recorders I tried, you’d get files named “Track 01.mp3” with zero information. Then you’re stuck manually tagging 50 songs. No thanks.
Multiple format support is handy. I mentioned using M4A, but if you’re an audiophile, you can record to lossless WAV or FLAC. Those files are huge—like 50MB per song—but perfect quality.
Silent recording works perfectly. I was skeptical about this at first. Thought maybe the audio would sound weird or have artifacts. Nope. Sounds identical to regular recording, just lets you use your computer normally while it’s capturing.
No quality loss I can hear. Granted, I’m not using $500 headphones. But through my Audio-Technica M50x headphones and in my car, the recorded tracks sound identical to streaming Amazon Music directly. The 256kbps M4A files are transparent to my ears.
Honestly? The interface isn’t fancy. It looks like software from 2015. But it does the job well, doesn’t crash, and gets out of your way. I still prefer this over screen recording methods or browser extensions that might break with updates.


Import Converted Files to iTunes
Once Cinch finishes recording, getting those files into iTunes is the same as the purchased music process:
- In Cinch: Click the Library tab, right-click any song, choose “Open File Location”
- This opens the folder where Cinch saves everything
- Switch to iTunes: File → Add Folder to Library
- Navigate to that Cinch output folder
- Select it and click Open
iTunes imports all the files, reads the metadata, adds album art. Usually takes 20-30 seconds for a full album.
Same process as before. Easy part, honestly.
Organize and Optimize Your iTunes Library
Okay, you’ve got Amazon music in iTunes now. But if you’re anything like me, your music library can get messy fast without some organization.
Best Practices for iTunes Music Management
First thing: Go to iTunes → Preferences → Advanced. Check these two boxes:
- “Keep iTunes Media folder organized”
- “Copy files to iTunes Media folder when adding to library”
These settings tell iTunes to organize your music into a neat folder structure and make copies of imported files. Without this, your music files might be scattered across Downloads, Desktop, and who knows where else.
I learned this the hard way. My first 50 imported songs ended up everywhere. When I formatted my external hard drive, half my iTunes library went missing. Not fun.
The organized folder structure looks like this:
Music
└── iTunes
    └── iTunes Media
        └── Music
            └── [Artist Name]
                └── [Album Name]
                    └── Song files
Clean. Predictable. Backup-friendly.
Fix Missing Metadata and Album Art
Sometimes songs import without album art or with incomplete info. Happens maybe 30% of the time with purchased MP3s, rarely with Cinch recordings.
Method 1: Let iTunes fetch it automatically
- Right-click the album
- Select “Get Album Artwork”
- Wait 5-10 seconds
Works about 70% of the time. iTunes queries its database and pulls the matching cover.
Method 2: Add it manually
- Right-click the album or song
- Select “Get Info”
- Go to the Artwork tab
- Drag and drop an image file (JPG or PNG)
You can find high-quality album art on Google Images or the Amazon Music website. I usually save the album art when I’m on Amazon Music anyway.
With Cinch, this rarely happens. The metadata comes through clean most of the time. But it’s good to know the fix for those occasional edge cases.
Batch editing tip: If you need to fix metadata for multiple songs from the same album, select them all (Command+click or Ctrl+click), right-click, and choose Get Info. Any changes you make apply to all selected tracks. Saves tons of time.
Create Smart Playlists from Your Amazon Music
Here’s a trick I use to keep Amazon-sourced music separate from my other files:
When I import Amazon music, I add a custom tag. In the Get Info window, there’s a Comments field. I type “Source: Amazon” in there.
Then I create a Smart Playlist:
- File → New → Smart Playlist
- Set rule: Comment contains “Amazon”
- Check “Live updating”
Now all my Amazon music automatically appears in one playlist. Makes it easy to see what I’ve imported and what’s from other sources.
You can get creative with Smart Playlists:
- Group by import date (Date Added is in the last 30 days)
- Filter by audio quality (Bit Rate is greater than 250 kbps)
- Separate by format (Kind contains “MPEG audio file” for MP3, or “AAC audio file” for M4A)
I have separate playlists for road trip music (upbeat stuff), workout tracks, and background music for work. The smart playlist rules keep them updated automatically as I add new songs.

Troubleshooting Common Problems
Even with the right process, you might hit some snags. Here are the issues I’ve encountered and how to fix them.
iTunes Won’t Recognize My Files
This happened to me twice. Dragged files into iTunes, and… nothing. No import, no error message. Just silence.
Common causes:
- Wrong file format (iTunes supports MP3, M4A, WAV, AIFF, and ALAC—but not OGG or FLAC)
- Corrupted file during download or recording
- File extension doesn’t match actual format
Solutions to try:
First, check the file format. Right-click the file in Windows Explorer or Finder, select Properties (or Get Info on Mac). Look at the file type.
If it says “MPEG Audio” or “AAC Audio,” iTunes should handle it. If it’s something else, you’ll need to convert it. VLC media player can convert most audio formats for free.
Second, try enabling “Copy files to iTunes Media folder” in iTunes settings, then re-import. Sometimes iTunes has permission issues accessing files in certain folders. Copying them solves that.
Third, if nothing works, the file might be corrupted. Try downloading or recording again.
Most times? It’s the file format. M4A and MP3 work best for me.
Missing Album Art or Wrong Metadata
This is annoying but fixable.
Common causes:
- Metadata stripped during download or conversion
- iTunes can’t auto-match the song to its database
- The song is rare or obscure
Solutions:
If you’re using Cinch, this rarely happens because it fetches metadata automatically during recording. But if it does:
- Try the “Get Album Artwork” option first (right-click → Get Album Artwork)
- If that fails, manually add the art (Get Info → Artwork tab → drag image)
- For stubborn cases, use Mp3tag—it’s free and pulls metadata from multiple online databases
One trick: If iTunes shows wrong information (like the wrong album name), it sometimes caches that info. Delete the song from iTunes (keep the file), clear the iTunes cache (iTunes → Preferences → Advanced → Reset Cache), then re-import.
This happened constantly before I switched to Cinch for subscription music. The auto-tagging saves so much hassle.
iPhone Sync Issues After Import
Got your music in iTunes but it won’t sync to your iPhone? Frustrating. Here are the usual suspects:
Problem 1: Sync button is grayed out
- Cause: iCloud Music Library (or “Sync Library” in newer iOS) is turned on
- Solution: On your iPhone, go to Settings → Music → turn off “Sync Library”
You can’t manually sync music when iCloud is managing it. Pick one method or the other.
Problem 2: Songs appear on iPhone but won’t play
- Cause: DRM protection (shouldn’t happen with Cinch or purchased songs, but sometimes iTunes gets confused)
- Solution: Delete the songs from iPhone, re-sync. If that doesn’t work, the files might still have DRM
Problem 3: Duplicate songs after syncing
- Cause: iTunes matching songs from Apple Music with your local files
- Solution: iTunes → Preferences → Store → uncheck “Show Apple Music,” then in Settings, enable “Prefer exact matches”
This forces iTunes to prioritize your local files over streaming matches.
The iPhone sync stuff is honestly the most finicky part of this whole process. Most of the time it works fine, but when it doesn’t, these fixes usually solve it.
Wrapping Up
So that’s the full workflow. Purchased Amazon music? Download and import—takes 10 minutes. Subscription music from Unlimited or Prime? Record with Cinch, then import. Same result either way: your music in iTunes, synced to your iPhone, playable anywhere.
Your setup might behave slightly differently depending on your Mac vs Windows version, iTunes vs Music app, and what iOS version you’re running. But the core process stays the same.
Took me too long to figure this out. Spent weeks trying browser extensions that broke, screen recorders that produced garbage audio, and “free” tools that were actually trials. Hopefully you get there faster.
Do what fits your workflow. For me, it’s about music freedom—owning files I can use however I want, without worrying about subscriptions or compatibility. iTunes might feel old-school, but it still works. And in 2025, that’s worth something.
If you nail this setup, the next rabbit hole is organizing playlists efficiently. Smart Playlists can get wild if you really dive into the rules and conditions. But that’s a topic for another day.
Frequently Asked Questions
Can I transfer Amazon Music Unlimited songs to iTunes for free?
Not directly. Unlimited songs have DRM protection and can’t be exported as files using free methods. You need a recording tool like Cinch Audio Recorder to capture and convert them. The tool costs money, but it’s a one-time purchase rather than another subscription.
Will I lose audio quality when transferring to iTunes?
For purchased songs, no—they’re already MP3 format at 256kbps or higher, which is transparent quality for most people. For Unlimited or Prime music recorded with Cinch, you can record at 320kbps MP3, 256kbps M4A, or even lossless WAV/FLAC. I use 256kbps M4A and honestly can’t hear any difference from the original stream.
Do I need to keep my Amazon Music subscription after transferring to iTunes?
No. Once you transfer songs to iTunes (either by downloading purchased music or recording subscription music with Cinch), those files are local and permanent. You can cancel Amazon Music Unlimited or let your Prime membership lapse. The files remain on your computer and iPhone.
Can I sync Amazon Music to iPhone without using a computer?
Not really, not if you want local files. The Amazon Music app itself works on iPhone, but it locks songs to the app—you can’t export them or play them in other apps. To get actual music files onto your iPhone, you need to use iTunes or Finder on a computer for the sync process.
Is using Cinch Audio Recorder to record streaming music legal?
Yes, for personal use. Recording streaming audio for your own listening is legal in most countries, similar to recording radio broadcasts. Cinch records the audio output from your computer’s sound card—it’s not hacking or bypassing anything. Just don’t share or distribute the recordings commercially.