

Last week, I spent an hour creating what I thought would be the perfect TikTok video in InShot. The editing was flawless, the transitions smooth, but when I tried to add that trending Spotify track everyone’s using, it wouldn’t import. The frustration was real – I had the perfect song in mind, but InShot simply refused to recognize my Spotify downloads.
Sound familiar? After diving into forums, testing multiple methods, and even trying some questionable workarounds, I finally discovered why this happens and, more importantly, how to fix it properly. The solution isn’t just a hack – it’s a legitimate workflow that preserves audio quality and keeps your music library organized.
If you’re struggling to add Spotify music to InShot, you’re not alone. This is one of the most common pain points for mobile video creators, and I’m here to share exactly what worked for me.
In This Article:
Why You Can’t Just Drag Spotify Songs into InShot
When I first encountered this issue, I honestly thought I was doing something wrong. Maybe I hadn’t updated InShot? Perhaps there was a hidden import feature? But after an hour of frustrated Googling, I discovered there’s a legitimate technical reason why this simple task is impossible.
Understanding Spotify’s DRM Protection
Here’s the core issue: Every single song you download from Spotify, whether you’re using the free tier or paying for Premium, comes wrapped in DRM (Digital Rights Management) protection. Think of it like a digital padlock that keeps your music confined strictly to Spotify’s app.
These downloads are stored in a proprietary format called Ogg Vorbis (.ogg files). While this format is excellent for streaming efficiency, it’s encrypted specifically to prevent use outside Spotify’s ecosystem. The files physically exist on your device, but they’re essentially useless for video editing, music production, or any application beyond the Spotify player.
What really surprised me was learning that Spotify Premium doesn’t change this limitation at all. I initially thought upgrading from Free to Premium would unlock some file export feature. Nope. Premium subscribers face the exact same DRM restrictions. The download feature, regardless of your subscription tier, is exclusively designed for offline listening within Spotify’s controlled environment.
This protection exists for legitimate copyright reasons – artists and labels need to protect their work. But for content creators trying to use legally-accessed music in videos, it creates a genuine obstacle.
InShot’s Audio Format Requirements

On the flip side, InShot is actually quite flexible with audio formats. During my testing, I found it happily accepts:
- MP3 – The most universal format, works everywhere
- AAC – Apple’s preferred format, great quality
- WAV – Uncompressed, lossless audio (huge files but perfect quality)
- M4A – Another Apple format, good compression with quality retention
The incompatibility gap is now crystal clear: Spotify locks everything in encrypted OGG Vorbis format, while InShot requires standard, unprotected audio files. This fundamental mismatch creates the frustrating roadblock that every mobile video creator eventually hits.
The Solution That Actually Works: Cinch Audio Recorder
After testing several methods over the past few months, including some questionable browser extensions and complicated multi-step workarounds, I found Cinch Audio Recorder to be the most reliable, straightforward solution for importing Spotify music to InShot. Let me explain why this tool changed my video creation workflow.

What is Cinch Audio Recorder?

Cinch Audio Recorder Ultimate is professional-grade audio recording software that does one thing exceptionally well: captures music playing from Spotify (and other streaming platforms) and automatically saves each track as a separate, DRM-free audio file. No complicated settings, no technical knowledge required – you literally press one button and play your music.
What immediately sold me on Cinch was its simplicity combined with power. Unlike other tools I tested that required command-line interfaces or confusing conversion processes, Cinch presents a clean, intuitive interface. Click record, play your Spotify playlist, and Cinch handles everything else automatically – splitting tracks, grabbing metadata, organizing files.
At $25.99 for a lifetime license, it’s significantly cheaper than most competitors I evaluated (many of which charge annual subscriptions of $40-60). But the real game-changer? It works perfectly with both Spotify Free and Premium accounts. If you’re on the free tier, you don’t need to upgrade to Premium. That alone saves $9.99/month.
Learn more on the official product page.
Key Features for Video Creators
After using Cinch extensively to build my InShot music library, these standout features genuinely improve workflow:
Professional Recording Quality
Cinch captures audio at up to 320kbps MP3 quality, which is indistinguishable from the original Spotify stream for social media platforms like TikTok, Instagram, and YouTube Shorts. For more professional projects, Cinch also supports lossless WAV format recording. I’ve compared recordings side-by-side with original streams and can’t hear any difference.
Automatic ID3 Tag Preservation
This feature alone saves hours of manual organization. Cinch automatically captures and embeds all essential metadata: song title, artist name, album information, track numbers, and even album artwork. When you transfer files to your phone and browse them in InShot, you’ll see proper names and artwork instead of generic “Track01.mp3” files. For someone managing hundreds of tracks, this is invaluable.
Silent Recording Capability
One of my favorite features: Cinch lets you record with your computer’s speakers completely muted. It captures audio directly from your sound card using CAC (Computer Audio Capture) technology, not through a microphone. This means I can record entire playlists late at night or during work hours without disturbing anyone. Recording quality stays perfect regardless of system volume.
Built-in Ad Filtering
If you use Spotify Free, you know the frustration of audio ads interrupting playlists. Cinch includes an intelligent filter that automatically detects those short promotional clips and removes them. Just record your playlist, click the “Filter” button when finished, and all those annoying ads disappear. Saves time compared to manually deleting them.
How to Record Spotify Music with Cinch Audio Recorder
Let me walk you through the actual workflow:
Step 1: Download and Install Cinch
Visit the official download page and grab the installer (CinchAudioRecorder.exe for Windows or .dmg for Mac). Double-click and follow the setup wizard. Clean installation with no bloatware.
Step 2: Configure Settings
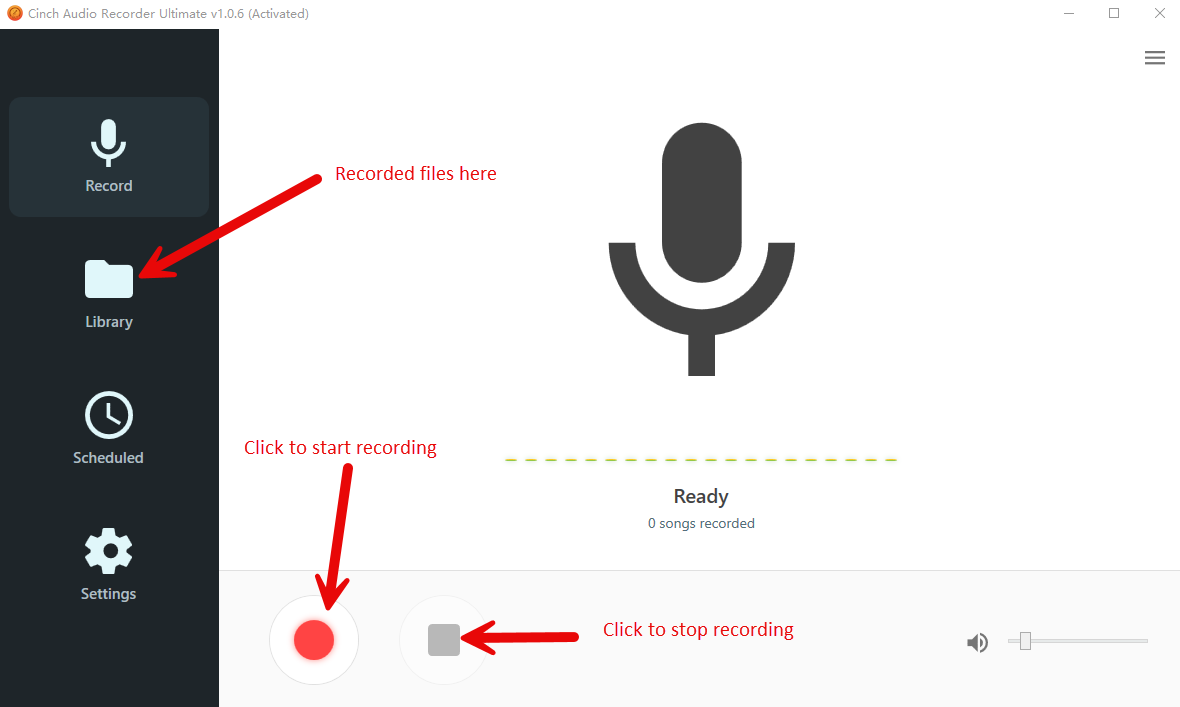
Launch Cinch and click the “Record” tab. Click the settings icon (bottom left):
- Output Format: Choose MP3 (best for InShot)
- Bitrate: Set to 320kbps (highest MP3 quality)
- Output Folder: Pick somewhere easy to find like “Music for Videos”
Step 3: Start Recording
- Click the big red Record button in Cinch
- Switch to Spotify (desktop or web player)
- Navigate to your song, album, or playlist
- Press play

Cinch automatically detects when each track begins and ends, saving each song as a separate, properly-named MP3 file. No manual splitting required.
Pro tip: Keep Spotify volume at 100% for best quality. You can mute system speakers – Cinch captures from the sound card directly. If you’re interested in recording Spotify music for other projects beyond InShot, Cinch works for those too.
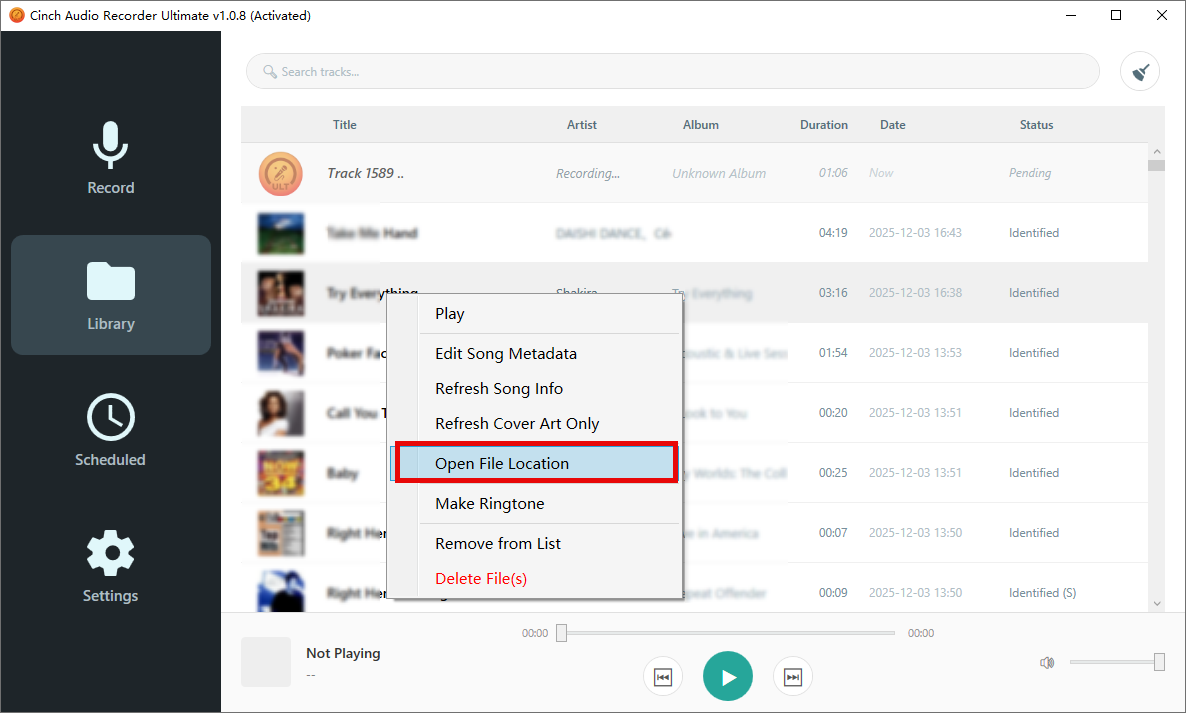
Step 4: Find Your Files
Switch to Cinch’s “Library” tab. Right-click any track and select “Open File Location” to find your MP3 files.
Download Cinch Audio Recorder:


Getting Your Music from Computer to InShot (Easier Than You Think)
The final step is getting those MP3 files from your computer onto your phone and into InShot. The method varies by device, but don’t worry – it’s straightforward.

For Android Users
USB Cable Transfer (Fastest Method):
- Connect your Android phone to computer using any USB cable
- On your phone, swipe down and tap the USB notification
- Select “File Transfer” or “Transfer files” mode (MTP mode)
- On computer, open File Explorer (Windows) or Android File Transfer app (Mac)
- Navigate to phone’s internal storage
- Open or create a Music folder
- Drag and drop MP3 files from Cinch’s output folder
- Wait for transfer to complete (10-30 seconds for most songs)
- Safely disconnect phone
In my experience, transferring 10-15 songs takes about 30 seconds. I usually do this weekly, bulk-transferring latest recordings.
Cloud Storage Method:
Upload Cinch MP3s to Google Drive, Dropbox, or OneDrive. Open cloud app on phone, download files, move to Music folder using a file manager app. Slower than USB but convenient when away from your computer.
For iPhone Users
iTunes/Finder Sync (Most Reliable):
For Windows or older Macs:
- Open iTunes on computer
- Go to File → Add File to Library
- Select your Cinch-recorded MP3 files
- Connect iPhone via USB
- Click iPhone icon in iTunes
- Go to Music tab
- Check “Sync Music”
- Select songs to transfer
- Click Apply/Sync
For Mac (Catalina or newer):
- Connect iPhone via USB
- Open Finder
- Select iPhone from sidebar
- Click Music tab
- Drag MP3 files into sync area
- Click Sync
iCloud Drive Method:
Upload MP3s to iCloud Drive, open Files app on iPhone, navigate to iCloud Drive, download to local storage.
Adding Music to Your InShot Project

Now for the satisfying part – seeing your Spotify music actually working in InShot:
- Open InShot on your phone
- Tap “Video” to start or select existing project
- Tap the Music button (note icon) in bottom toolbar
- Select “Tracks”
- Tap “Featured” at top
- Choose “Import” or “My Music”
- Browse to your Spotify recordings location
- Tap the track you want
- Music waveform appears on timeline, ready to edit
The first time that waveform appeared with my exact Spotify track, I felt genuine relief after all the failed attempts with other methods.
Other Methods I Tested (And Why I Didn’t Stick with Them)
Screen Recording
Phone screen recorders capture Spotify audio but quality suffers from compression. Background notifications interrupt recording. You get one long file requiring manual splitting. Only viable for quick, low-quality projects.
Other Recording Tools
Tools like AudiFab and AudiCable work well but typically require annual subscriptions ($40-60/year). Cinch’s one-time $25.99 payment offers better value. Cinch also supports multiple streaming platforms and provides more reliable ID3 tag preservation.
Quick Comparison
| Feature | Cinch | Screen Record | Other Tools |
|---|---|---|---|
| Quality | 320kbps | Fair | Good-Excellent |
| ID3 Tags | ✅ Auto | ❌ None | ⚠️ Variable |
| Price | $25.99 once | Free | $40-60/year |
| Platforms | All streams | All | Often limited |
Making Your Videos Sound Professional (The Little Details Matter)
Trimming Music
Use 15-45 seconds for most social media. Tap track, drag yellow handles, select the song’s hook or chorus. For TikTok content, the first 3 seconds are crucial – start with the catchiest part.
Fade Effects
Select track → volume icon → enable 1-2 second fade-in/out. Makes videos sound professional. Nothing screams amateur louder than abrupt music starts.
Volume Balance
- With dialogue: 30-40% music volume
- Visual-only: 70-80%
- Music-driven content: 85-95%
Music Selection Tips
- Match mood to content, not just trends
- Check song length for your platform (TikTok: 15-30s, YouTube Shorts: <60s)
- Organize music library by mood (High Energy, Chill, Dramatic, Funny)
- Personal use generally okay; commercial use requires licensing
Troubleshooting Common Issues
Files Not Showing in InShot
- Verify files are MP3 or M4A format
- Move to Music or Documents folder
- Re-transfer if corrupted
Poor Audio Quality
- Record at 320kbps minimum in Cinch
- Avoid multiple conversions
- Choose highest quality in InShot export settings
Sync Issues
- Use InShot’s offset feature to adjust timing
- Add markers at key beat points
- Preview multiple times before export
Pro Tips That Saved Me Hours
Here are the efficiency tricks I wish I’d known from day one:
- Record 10-15 trending songs weekly – Build your library proactively instead of scrambling when inspiration strikes
- Organize by mood (High Energy, Chill, Dramatic, Funny) – 30 seconds of setup saves hours of searching later
- Record full playlists at once – Cinch auto-splits everything, so you end up with a complete themed collection
- Use Cinch’s ringtone maker for transition sounds – Not just for phones, perfect for short video stings
- Filter ads systematically if using Spotify Free – Record first, filter once at the end
- Keep high-quality originals on computer – Storage is cheap, regret is expensive. You never know when you’ll need that quality
Want to use Spotify music elsewhere? Learn how to burn Spotify to CD or transfer Spotify to USB for car listening.
Conclusion
Looking back at my initial frustration trying to import Spotify to InShot, I genuinely wish I’d discovered this solution sooner. What seemed like an insurmountable technical barrier, Spotify’s DRM protection preventing direct file import, turned out to have a surprisingly straightforward workaround.
The workflow is genuinely simple: Record music from Spotify using Cinch Audio Recorder, transfer the files to your phone, import to InShot. Done. No complicated technical knowledge required, no sketchy browser extensions, no quality loss.
What makes this method work long-term is the reliability. You get clean, properly tagged MP3 files that work exactly as they should in InShot. The one-time $25.99 investment in Cinch pays for itself quickly compared to subscription-based alternatives, and you own the tool forever. Whether you’re on Spotify Free or Premium, the process works identically well.
My practical advice: Start small. Record 3-5 of your current favorite tracks to test the entire workflow from recording to InShot editing. Once you experience how smoothly it works, gradually build out your personal music library organized by mood and project type. Having that library of trending tracks ready when creative inspiration strikes eliminates the friction that often kills creative momentum.
Your InShot videos deserve better background music than generic stock tracks. Download Cinch, start recording, and give your content the sonic upgrade it needs.
For more creative ways to use your Spotify music, check out our guide on adding Spotify music to videos or learn how to make Spotify ringtones from your favorite tracks.
FAQ
Q1: Can I use Spotify Free with this method?
Yes, Cinch Audio Recorder works with both Spotify Free and Premium accounts. Use the ad filter feature to remove ads from recordings.
Q2: What audio format works best for InShot?
MP3 at 320kbps offers the best balance of quality and compatibility with InShot on both Android and iPhone.
Q3: Will the recorded music include artist information?
Yes, Cinch automatically captures ID3 tags including song title, artist name, album, and cover art.
Q4: Is this method legal?
Recording Spotify music for personal creative projects is generally acceptable. Avoid redistributing or using commercially without proper licensing.
Q5: How long does it take to record a song?
Recording happens in real-time, so a 3-minute song takes 3 minutes to record. Cinch processes and saves it automatically.


